Splitting Hairs
(Posted: 06/09/09)
***
While I was putting my Truth & Light slide show presentation together more than a year ago, I cut a corner in order to move the presentation along.
I intended to get back to it, but during the process of writing, so many revelations kept popping up, addressing it seemed more and more unimportant.
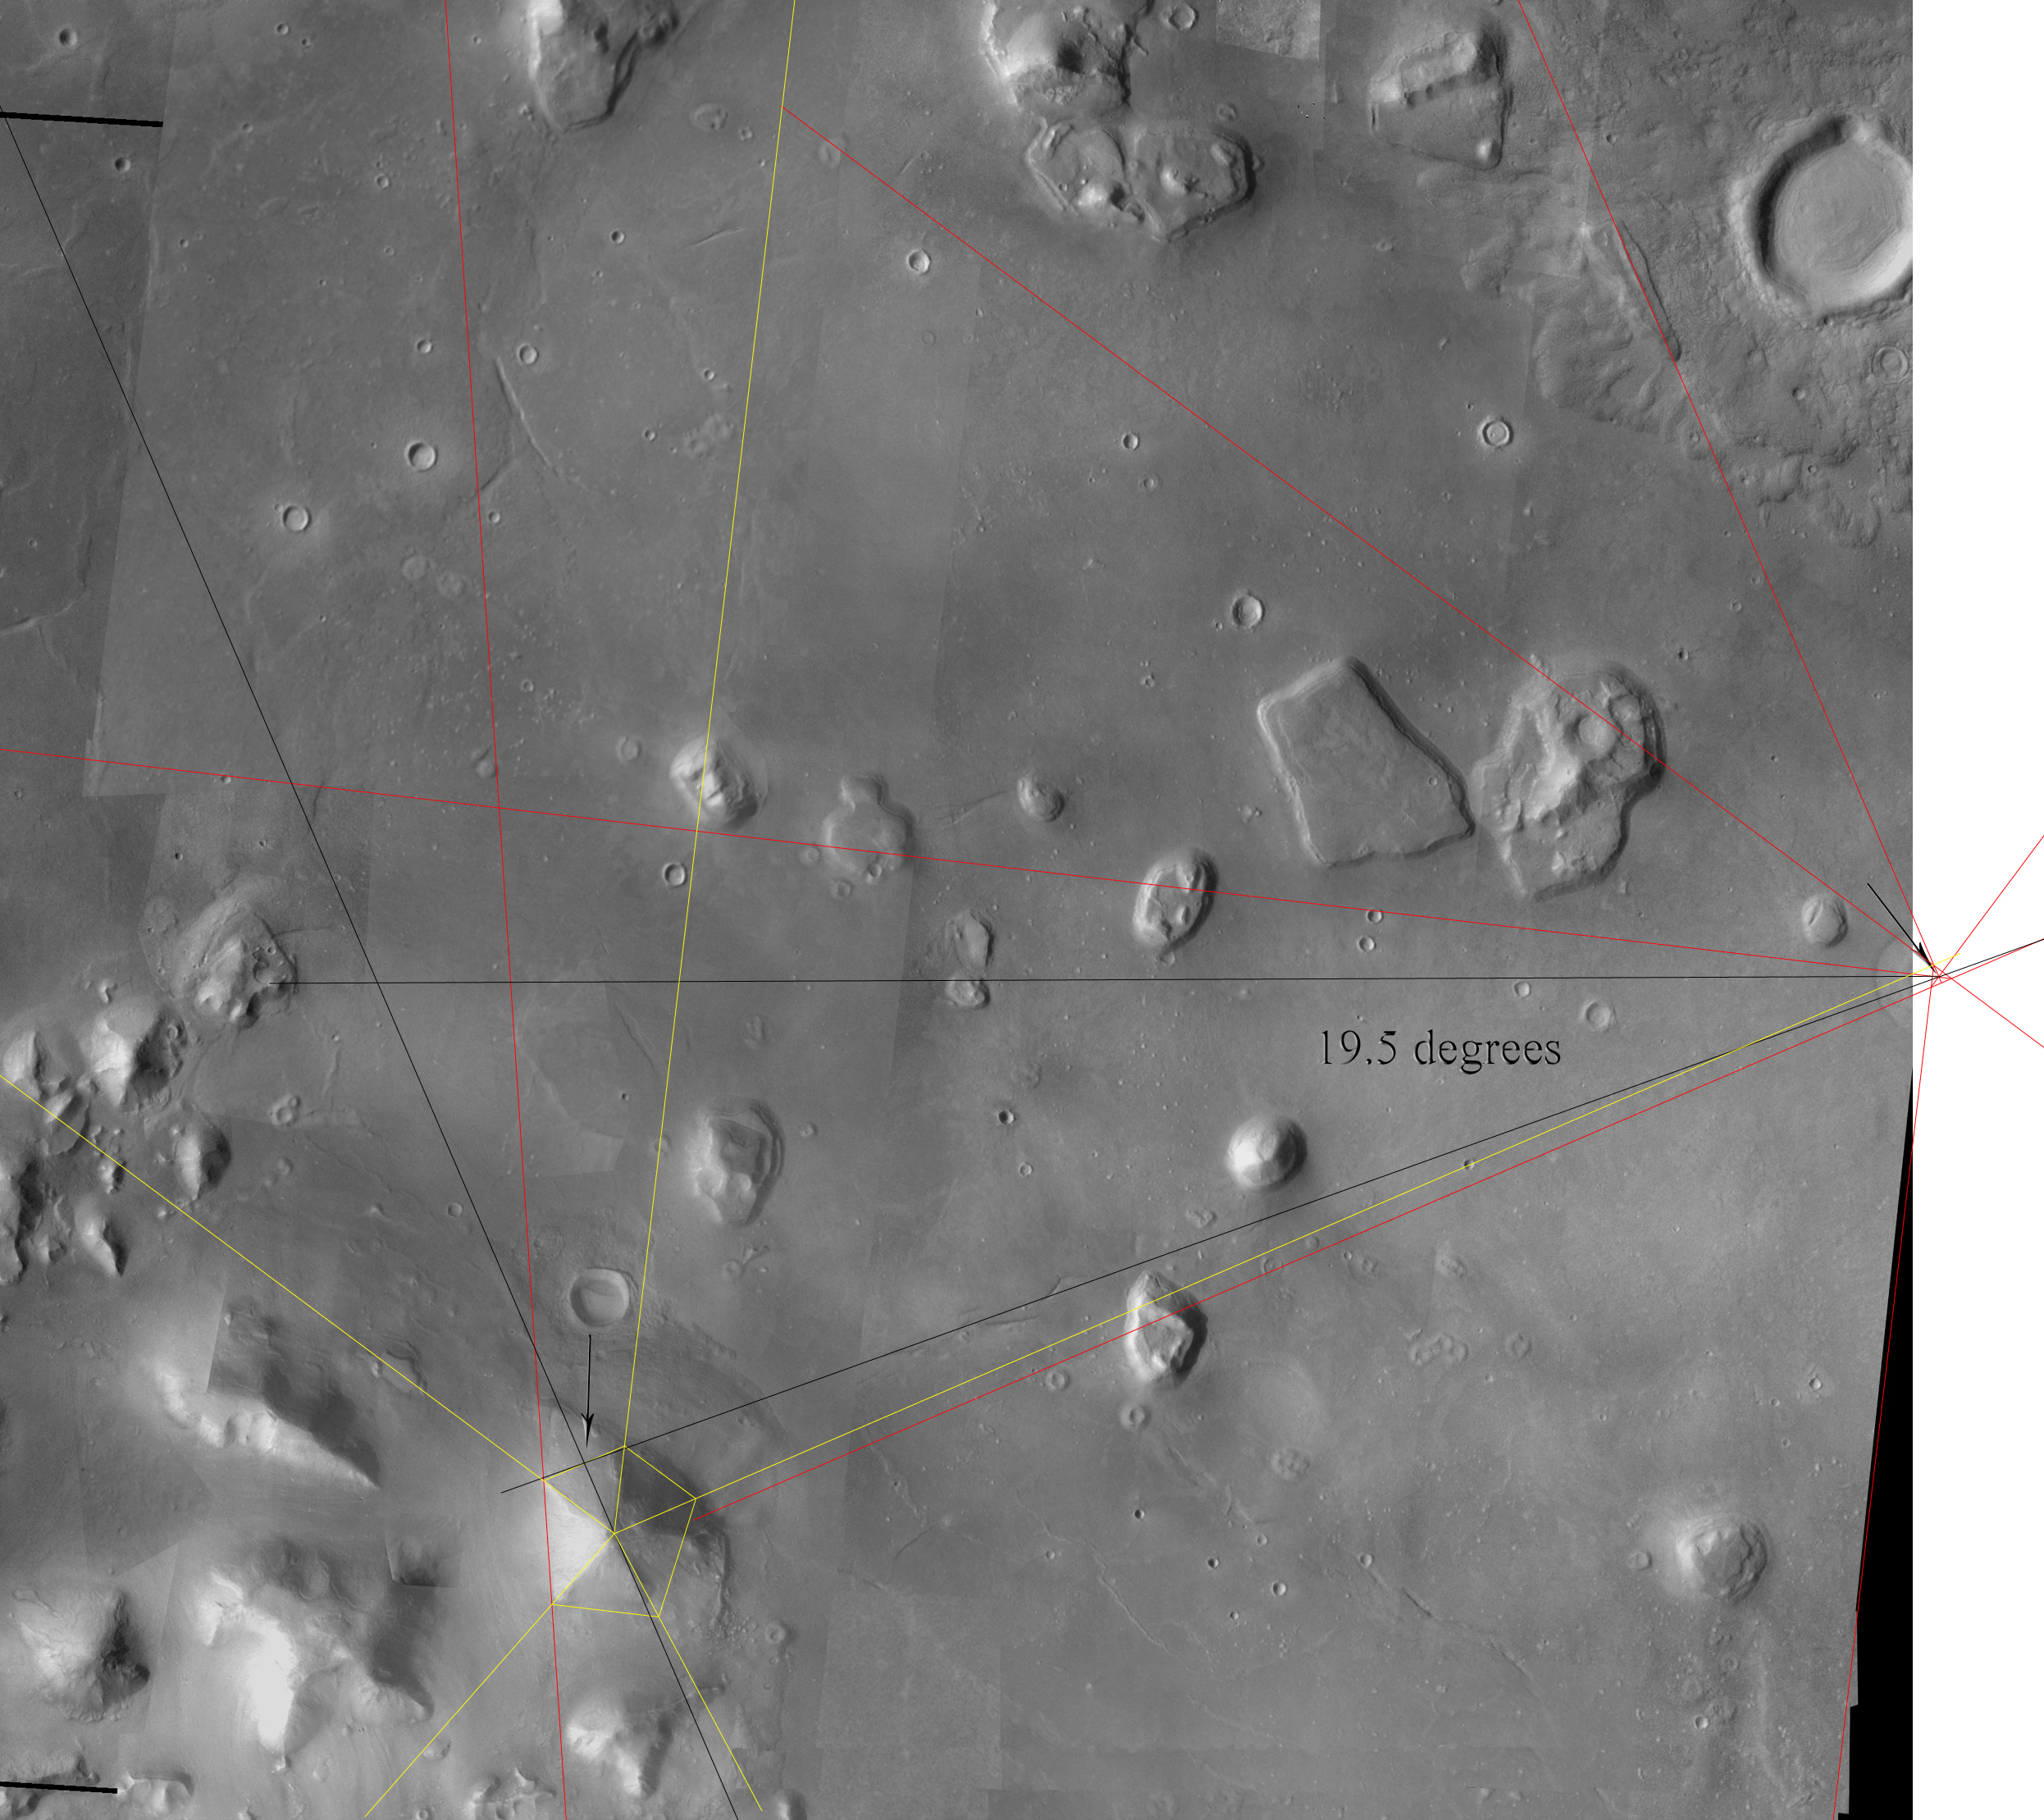
Given the relevancy of both resolution and the ultra-accurate angle 19.47 presented in my recent "Stubborn Assumptions" paper, the 'short cut' I took has re-surfaced in my mind as deserving a detailed explanation.
As I effectively demonstrate during "Stubborn Assumptions", once again in this specific instance, the limiting factor which allowed for the short cut was not measuring tolerances, rather the resolution of the data.
***
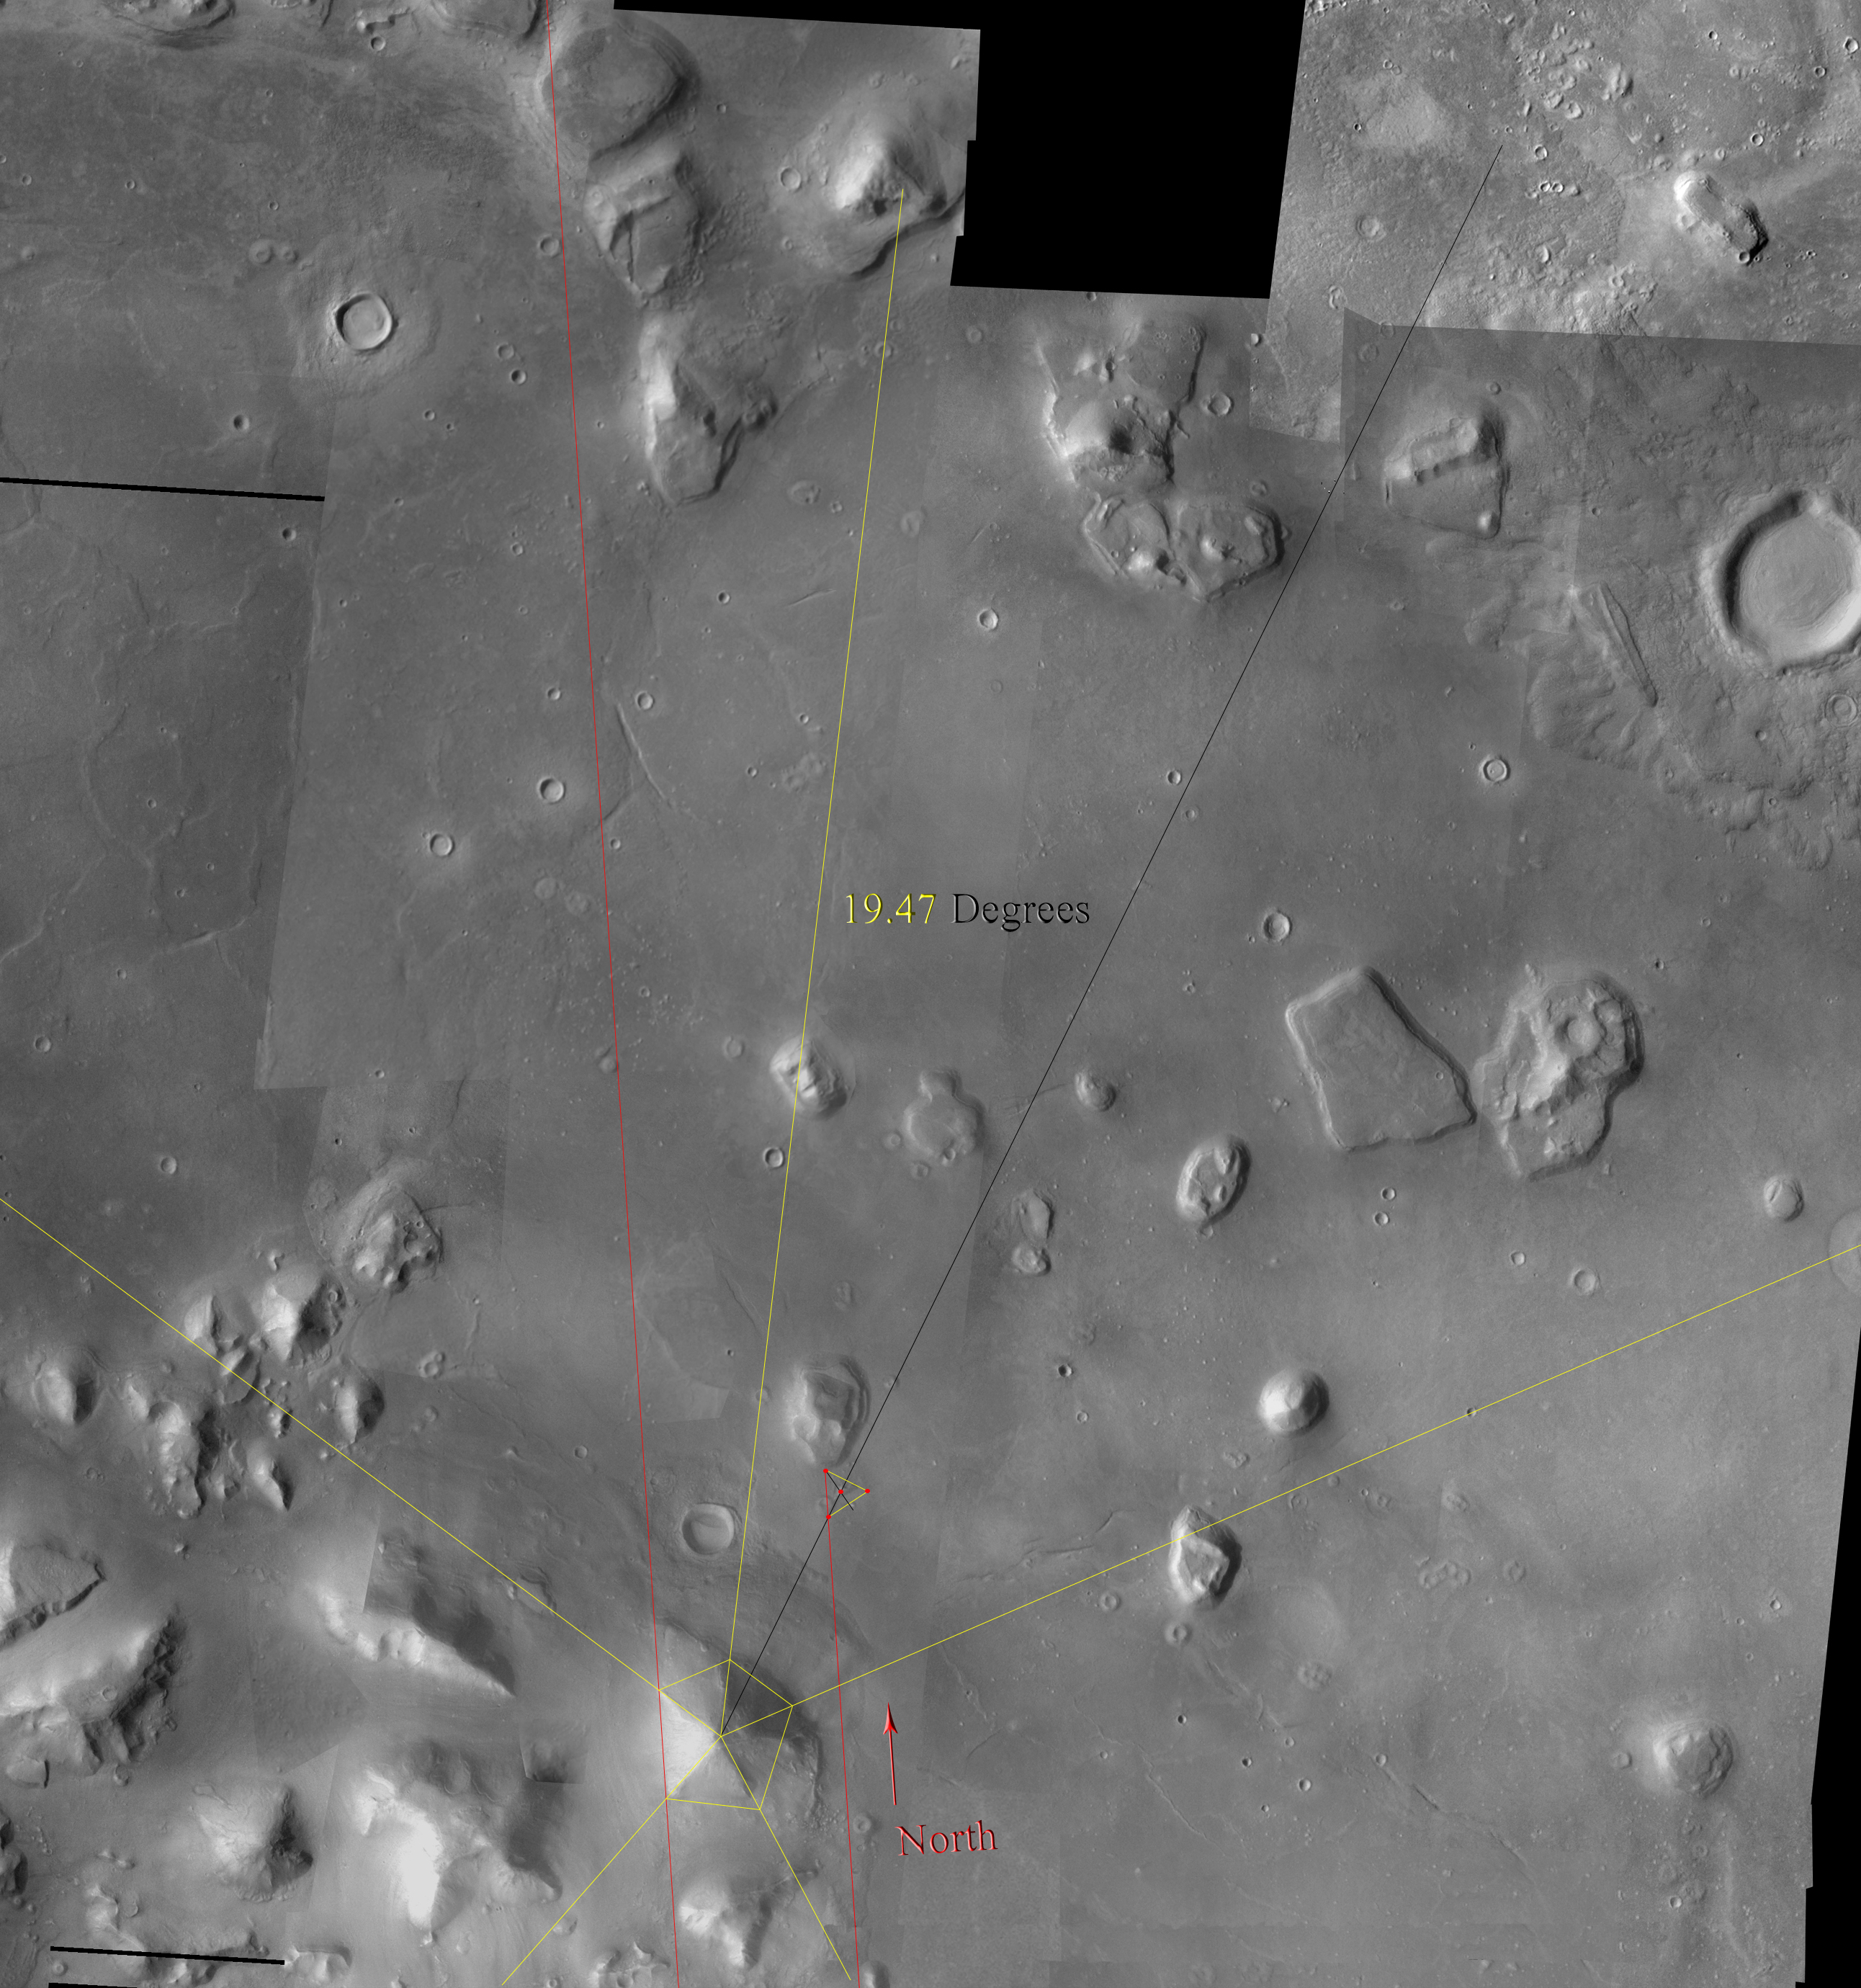
On slide # 19, I present this Hoagland measurement and illustration...
On that same slide, I also note the angle Hoagland presents is off by precisely .8 degrees.
Later, on slide #33, is where I present my short cut.
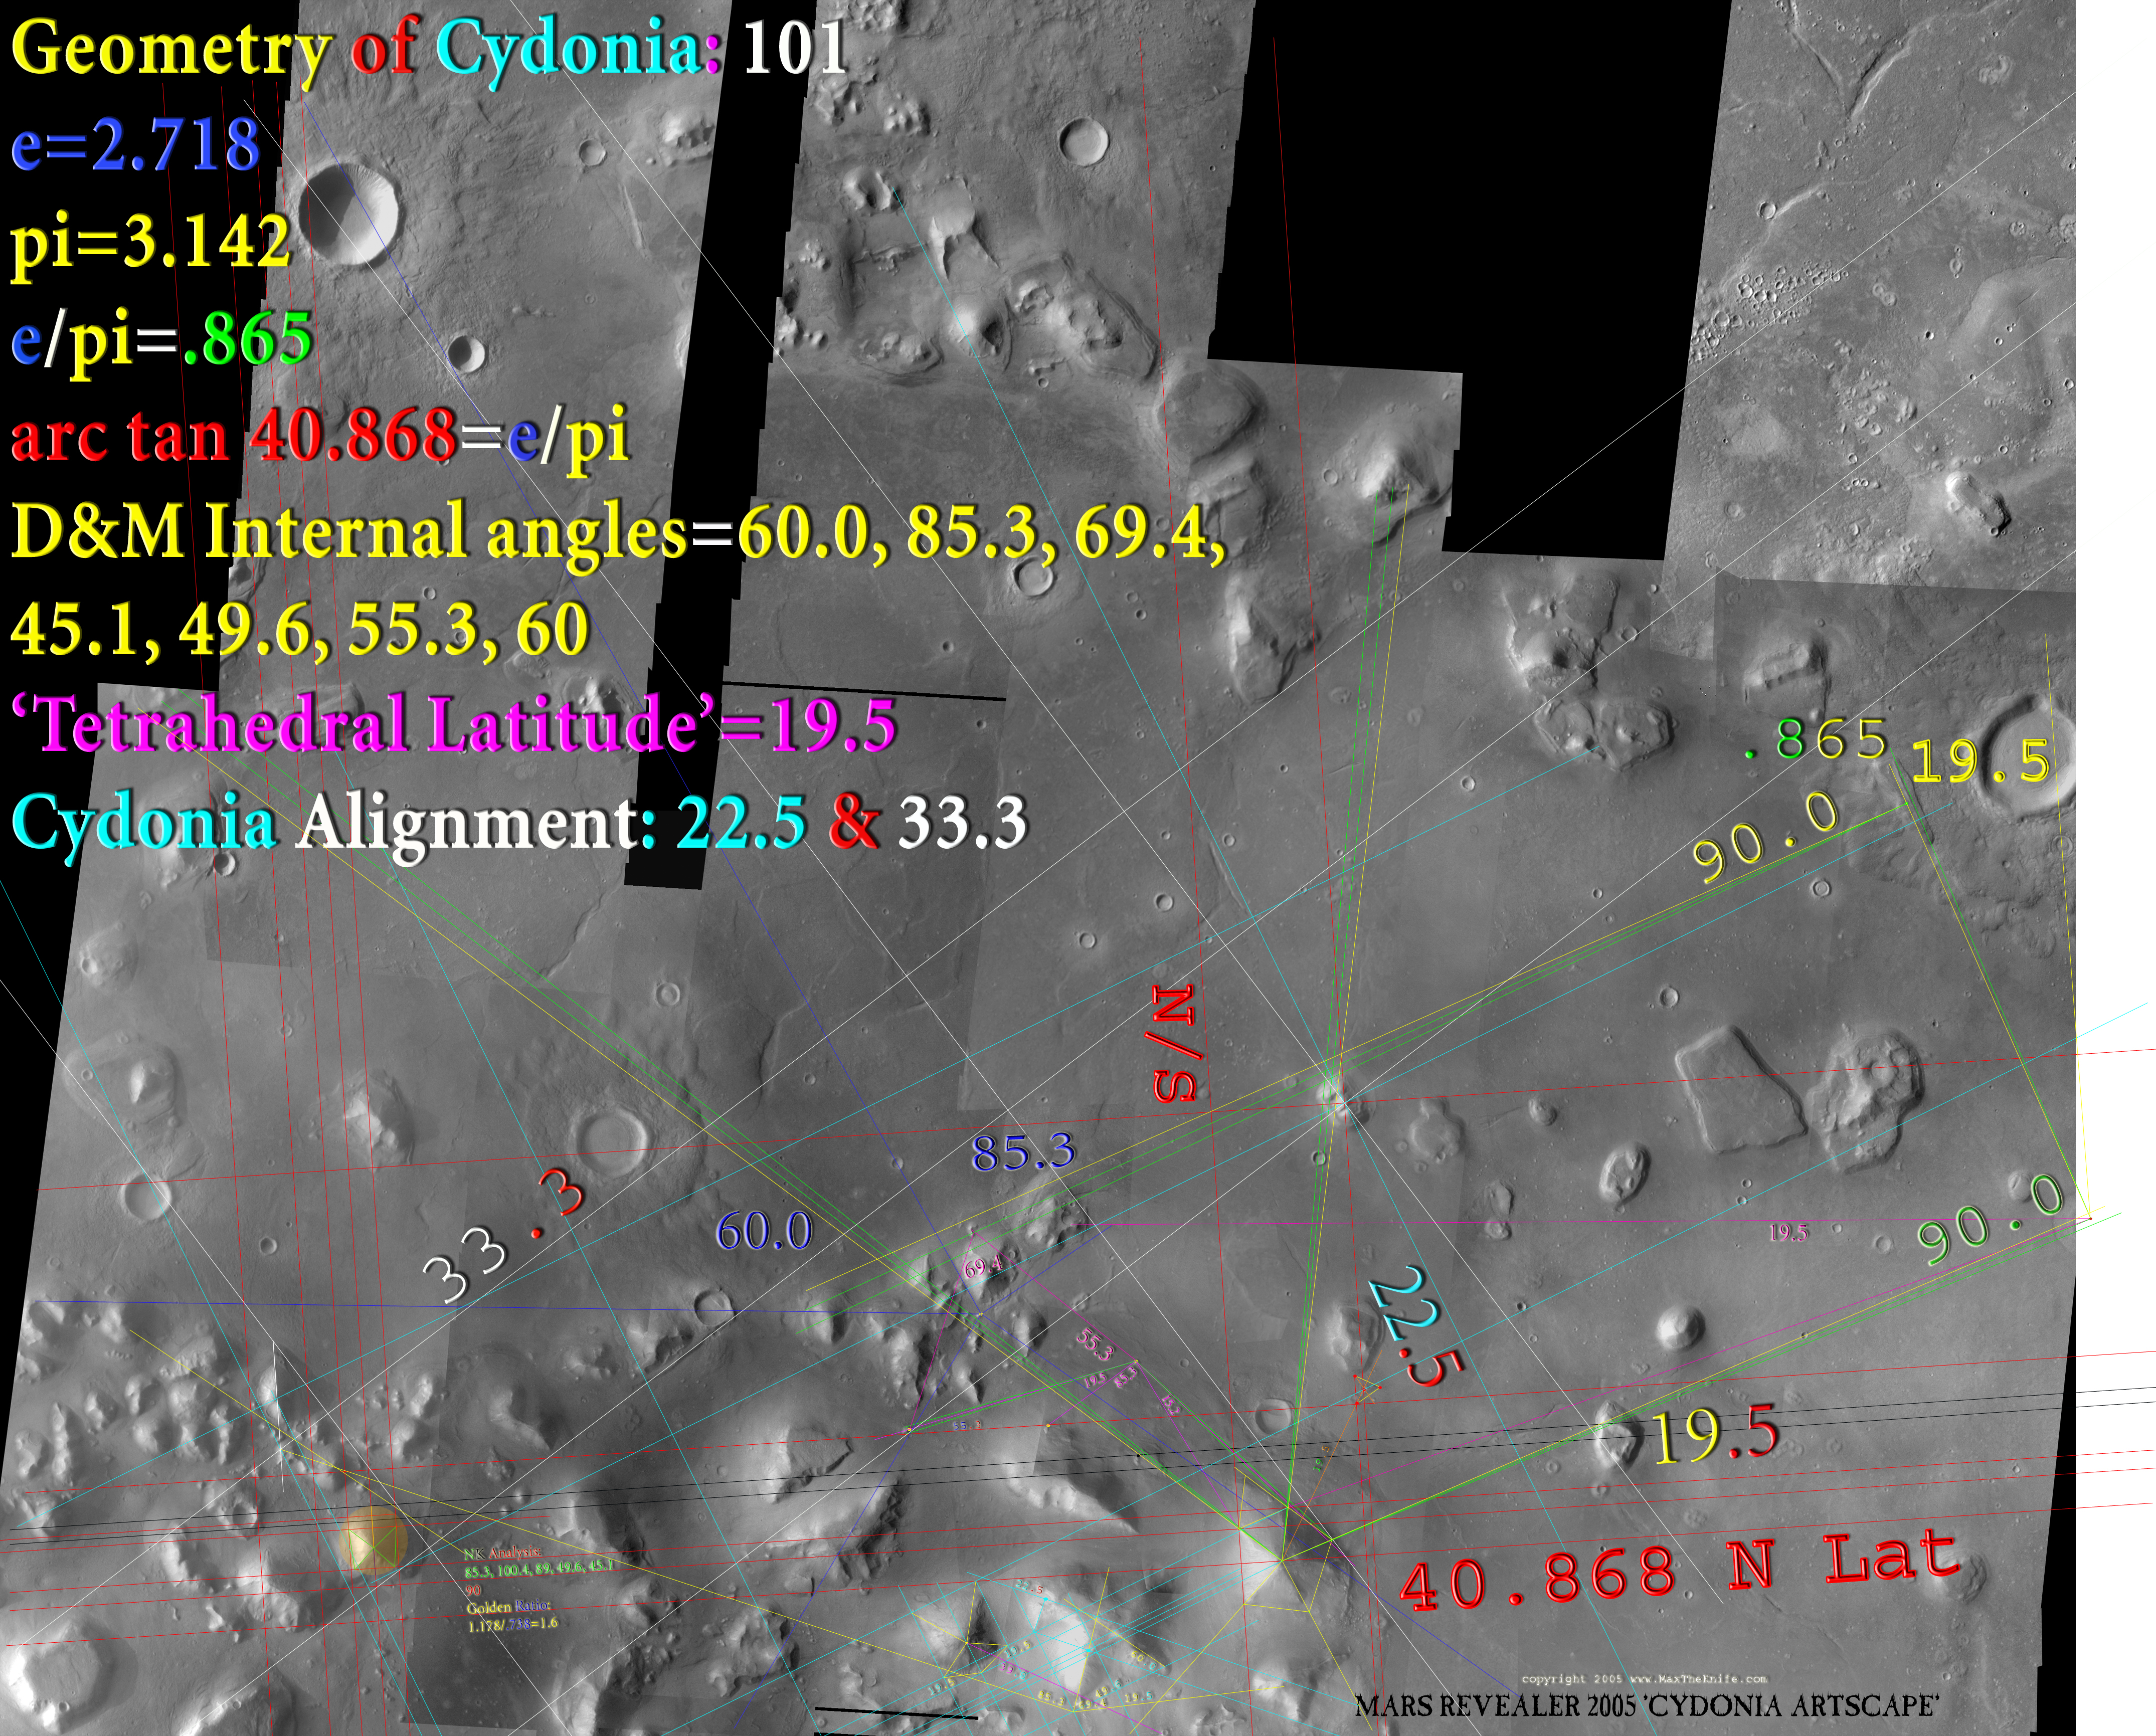
Compare the above image with a crop from my original work from August of 2005...
Clearly, in my original work, I have it set up such that 19.5 plays off the first green .865 line rather than the D&M's major axis of symmetry line notated in yellow.
This is something I have proved to myself time and again during the course of several 'start from scratch' efforts...
I let my 'short cut' go until now for several reasons:
1) If one downloads the image from my slide show and tries to verify the accuracy of the angle by using a measuring tool like the one included in Photoshop 7.0, it will check out just fine.
2) Leaving it 'as is' saved me the time of having to illustrate and explain the discrepancy between mine and Hoagland's measurements (which I'm doing now).
3) Going into too much detail about the discrepancy would have taken considerable time & effort and ultimately bored the average reader to sleep.
So, first, in order to help clear the air for future Cydonia draftsmen, I'll go into some more detail about how I actually go about constructing and placing any angle that is smaller than Photoshop's automatic 'dial in' capabilities.
***
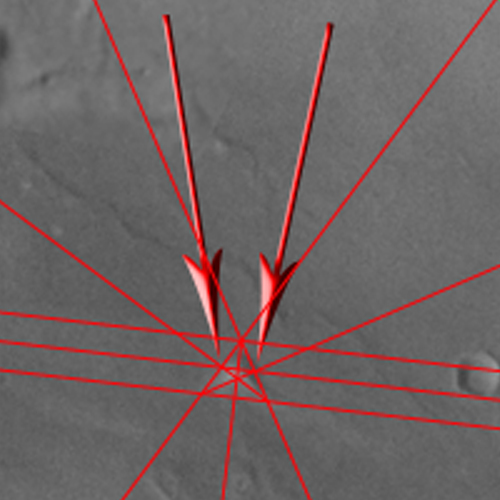
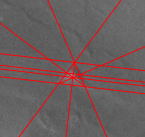
In order to overcome Photoshop's inherent programmed limitations, one must begin to literally 'split hairs'.
In order to illustrate, I have created lines that are nearly 5000 pixels long. Which again, reinforces the fact that higher resolution data = better data AND longer lines = more accurate angles.
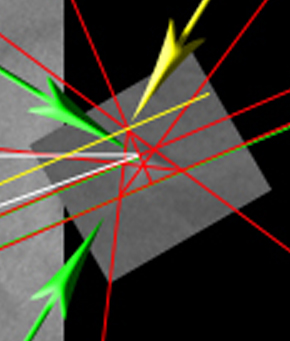
In order to actually SEE what I'm talking about I've cropped the following from my next illustration and enlarged it in order to effectively present the line separations.
One may still wish to download this image in order to verify the lines first hand.
(Next image cropped and enlarged 635% from following image)
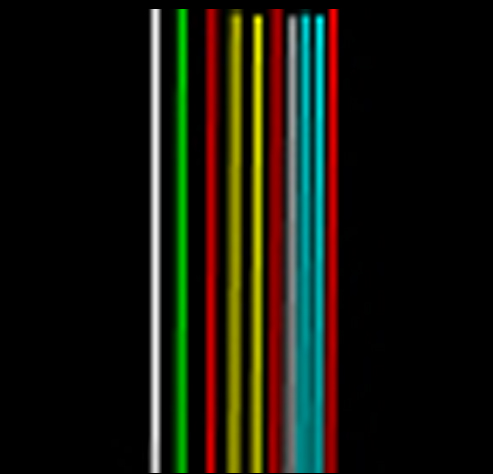

As one can see... I've developed a ridiculously accurate and reliable way of 'splitting hairs' in order to get around Photoshop's limits.
The only problem is... the method is very time consuming which raises the question,.. "Is the extra .05, .001 or even .0001 degrees even worth the effort?".
Well... yes and no.
For future efforts, which could conceivably be carried out upon higher resolution data utilizing even more accurate software like a CAD program perhaps, these miniscule measurements I've made serve as terrific verifiable scientific predictions.
Meaning, my .865 measurements, might actually turn out to be .893 or .868 rather than .865 (unlikely though :-) ) given better data and software.
In this capacity, I would have to say 'yes'. Taking the time is/was definitely worth the effort.
However, in the context of resolution, as I talk about in some detail during "Stubborn Assumptions", as it applies to Gary's Mosaic (~6mb) or ESA's image (~ 6mb)...
I would have to say 'no', it is not worth the effort simply because of the constraints dictated by the resolution of either image.
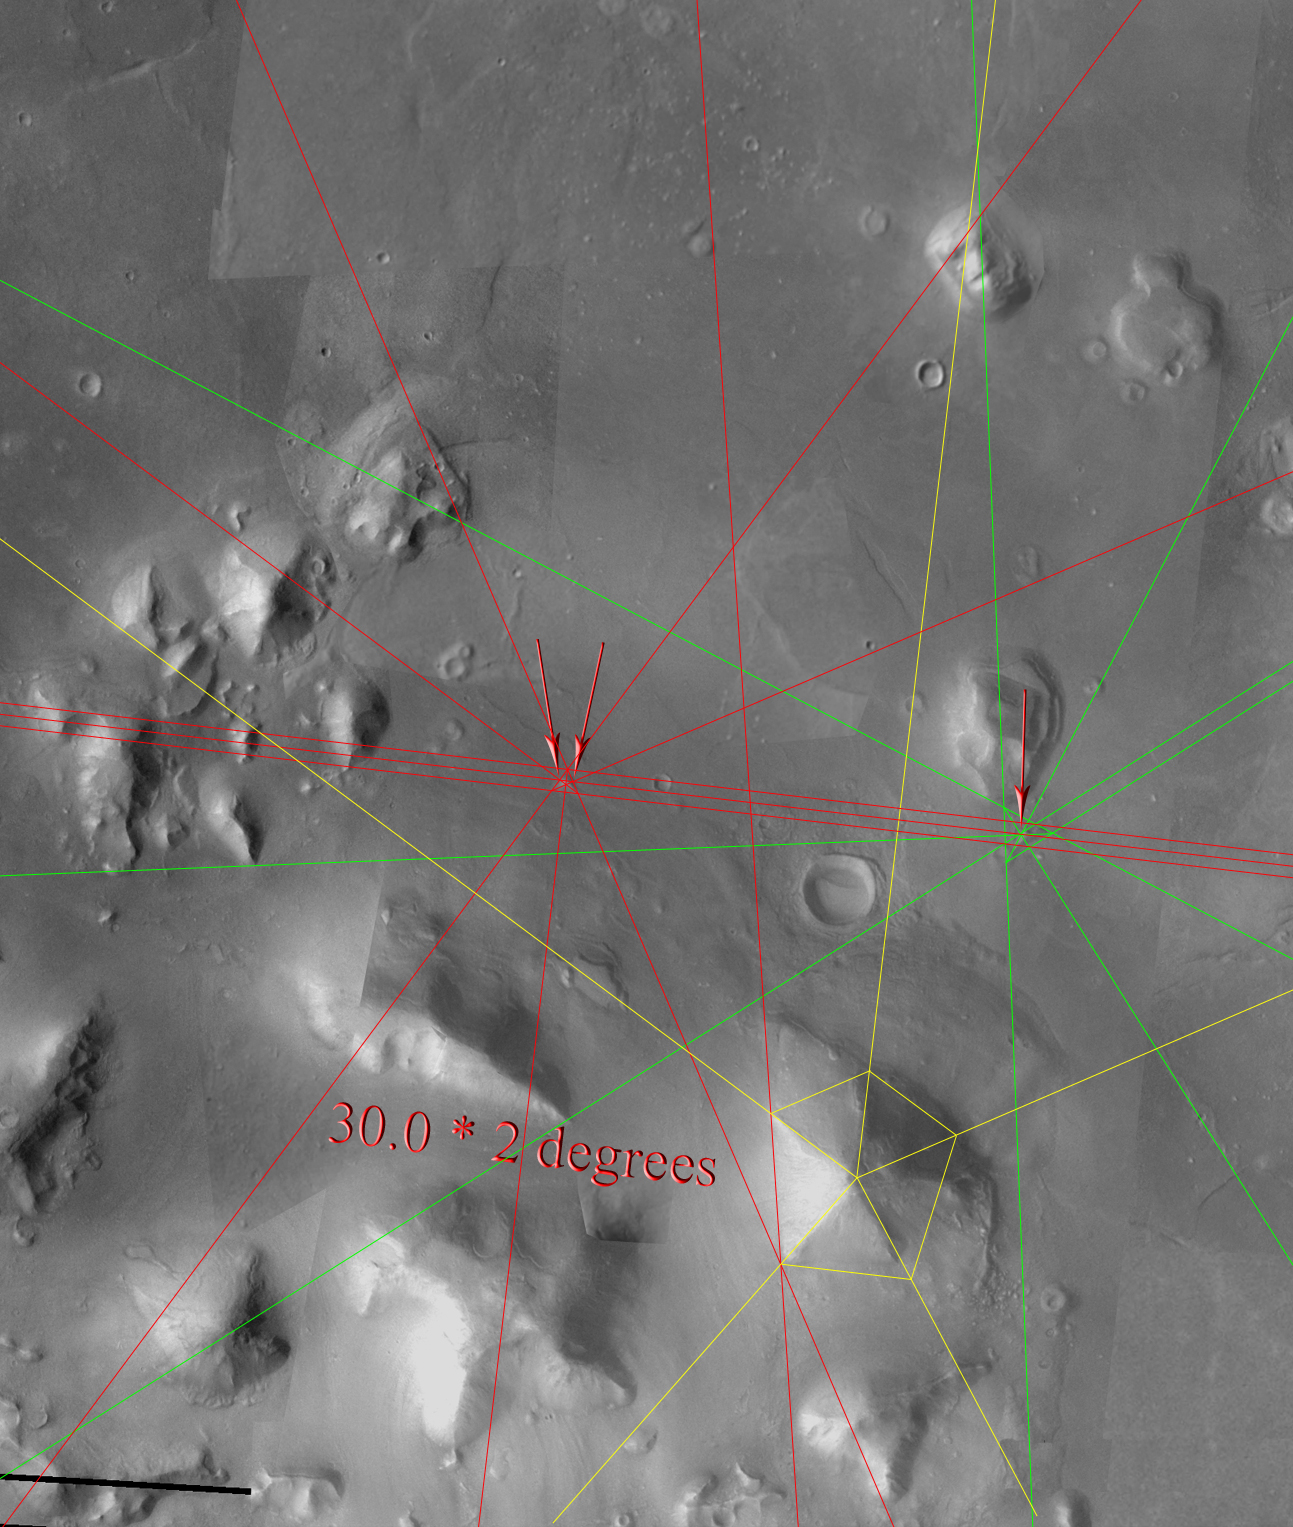
Nevertheless, .8 degrees is very perceptible and makes a noticeable difference when trying to verify this particular Hoagland measurement.
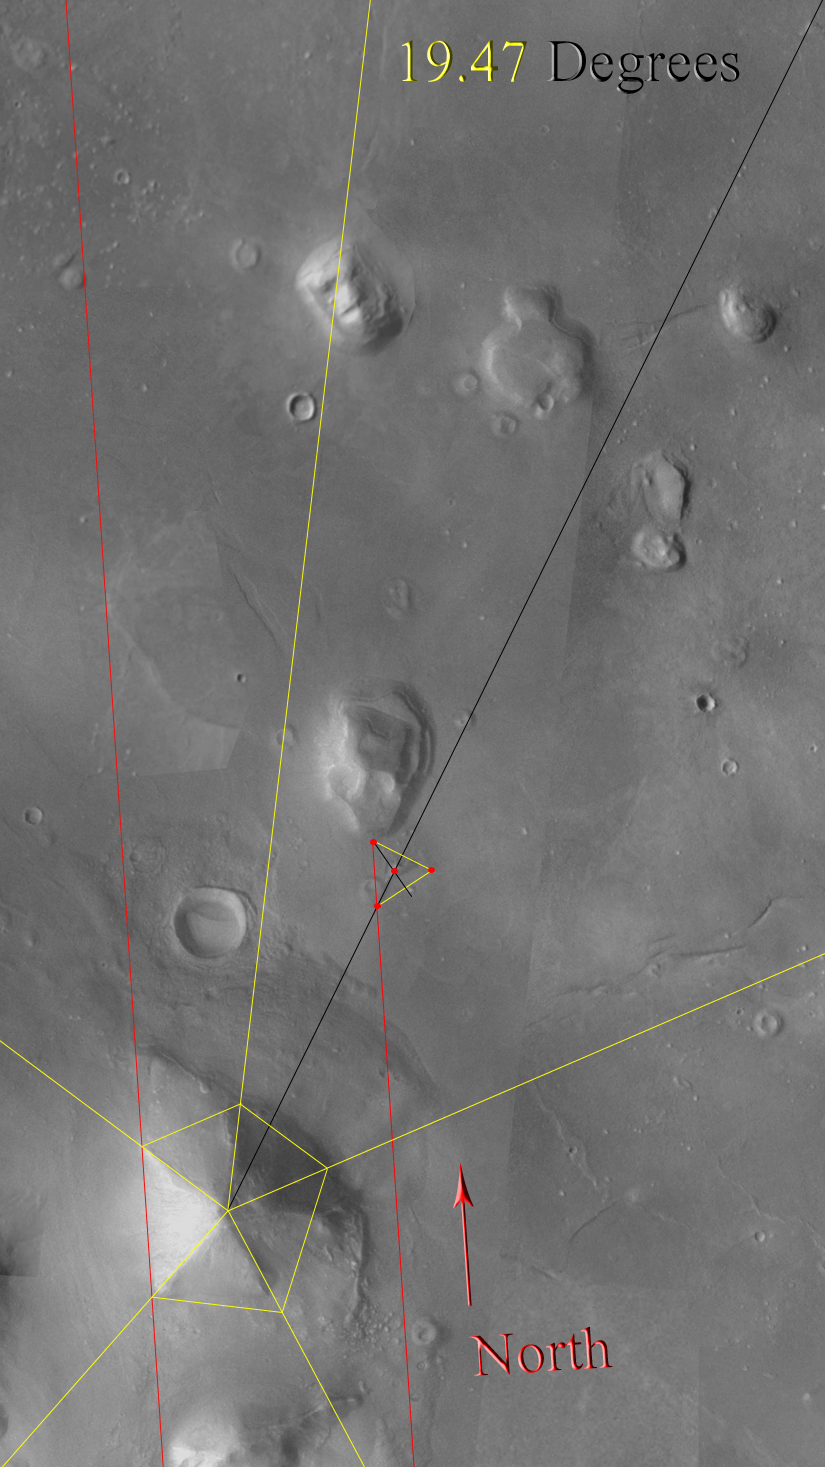
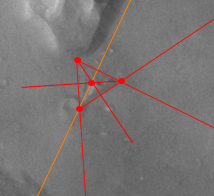
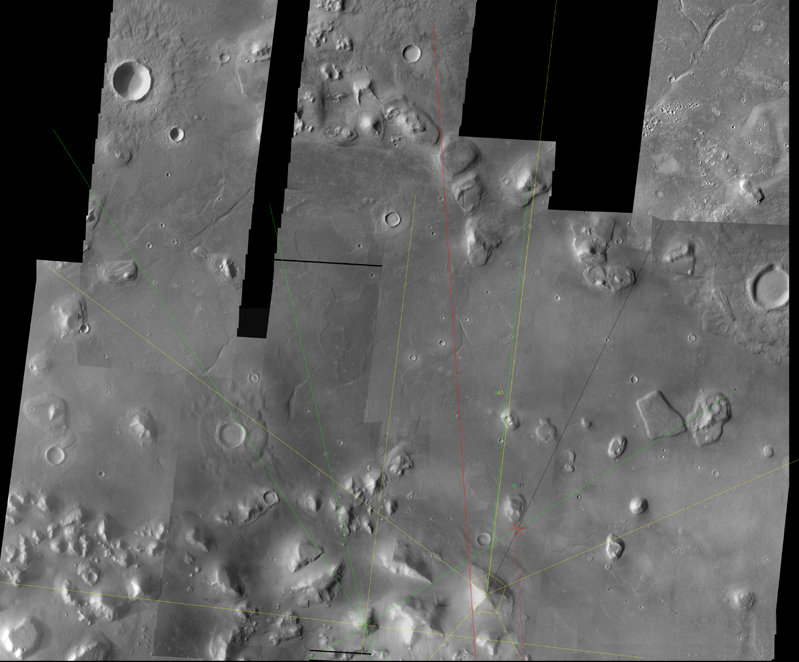
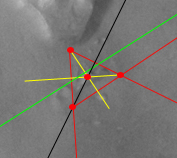
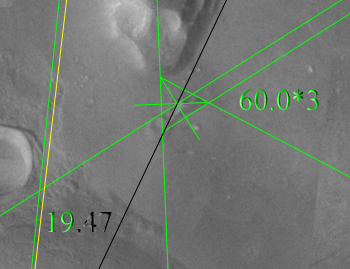
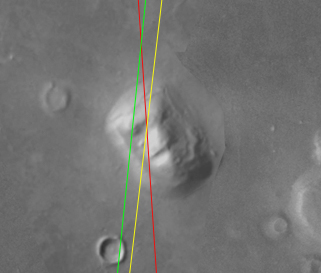
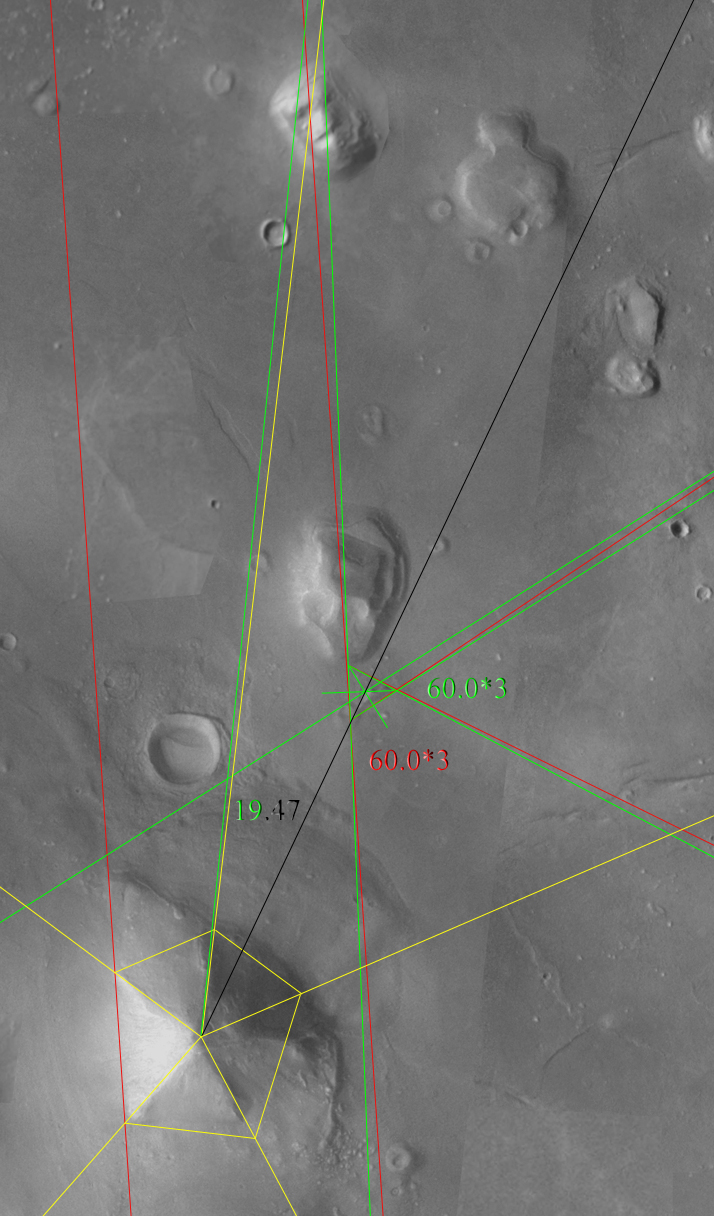
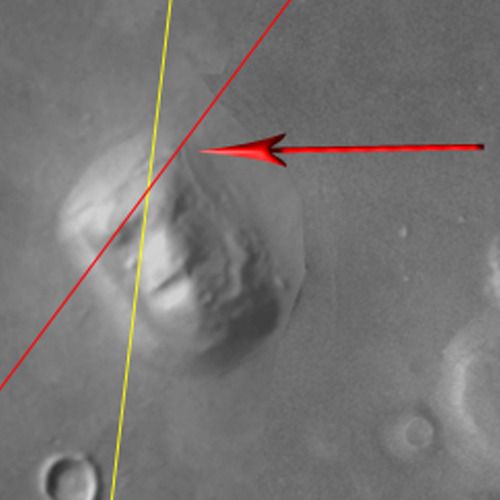
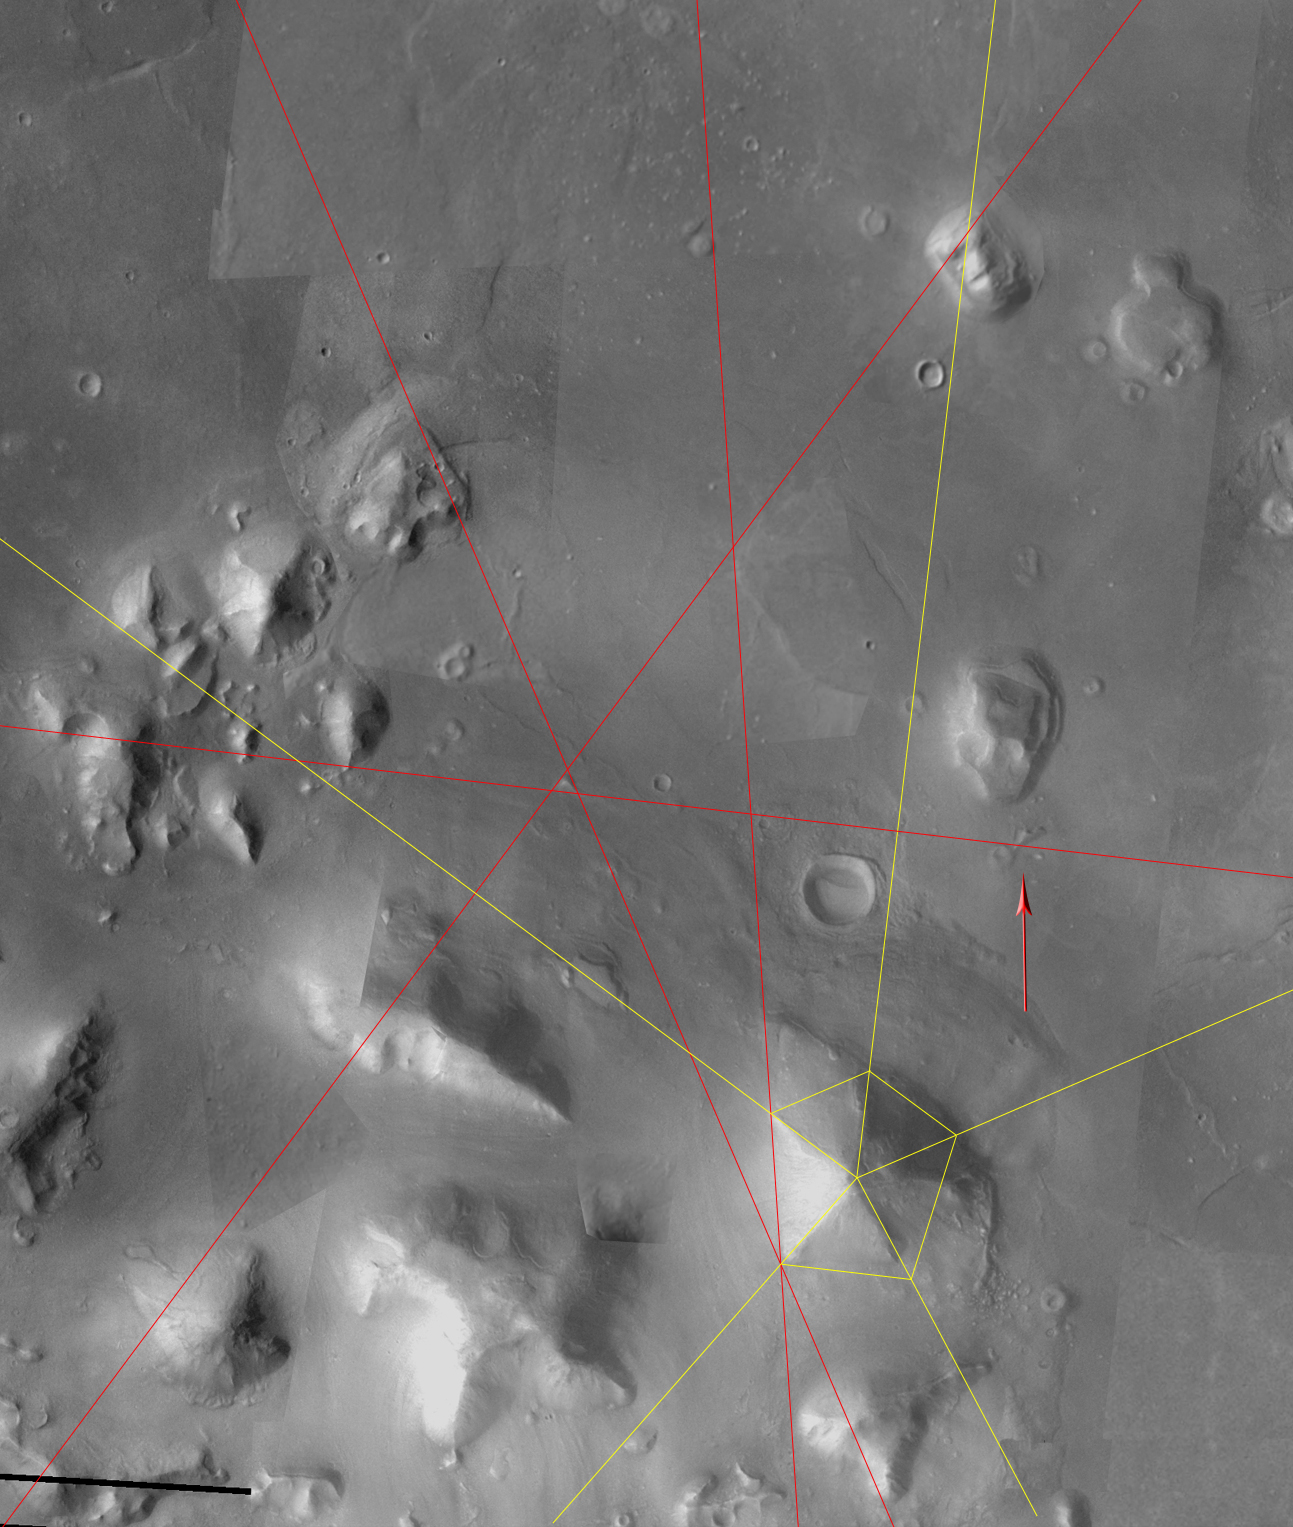
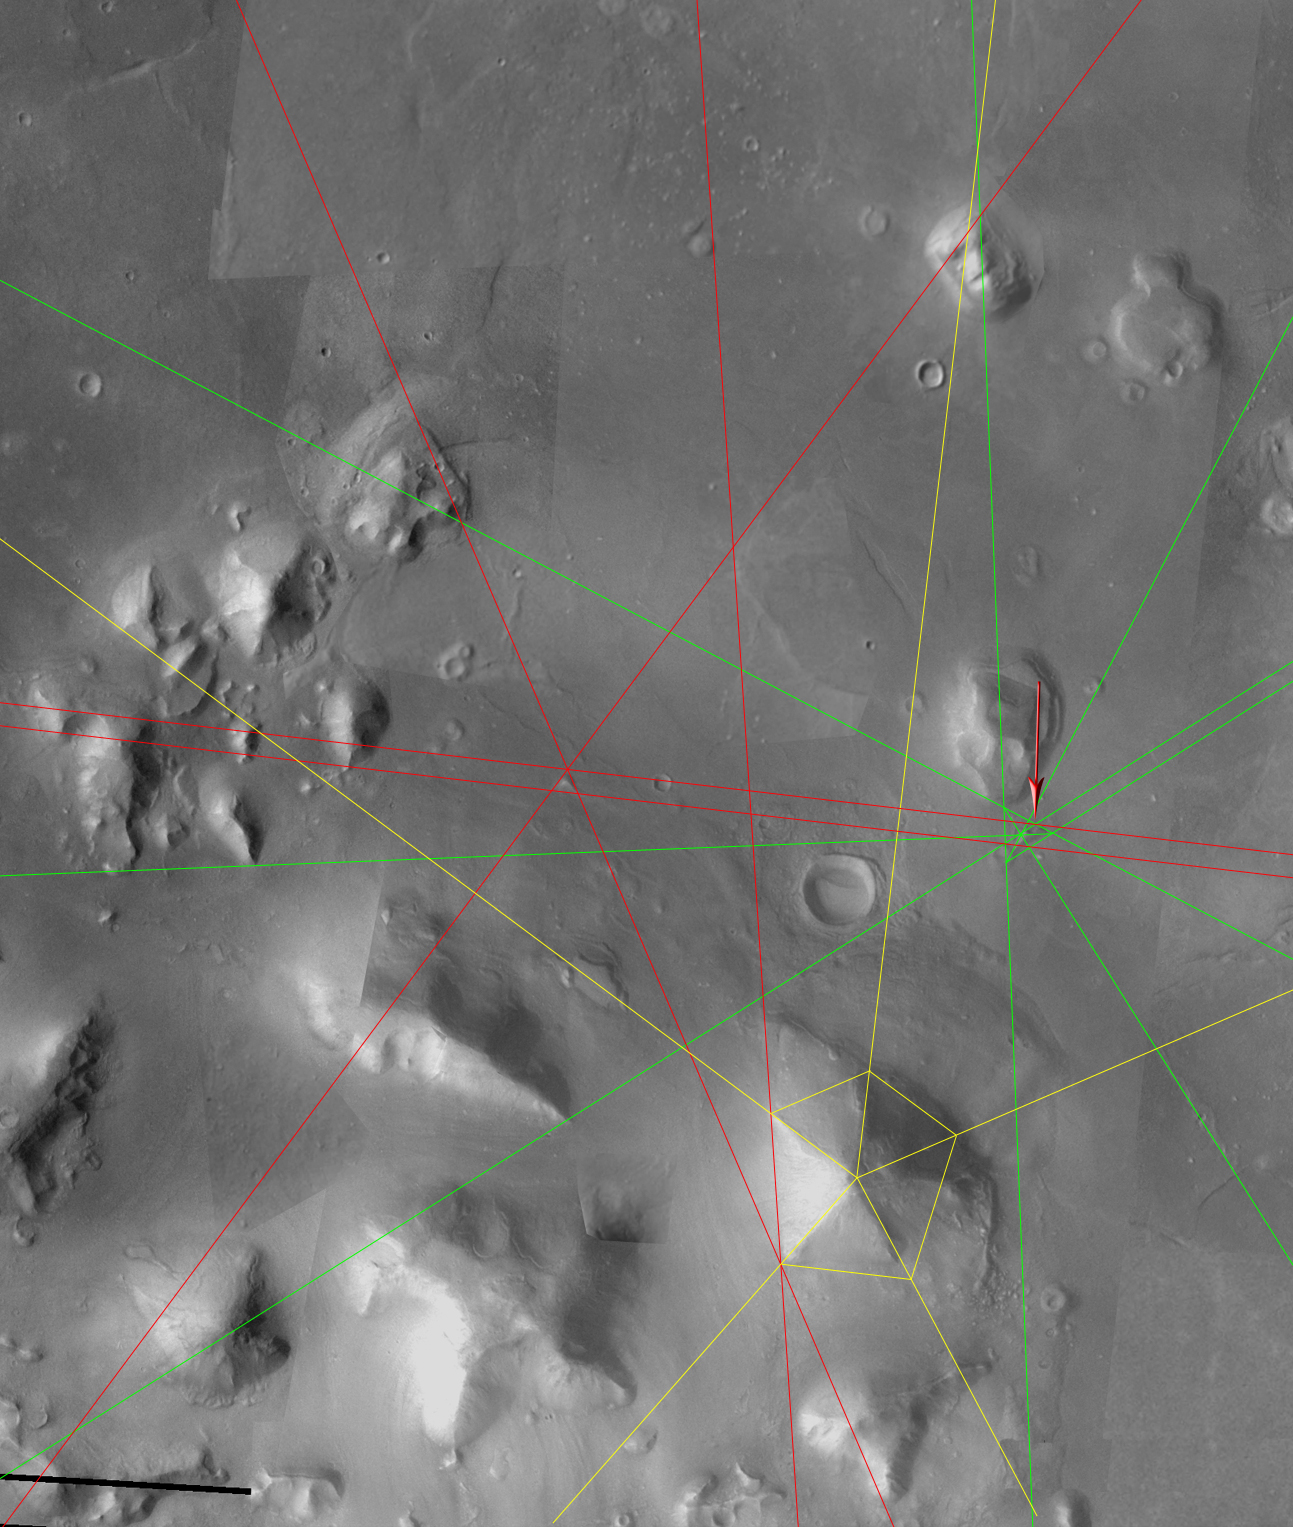
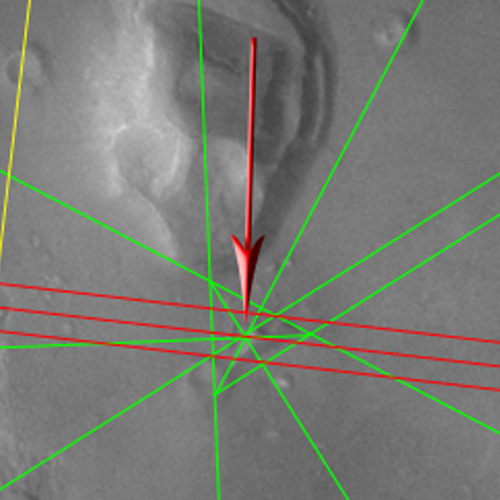
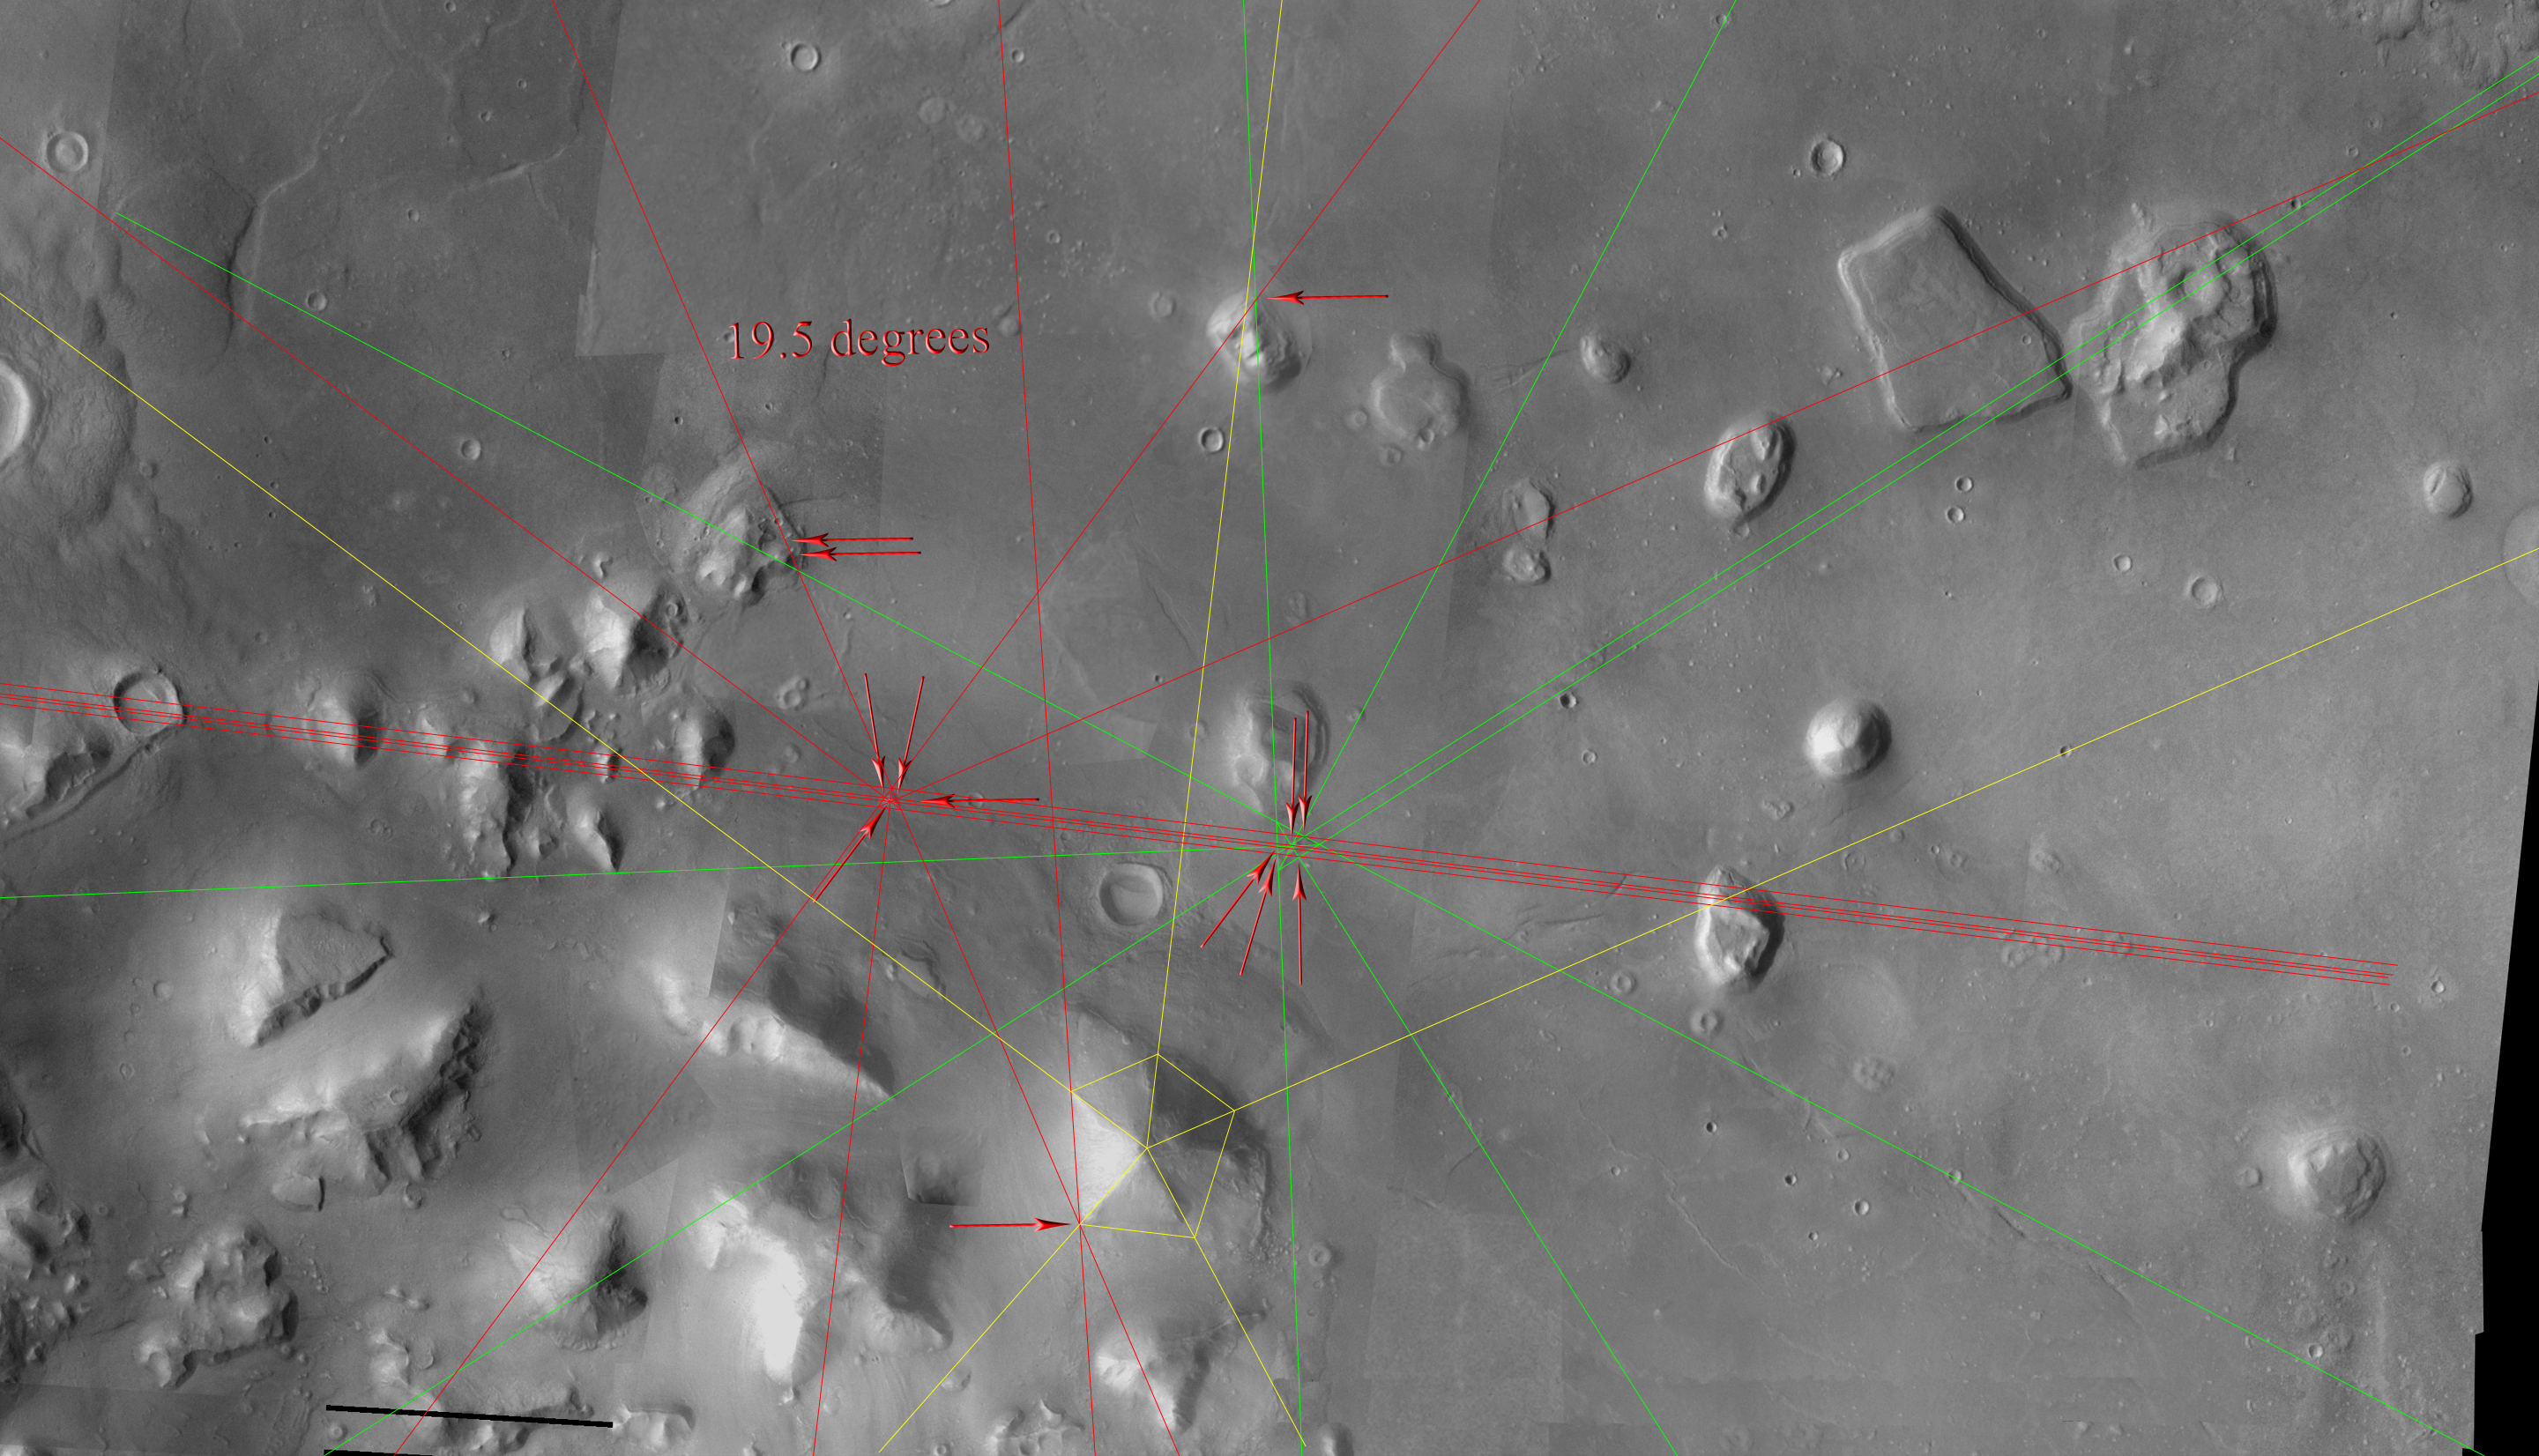
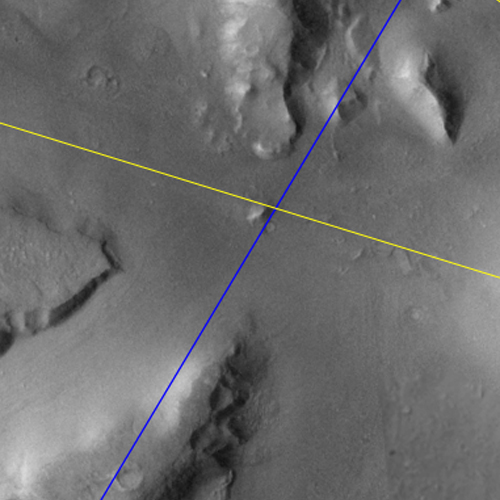
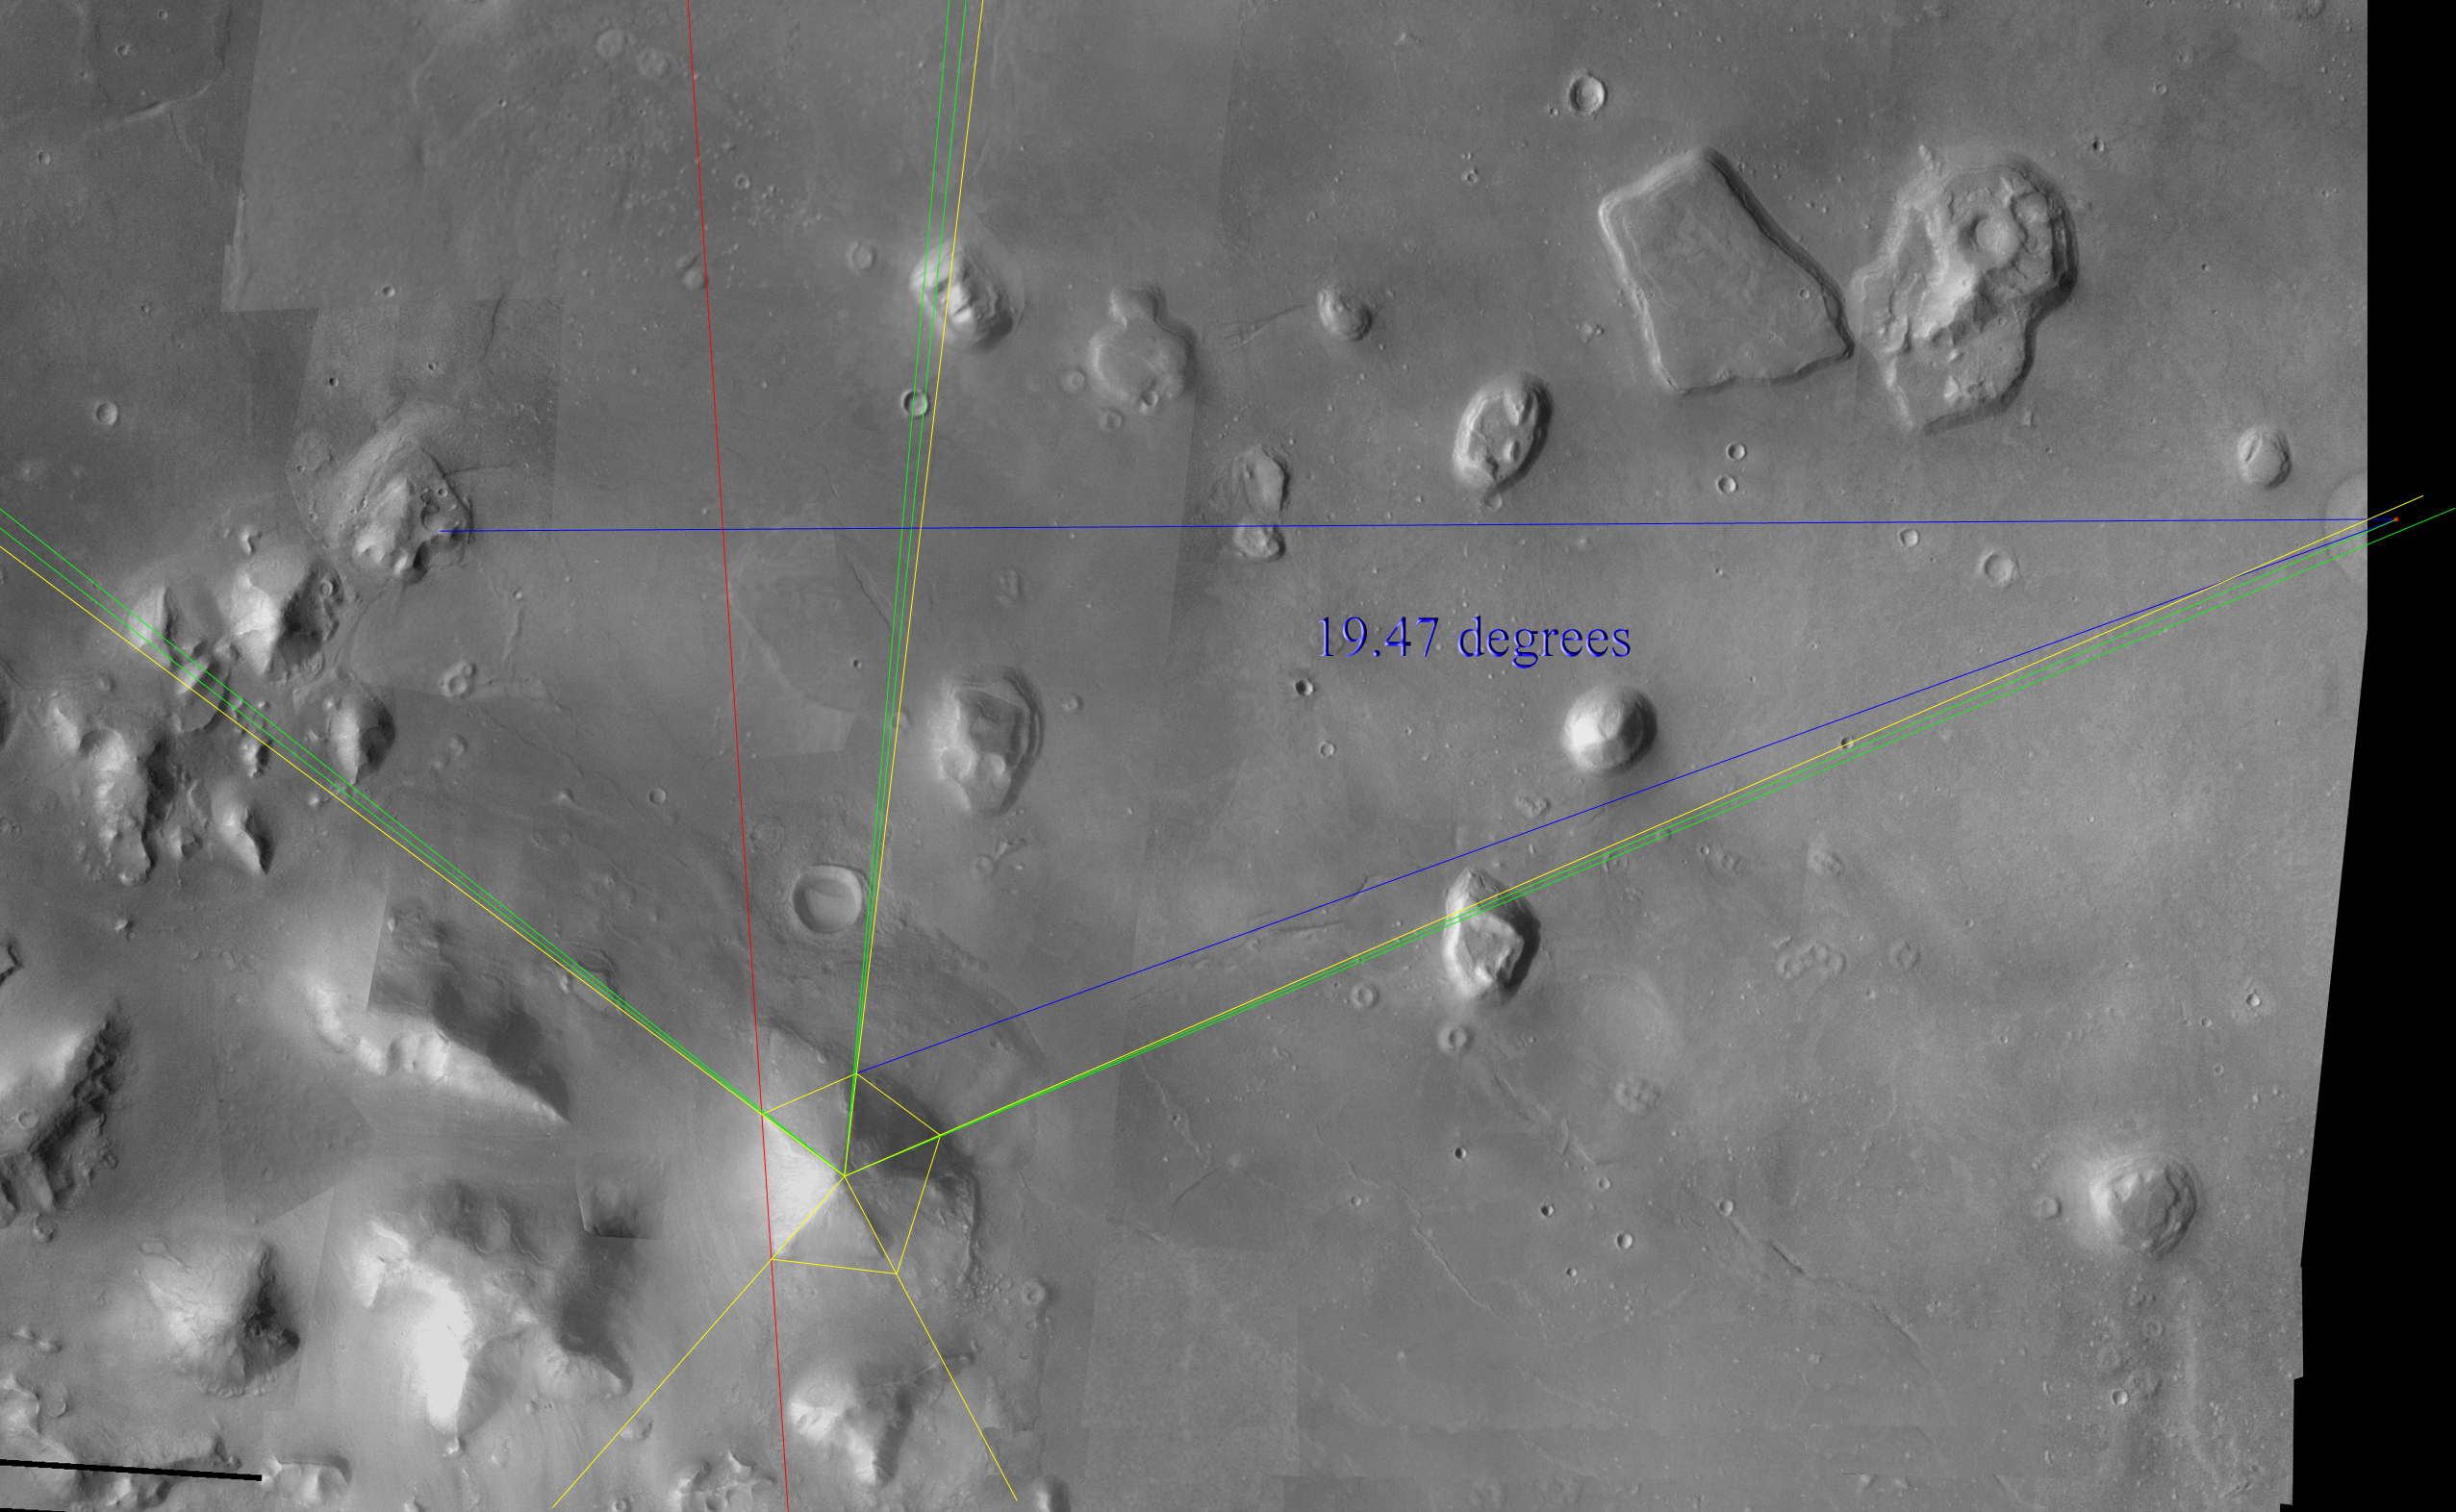
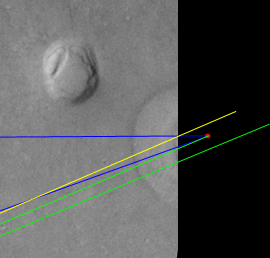
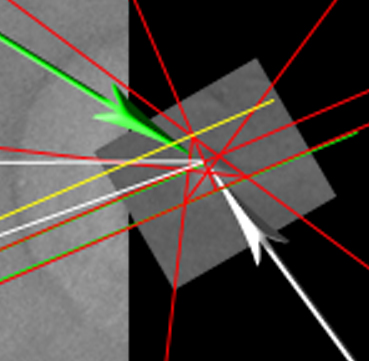
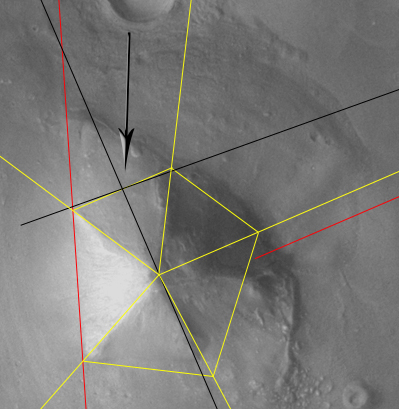
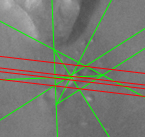
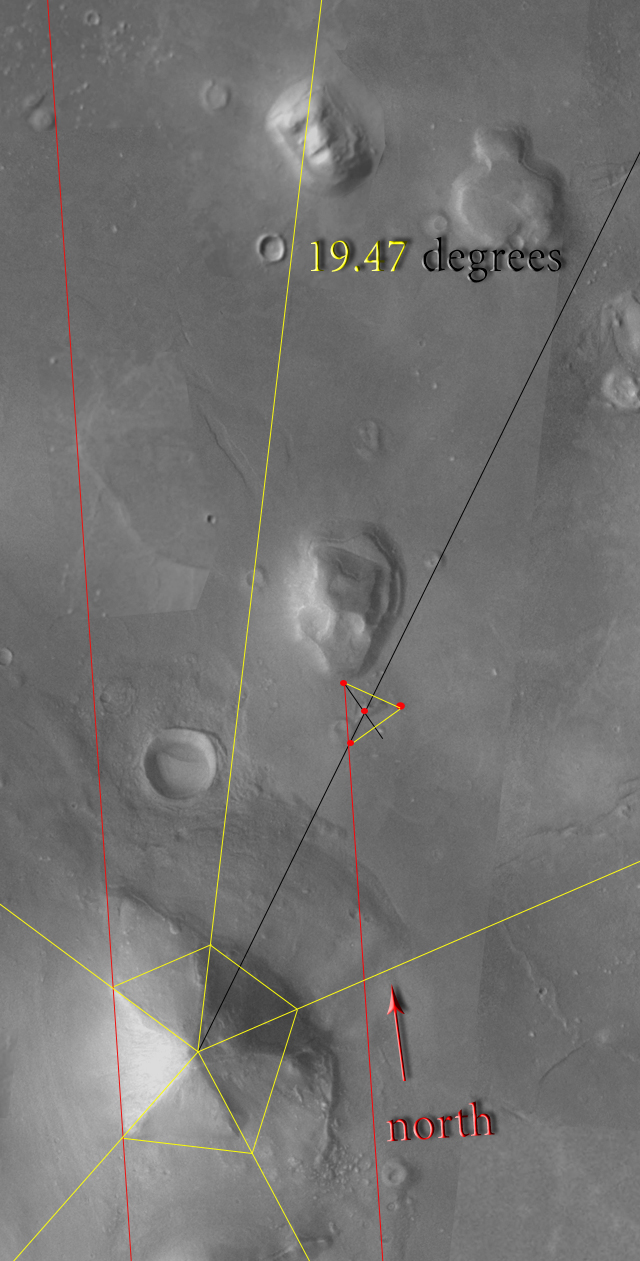
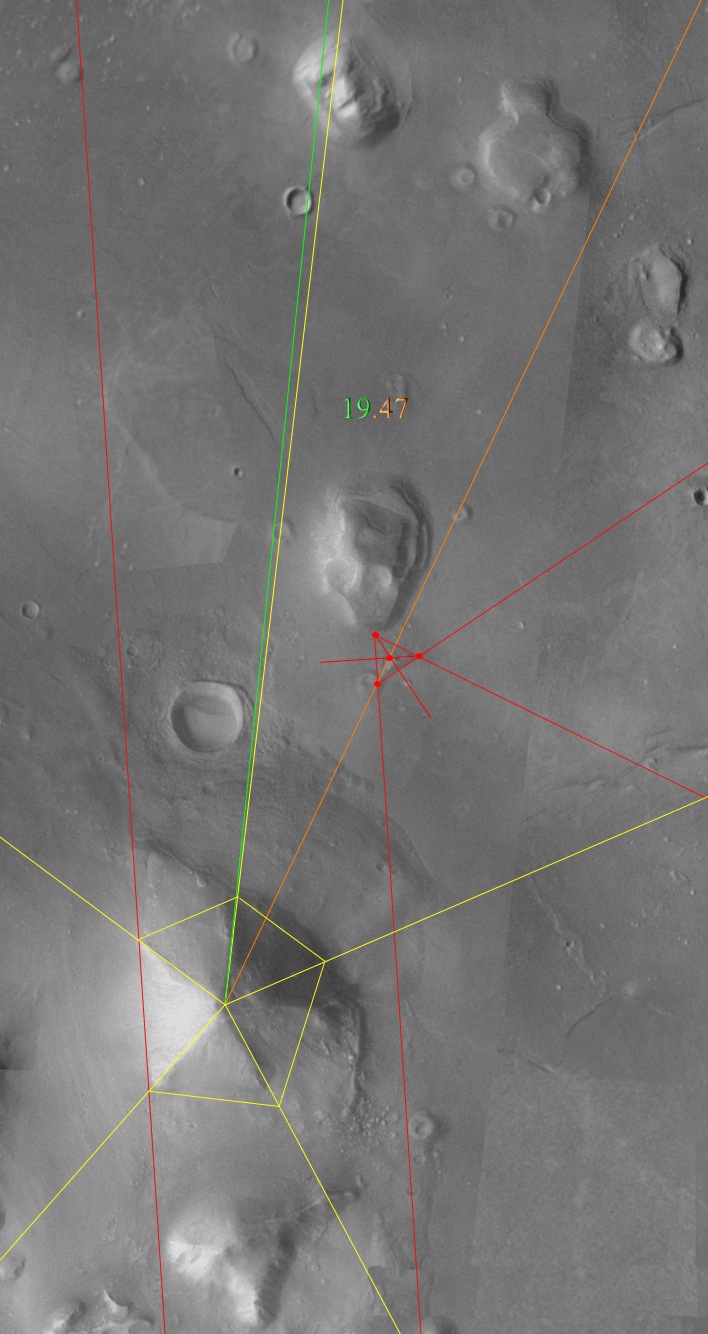
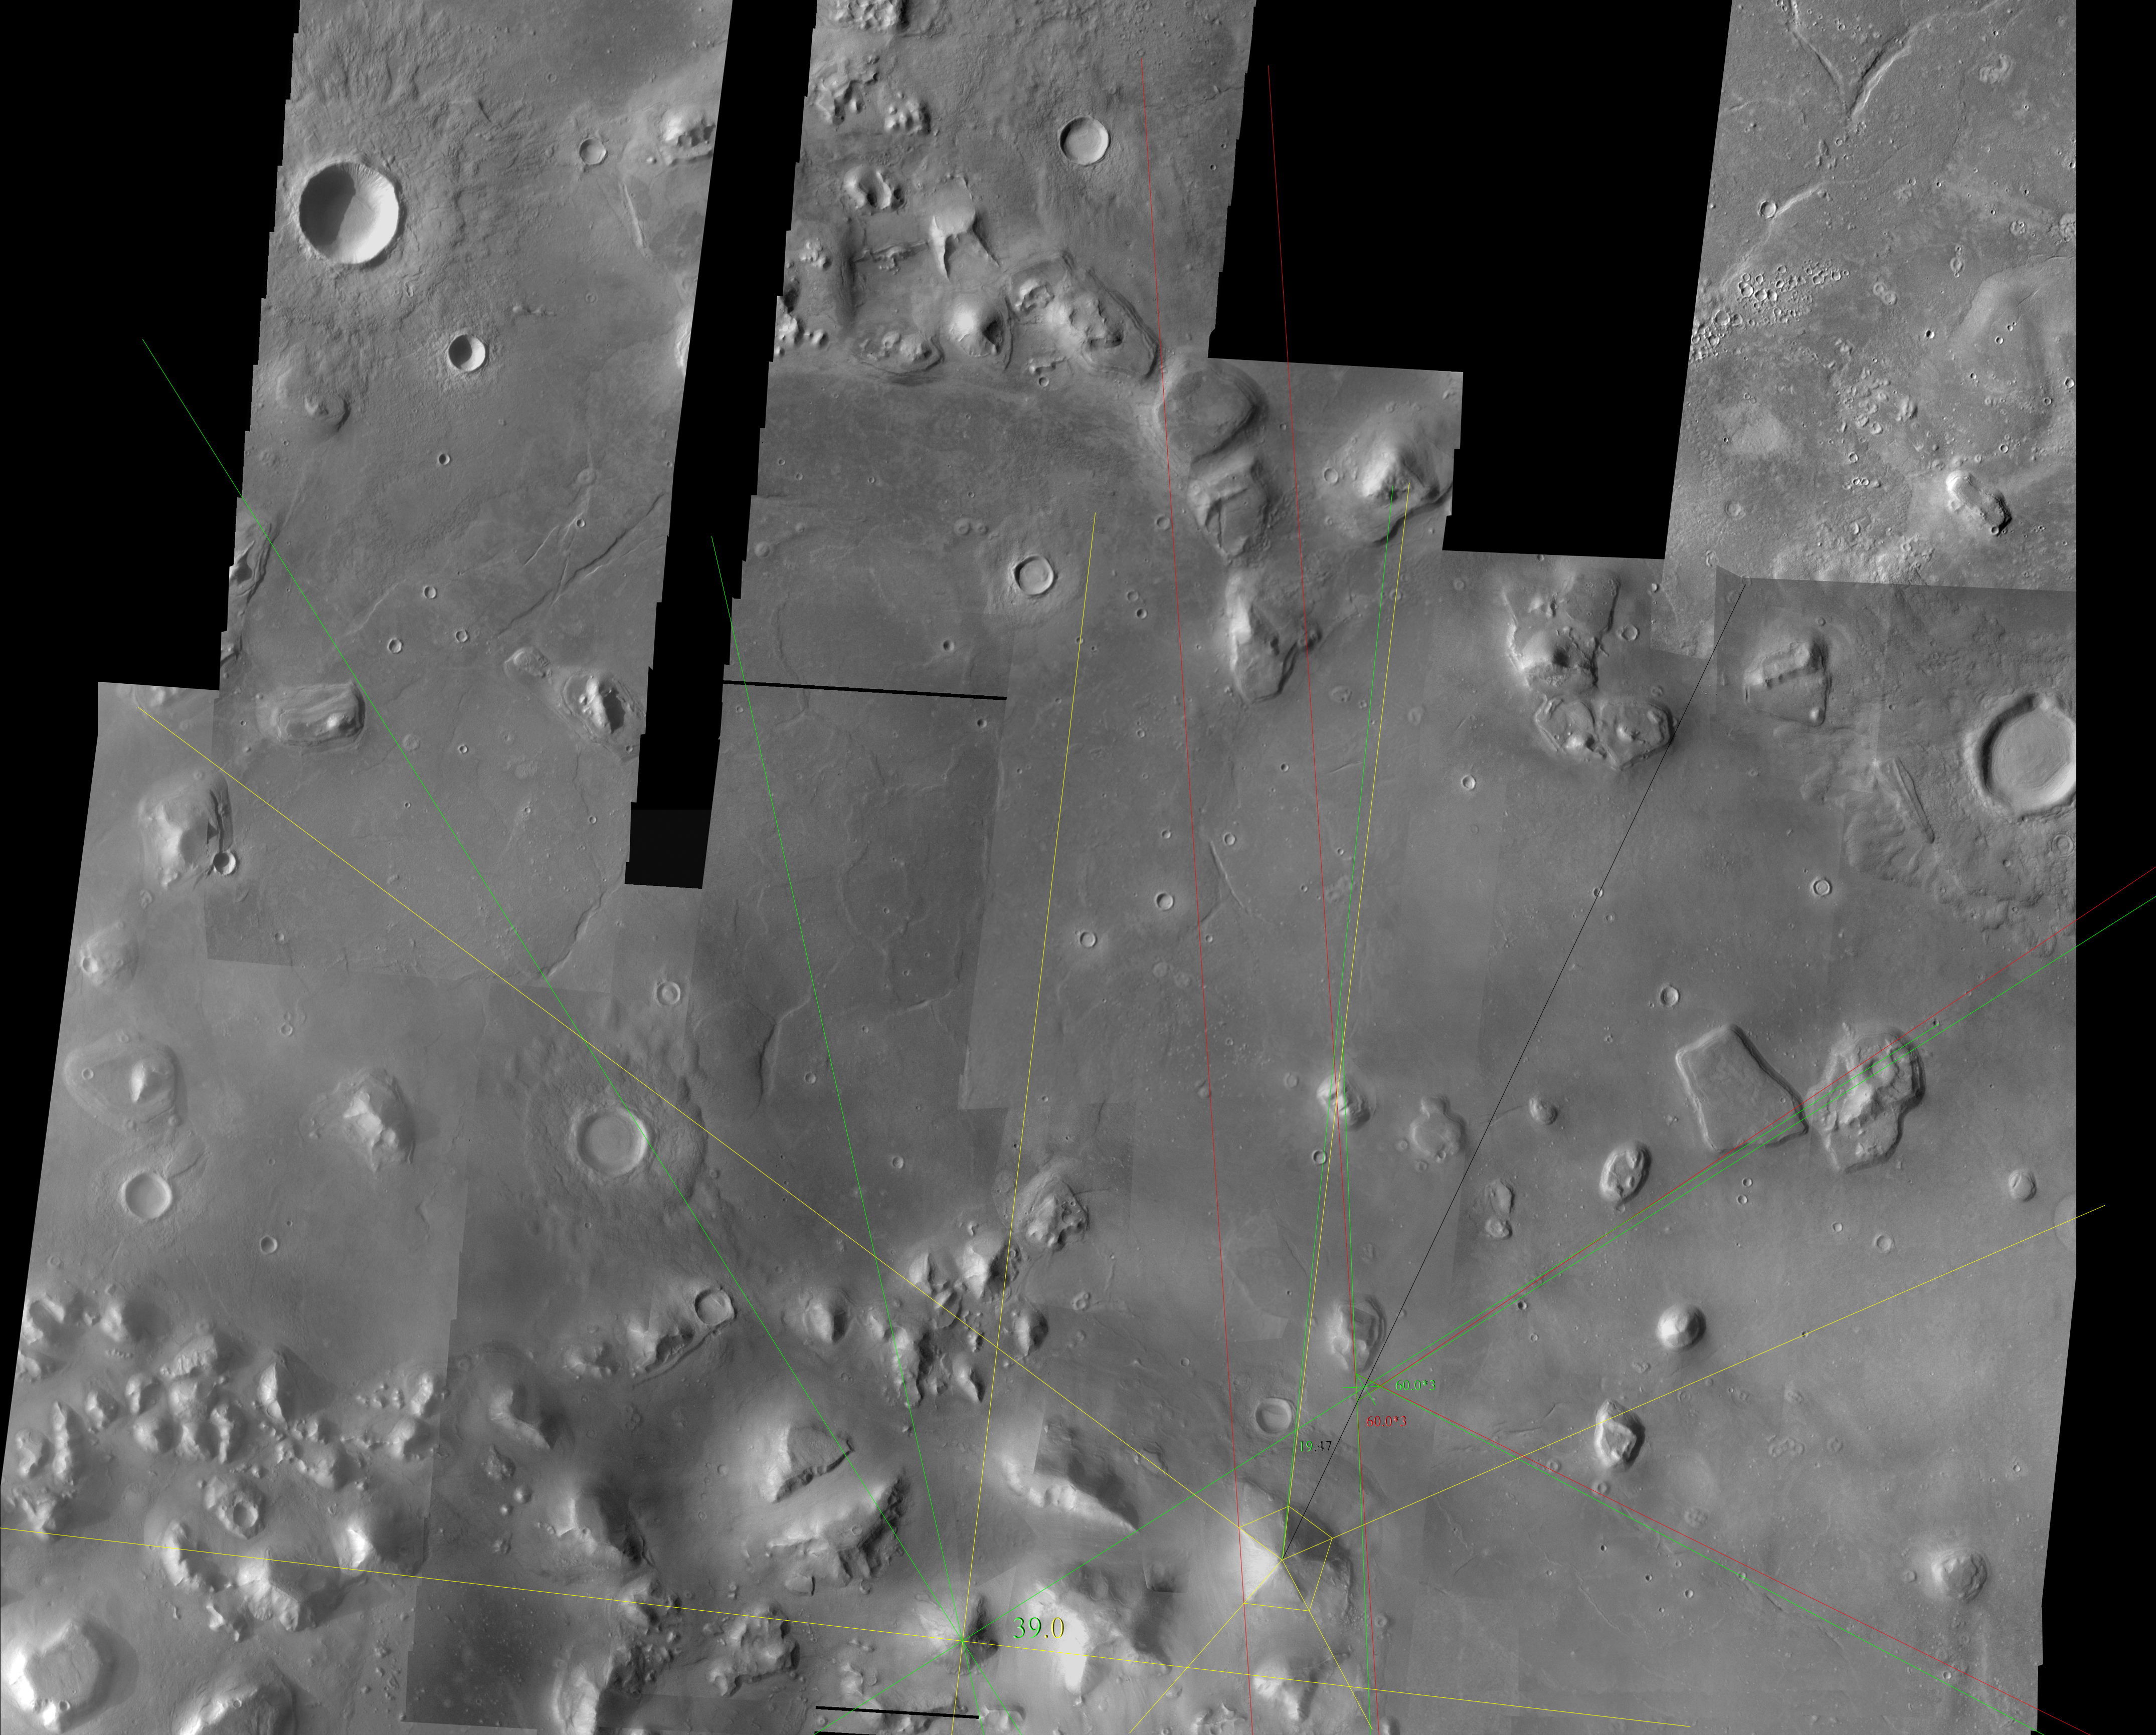
Observe... The following 19.47 lines are 'placed' utilizing the technique illustrated two images above.

Simply look where each line actually crosses the 'ruined tetrahedron'...
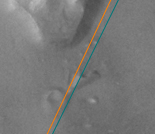
If one is to believe what's on this particular data set, one might assume the western base of this 'ruined tetrahedron' is positioned precisely on the same line as the D&M's western base.
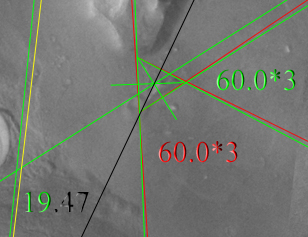
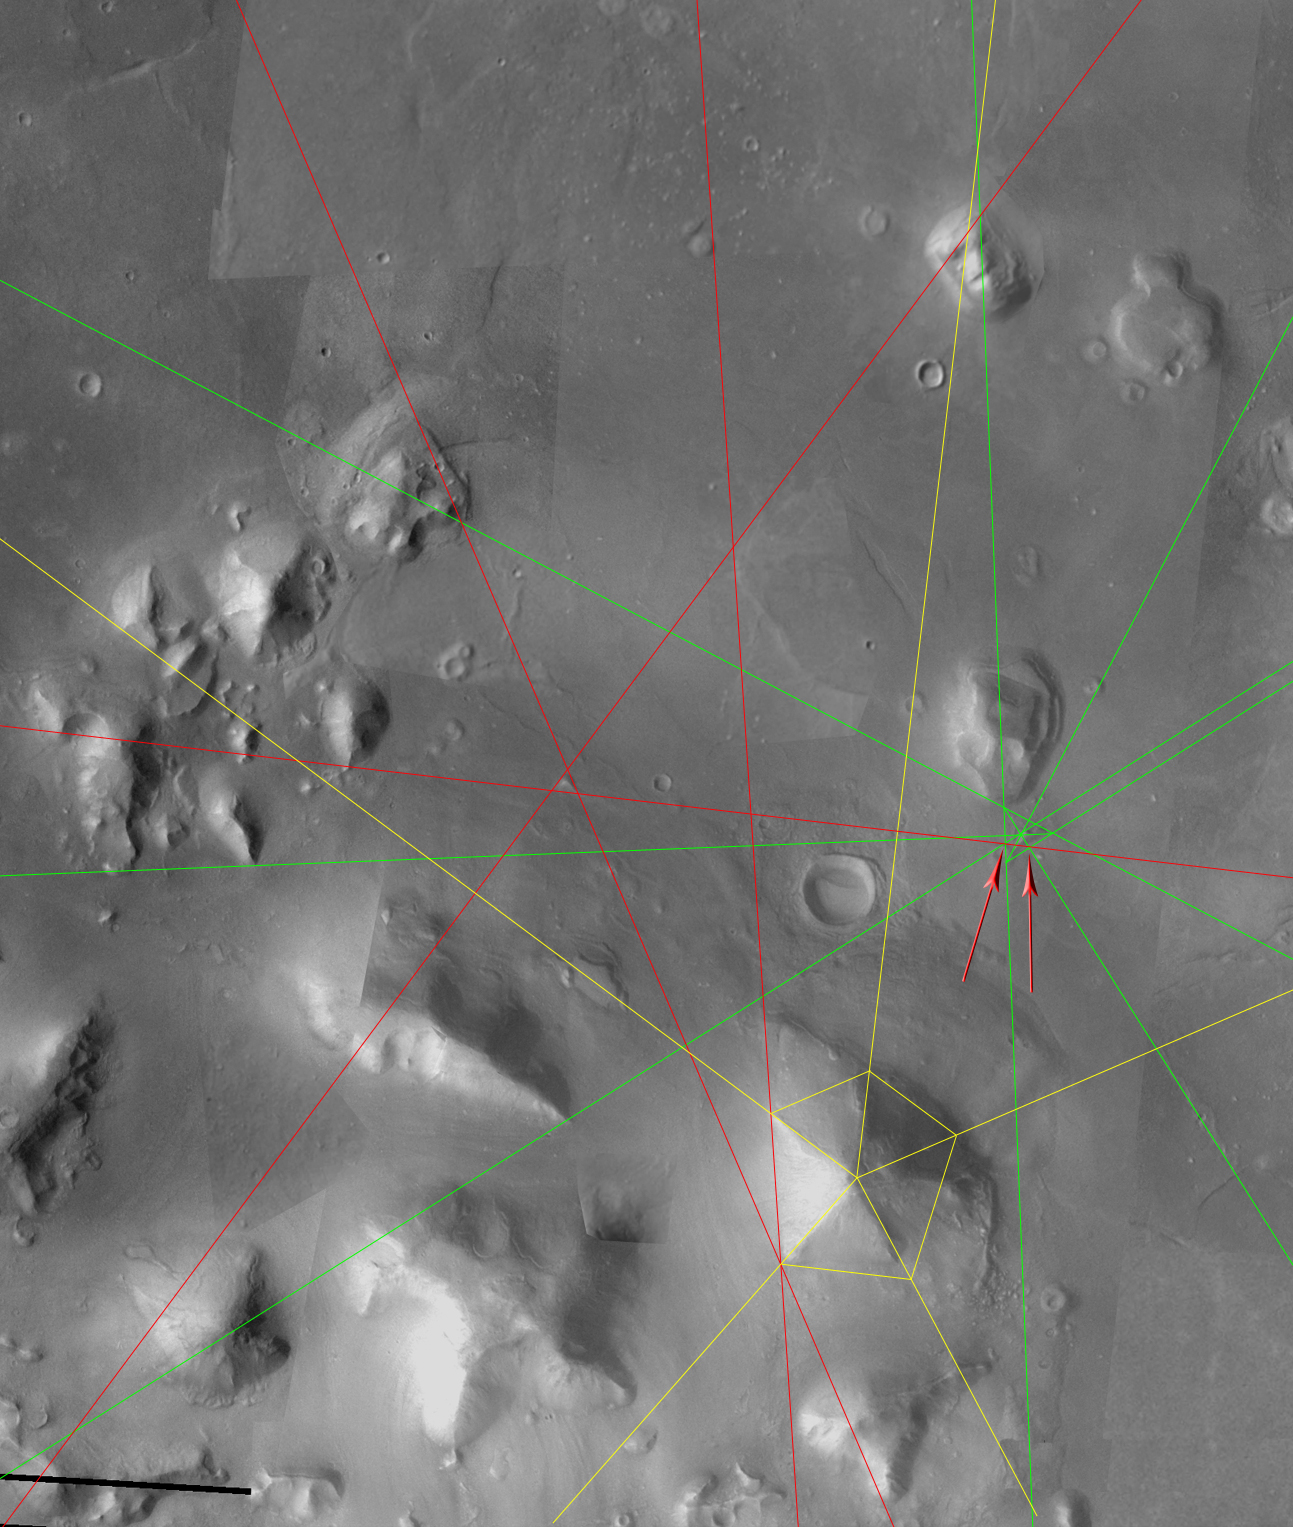
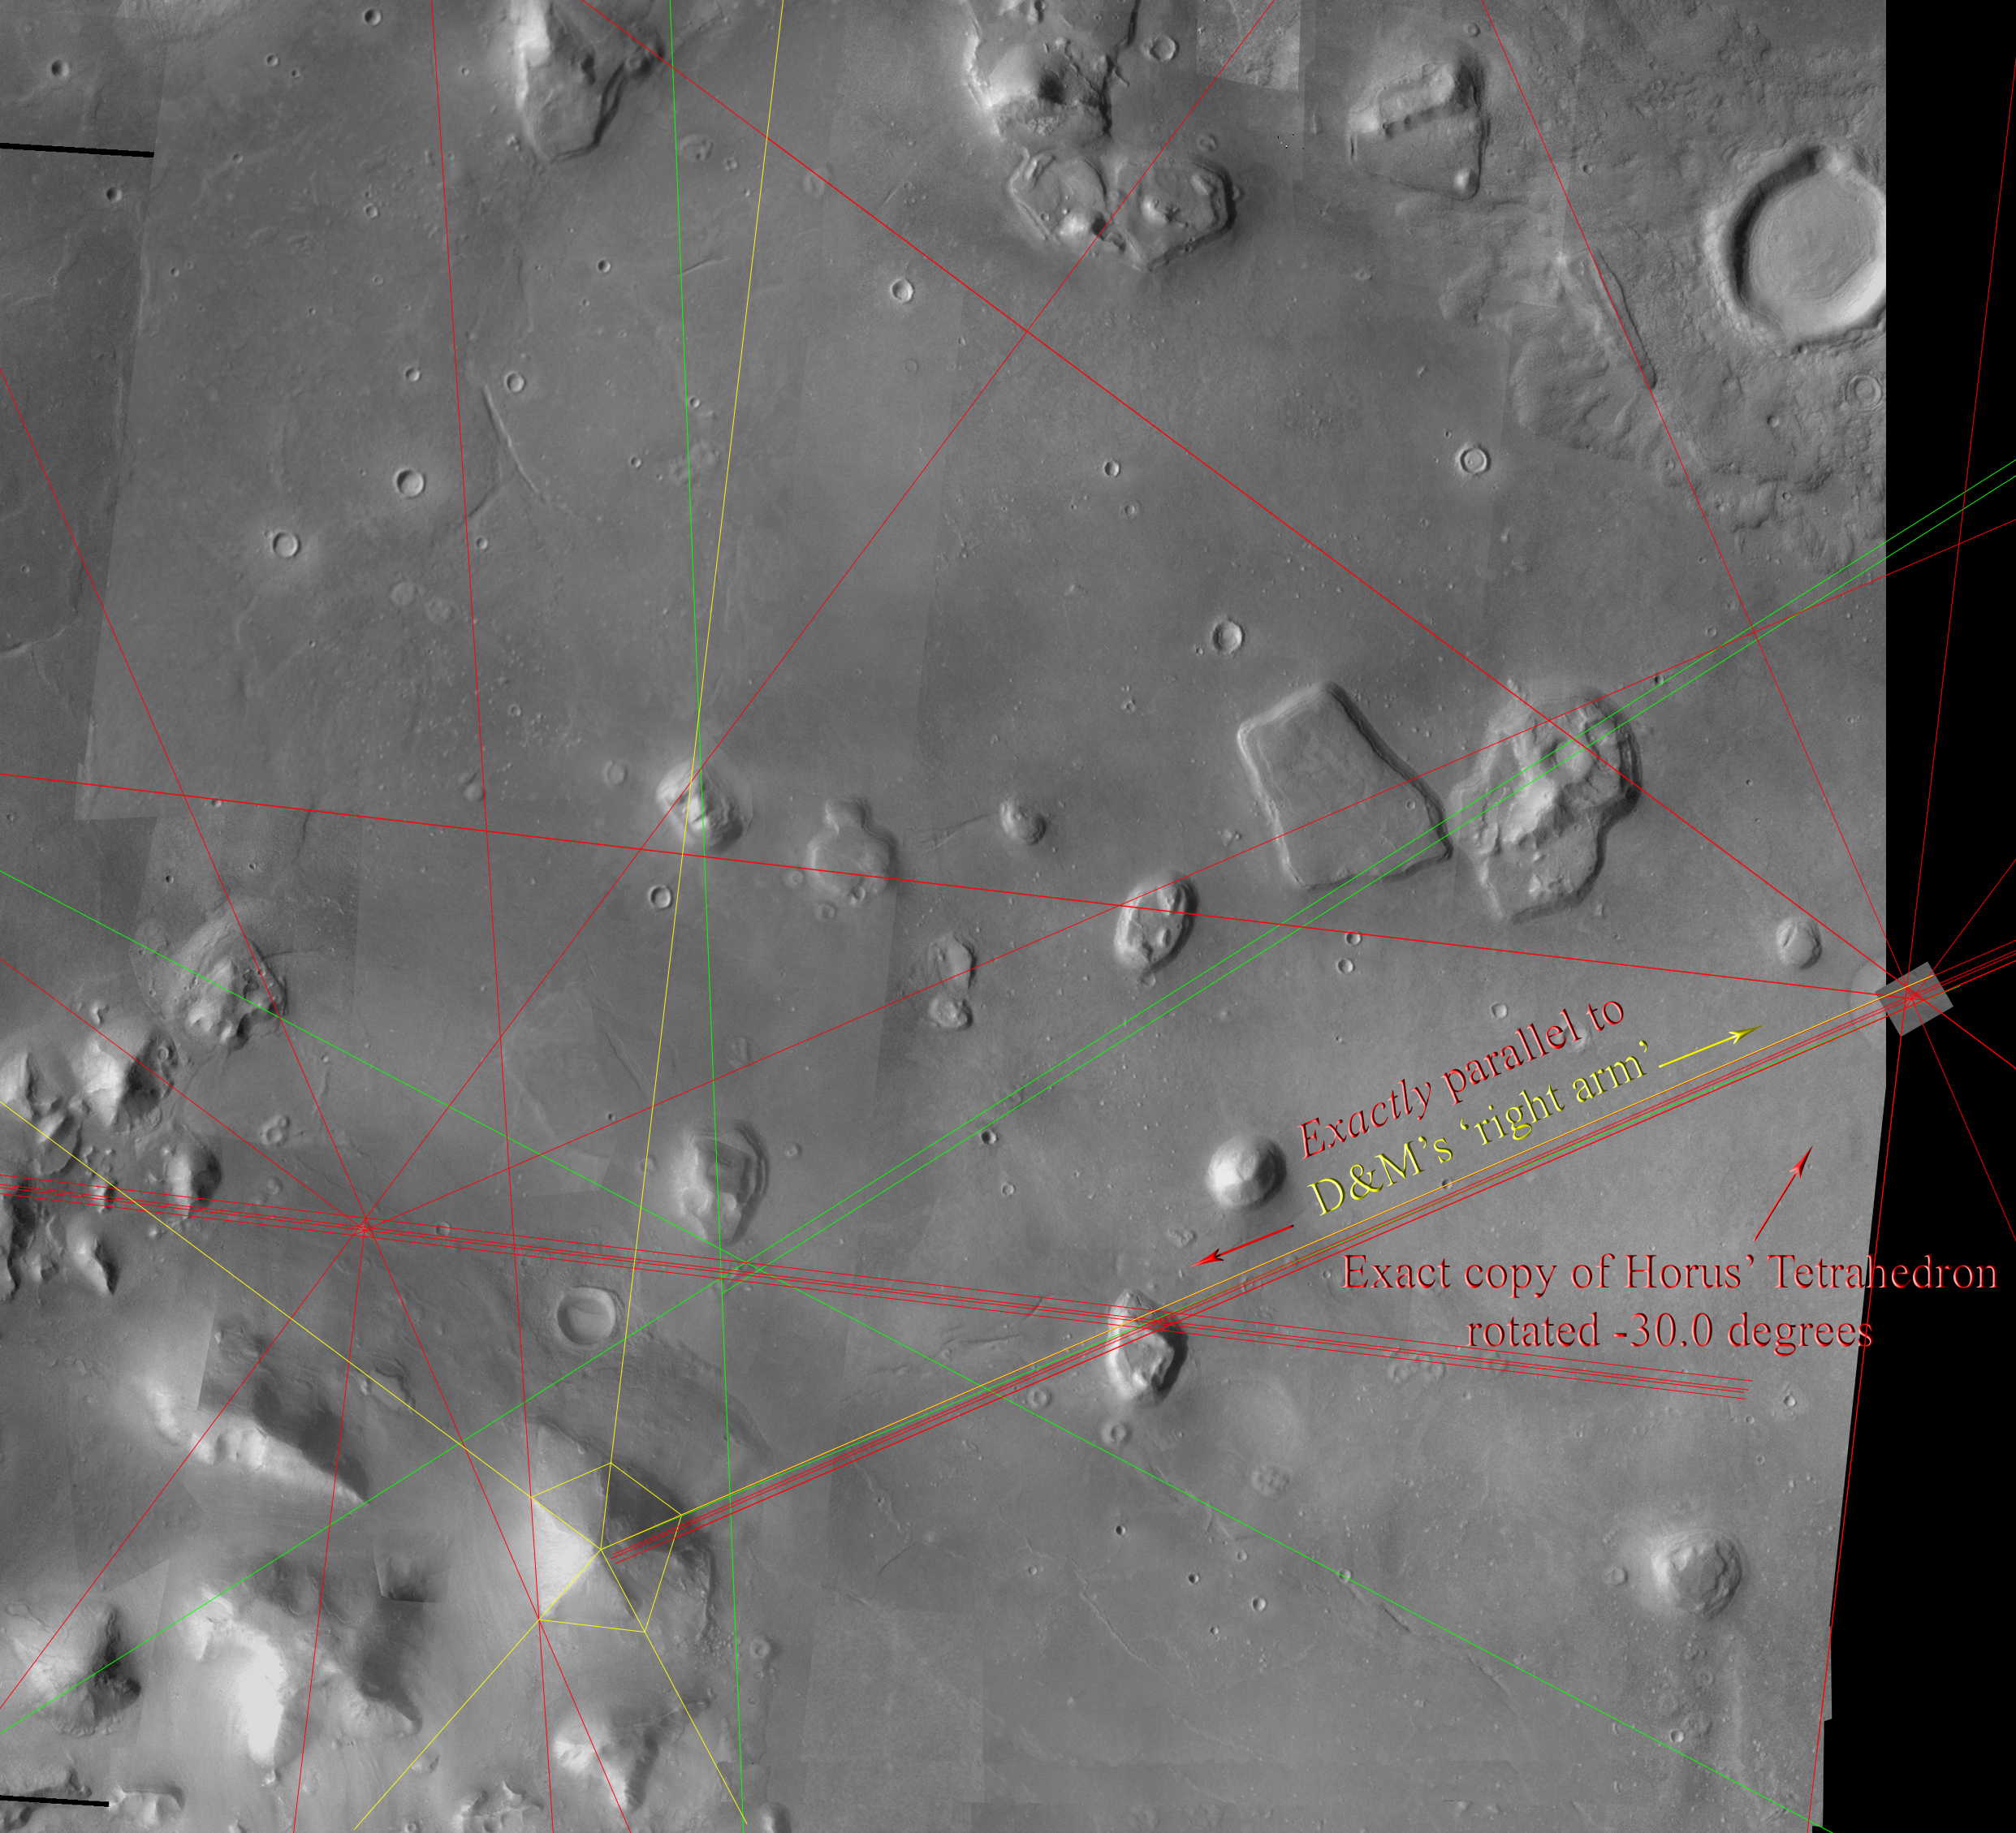
One can simply copy that line, duplicate it twice, rotate the lines appropriately and see that the lines correspond extremely well as I illustrate here...
(If this image isn't flashing, refresh the page)
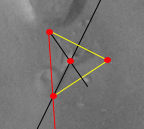
Now watch what happens if one applies Hoagland's measurement, 19.47 (bluish green) off the D&M's axis of symmetry (yellow).
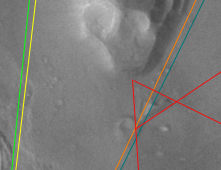
That line clearly does NOT pass through the apex of this 'ruined tetrahedron' as outlined by the neatly corresponding red lines I've provided.
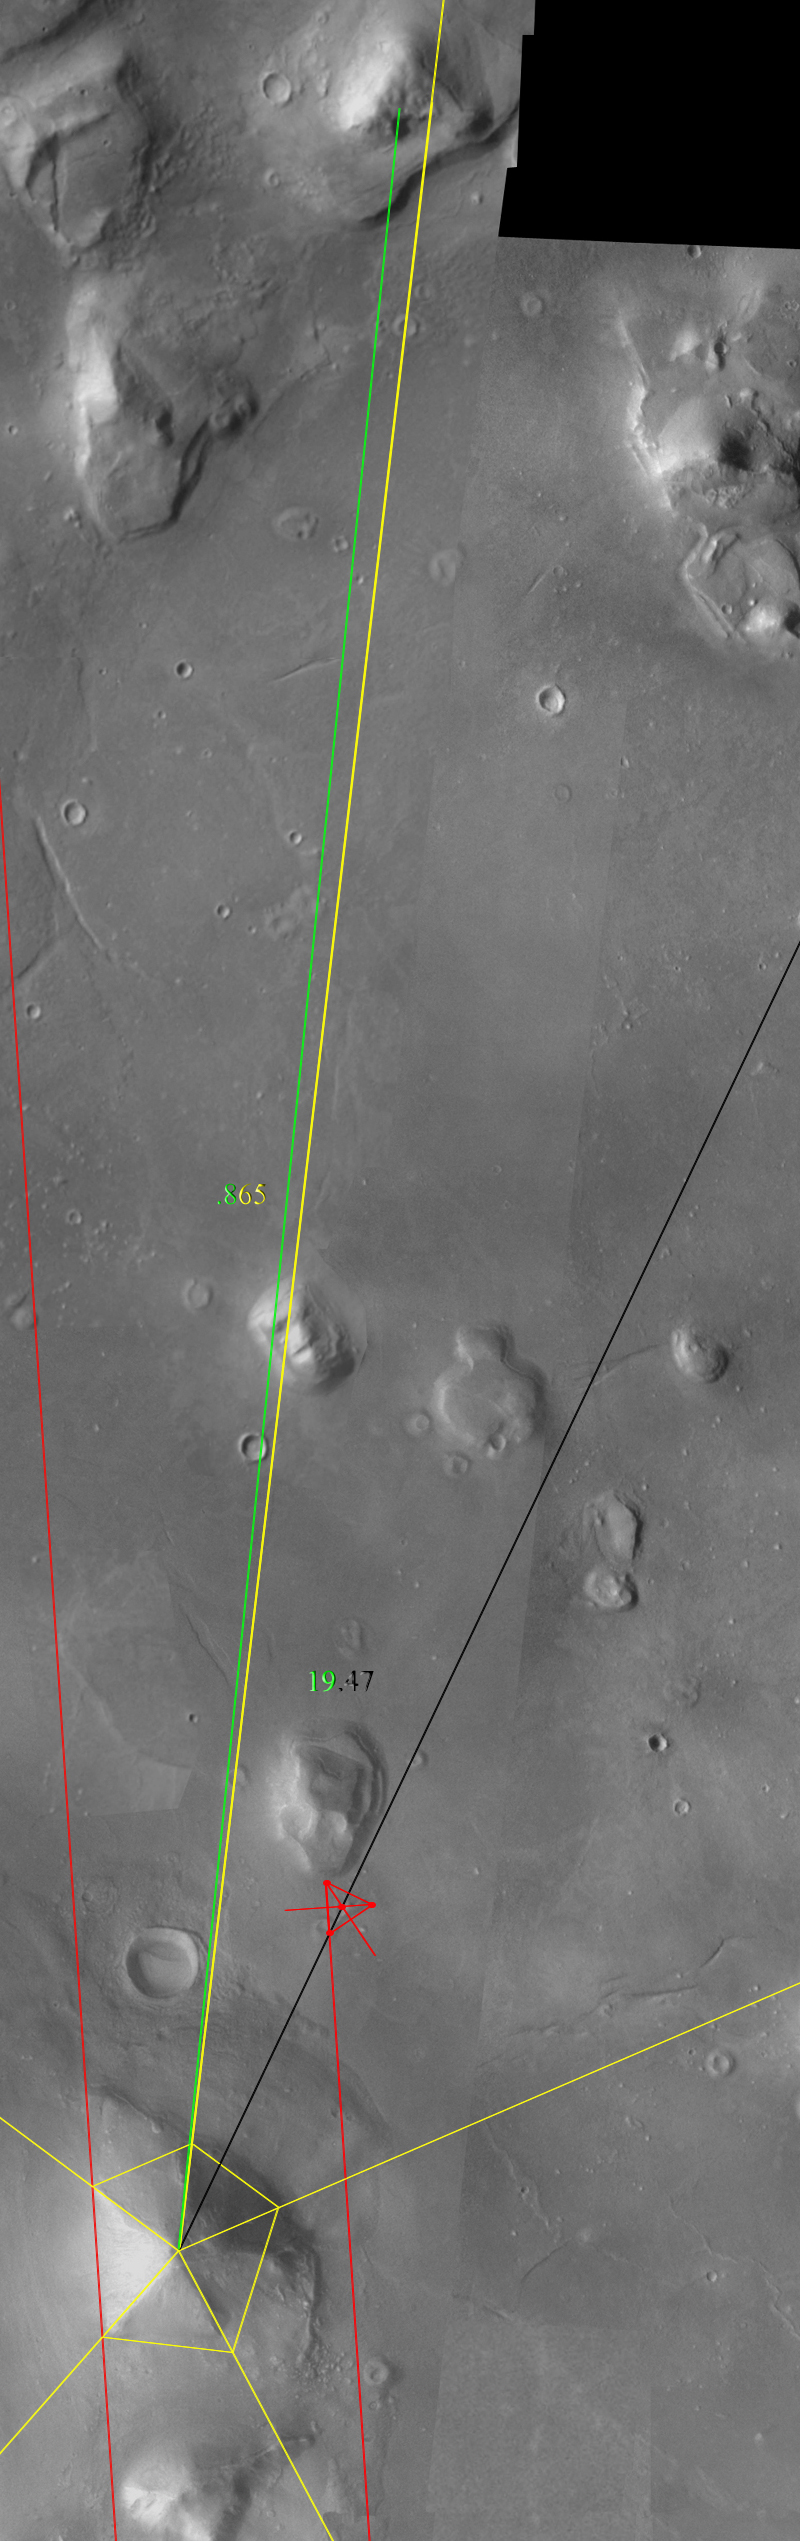
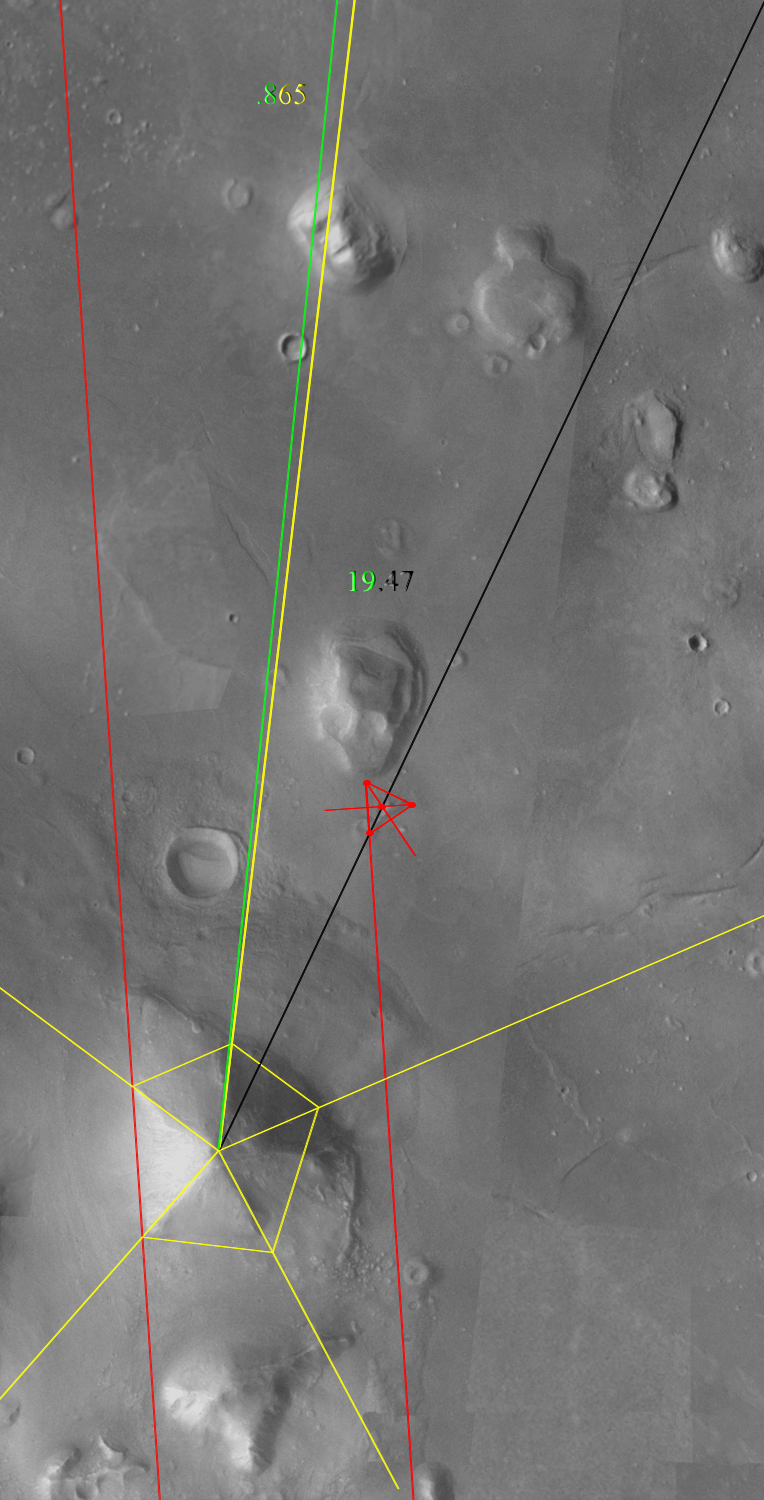
As one can see below, 19.47 off the green .865 line works perfectly.

Here is how I cut the corner...
I simply lowered the southern line... Because at a glance... the resolution of the image allowed me to get away with it.
Not at all unlike the misguided assumption I describe in "Stubborn Assumptions".
***
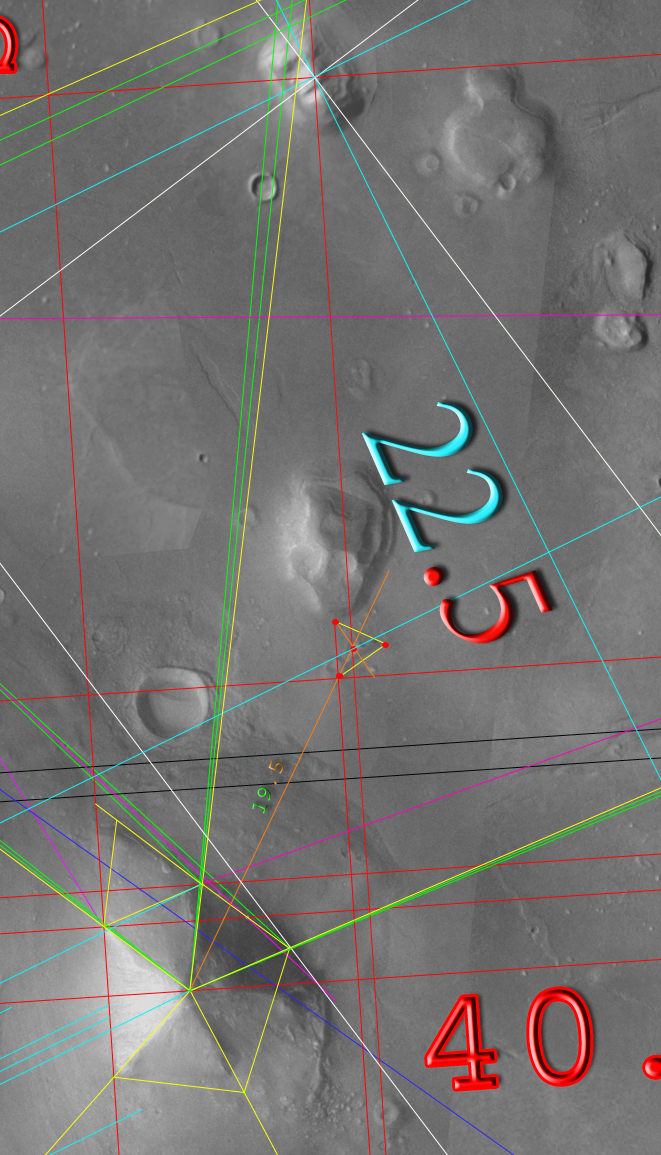
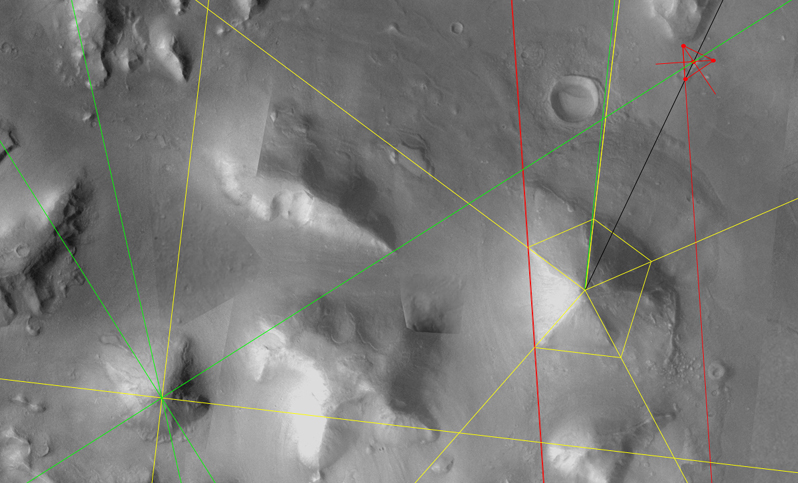
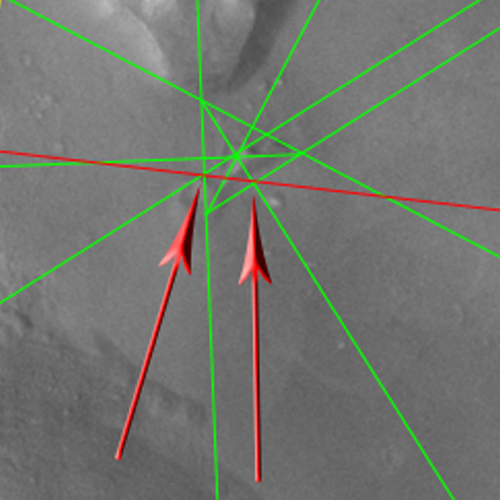
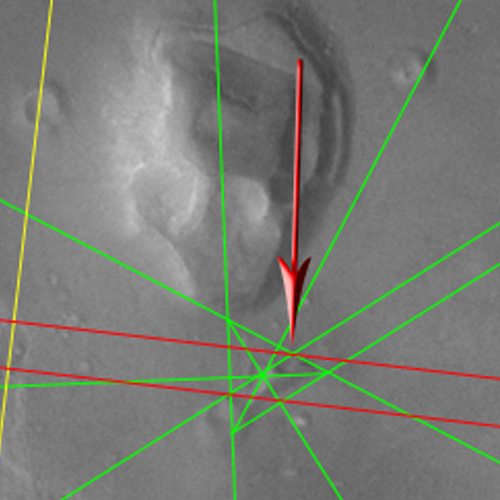
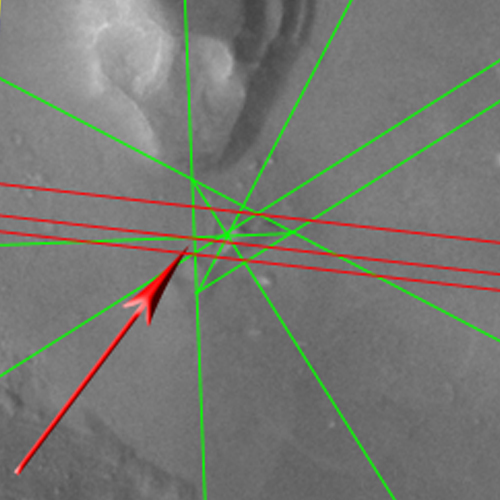
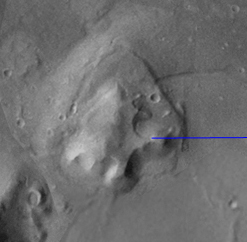
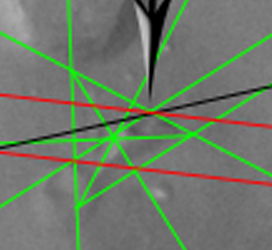
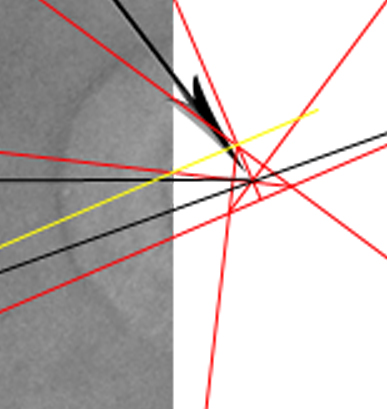
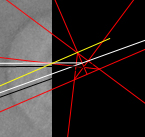
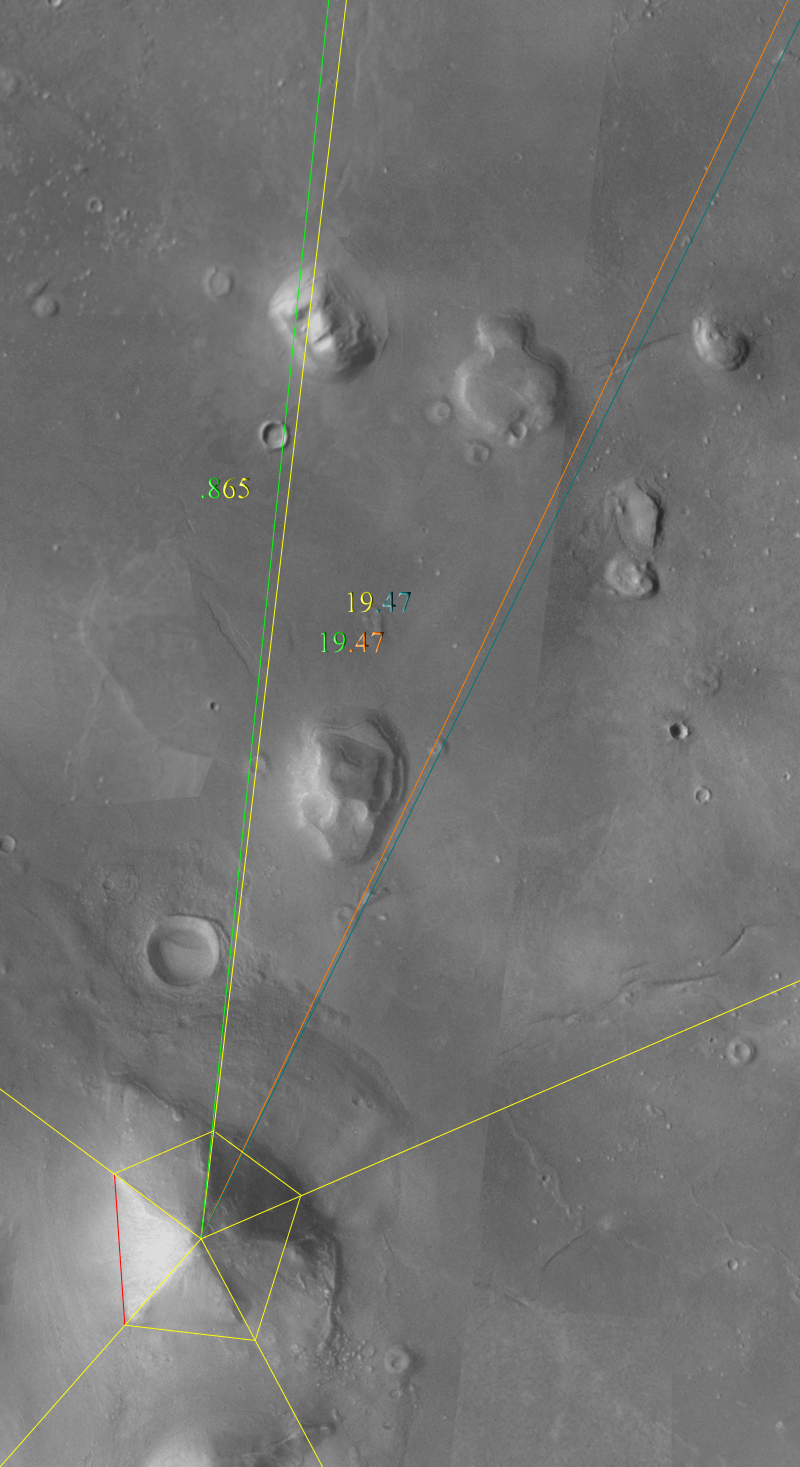
So... let's take a closer look...
Notice when viewed up close how far away the actual visible base of the 'ruined tetrahedron' is from the lower yellow line.
Again, to be clear, these measurements are constrained by two factors... 1) The resolution of the data. 2) The limitations of Photoshop's geometry software.
In this particular case, I am constrained far more by the image's resolution rather than Photoshop's measuring limits and my methods for getting around them.
Careful observation reveals my shortcut though, just as it did in my "Stubborn Assumptions" paper.
One can now begin to see what I mean about 'splitting hairs'.
This 19.47 measurement simply corresponds better to the visually perceptible data when measured off the green .865 line as opposed to the the D&M's axis of symmetry.
This discrepancy does nothing to mitigate any of the conclusions I laid out in my "Truth & Light" presentation or my "Stubborn Assumptions" paper.
All it does is reinforce what I said on slide # 145 of Truth & Light...
What I said then, still holds true today.
In fact, I'm anxious to see if & how people 'split the hairs' I've learned to split over the past 4 years.
Seeing how others improve upon my methods will be very rewarding for me.
Hopefully, we will all endeavor to...
"Keep going".
***
(Update, 07/02/09)
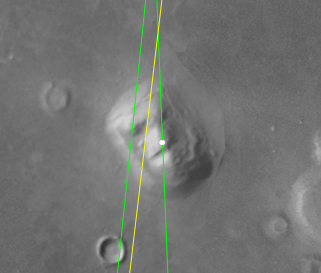
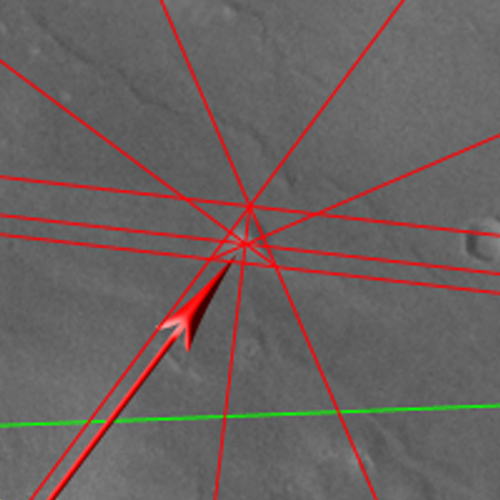
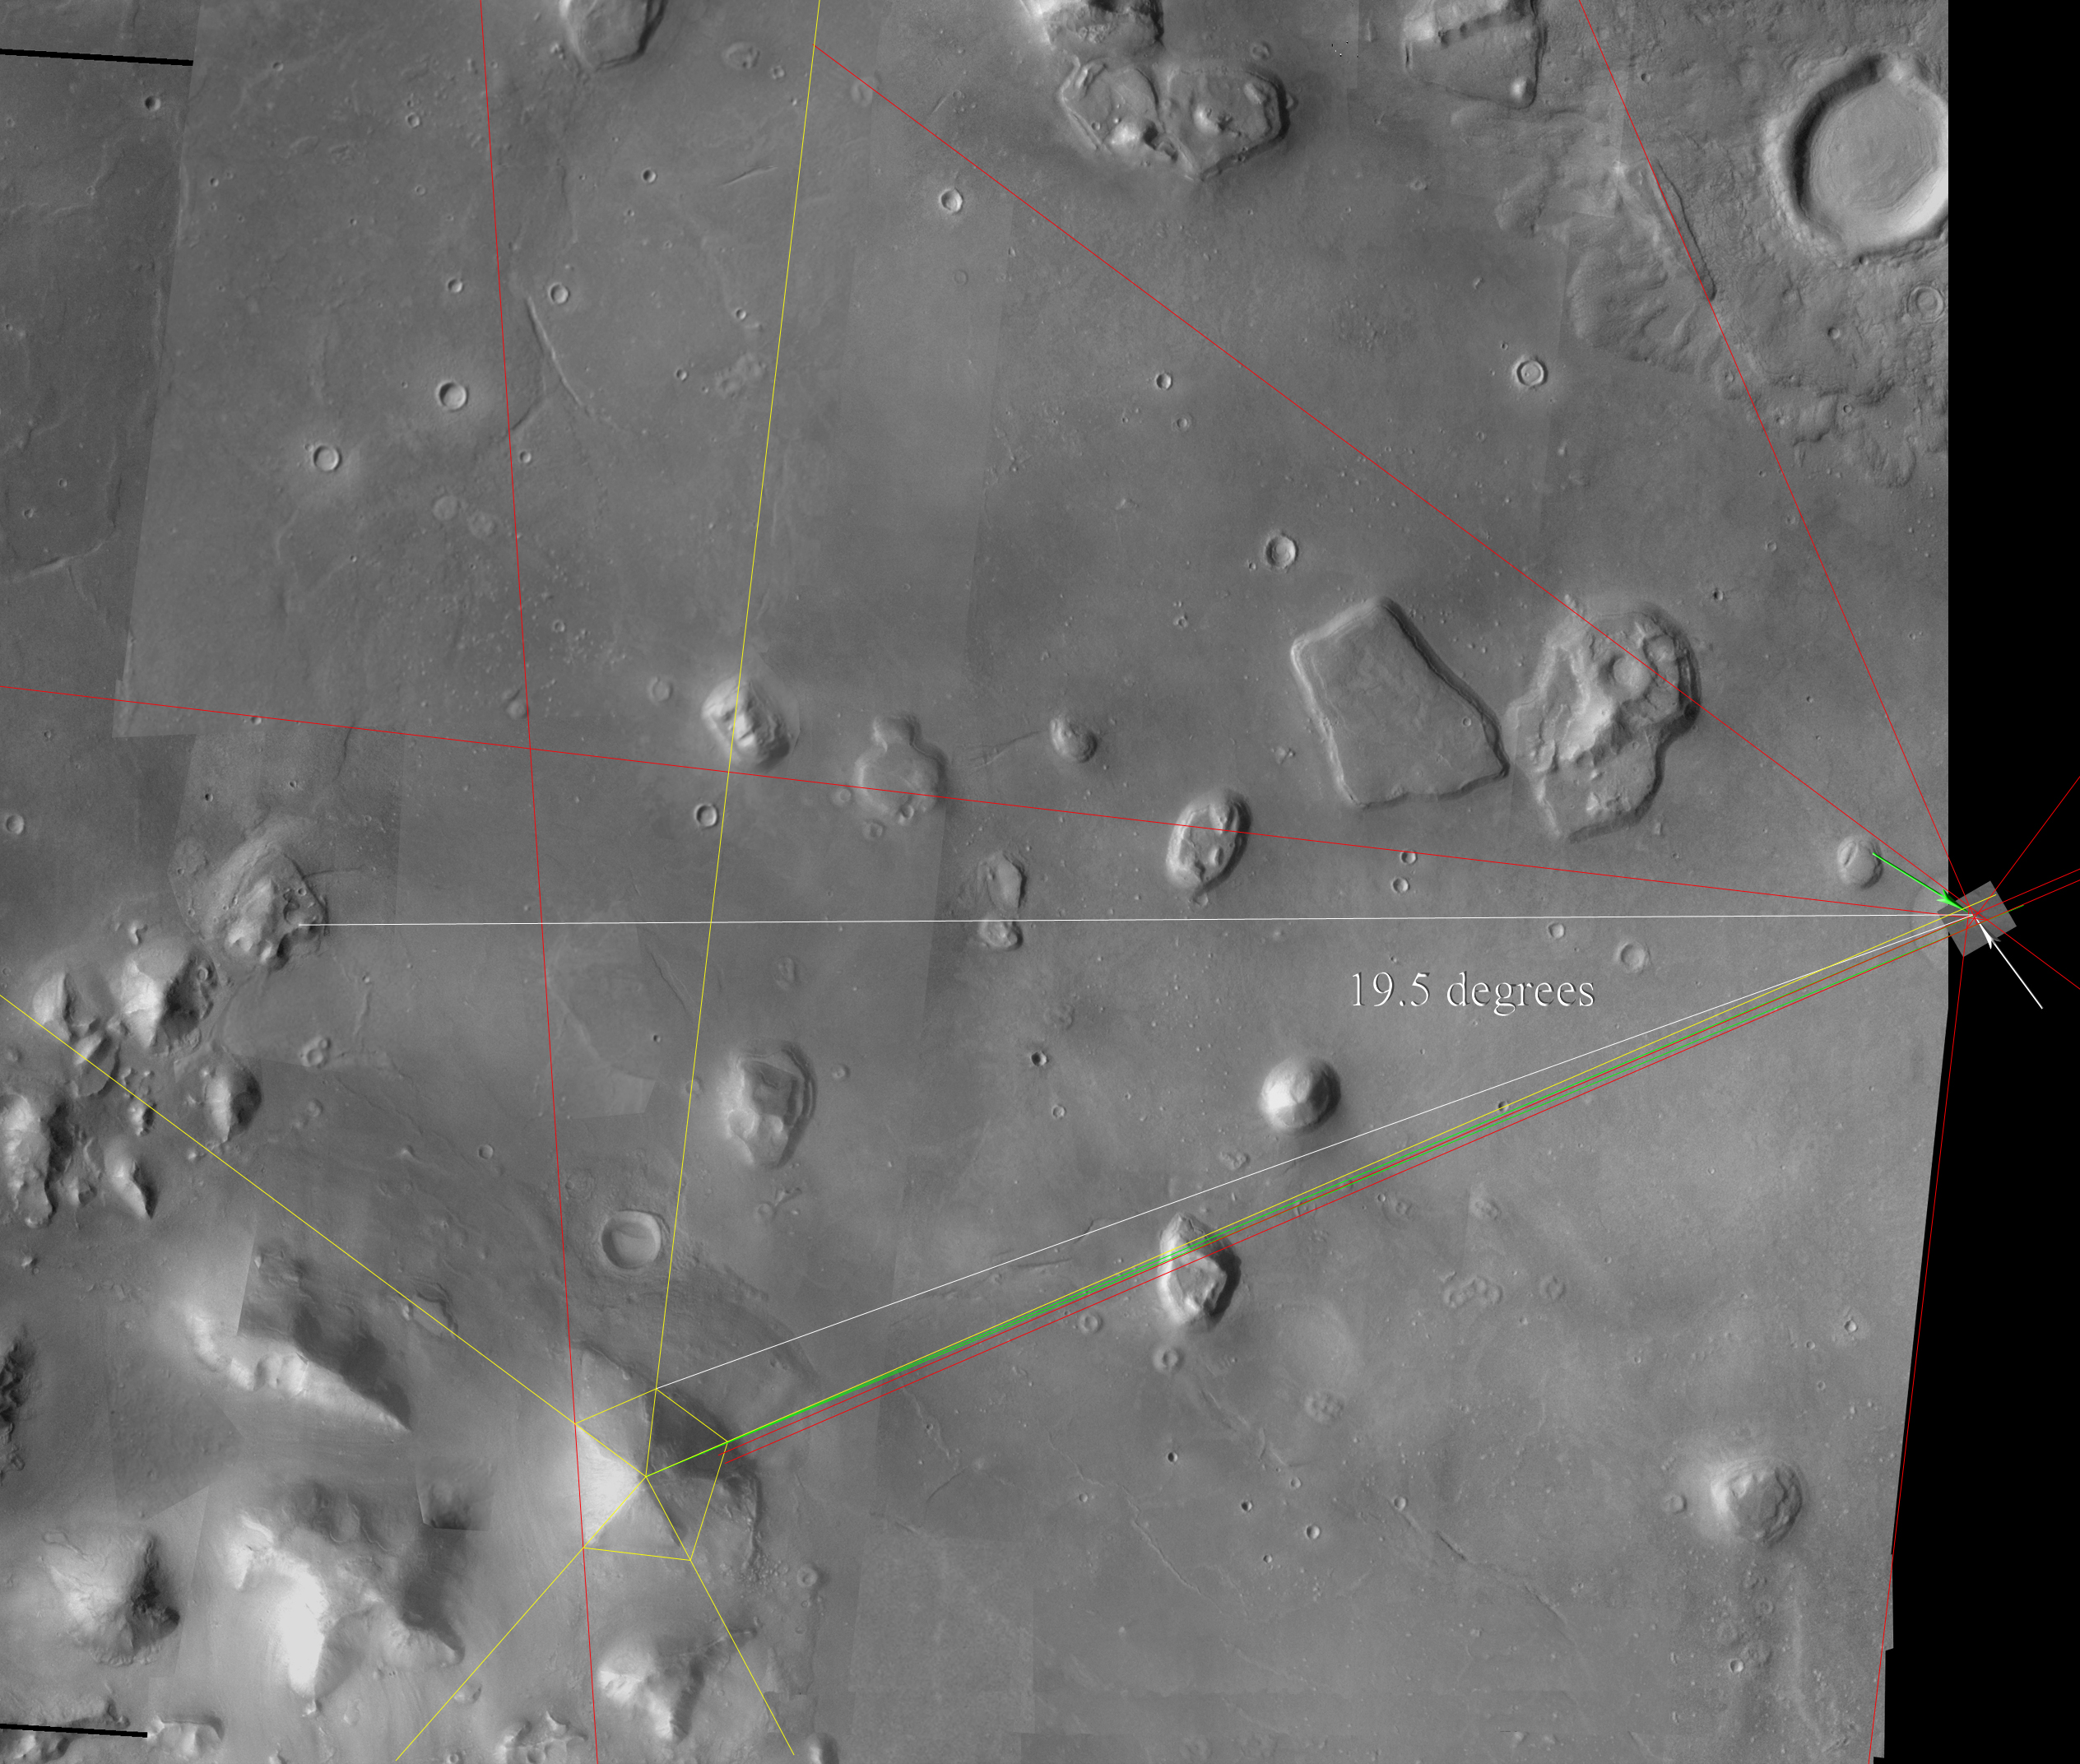
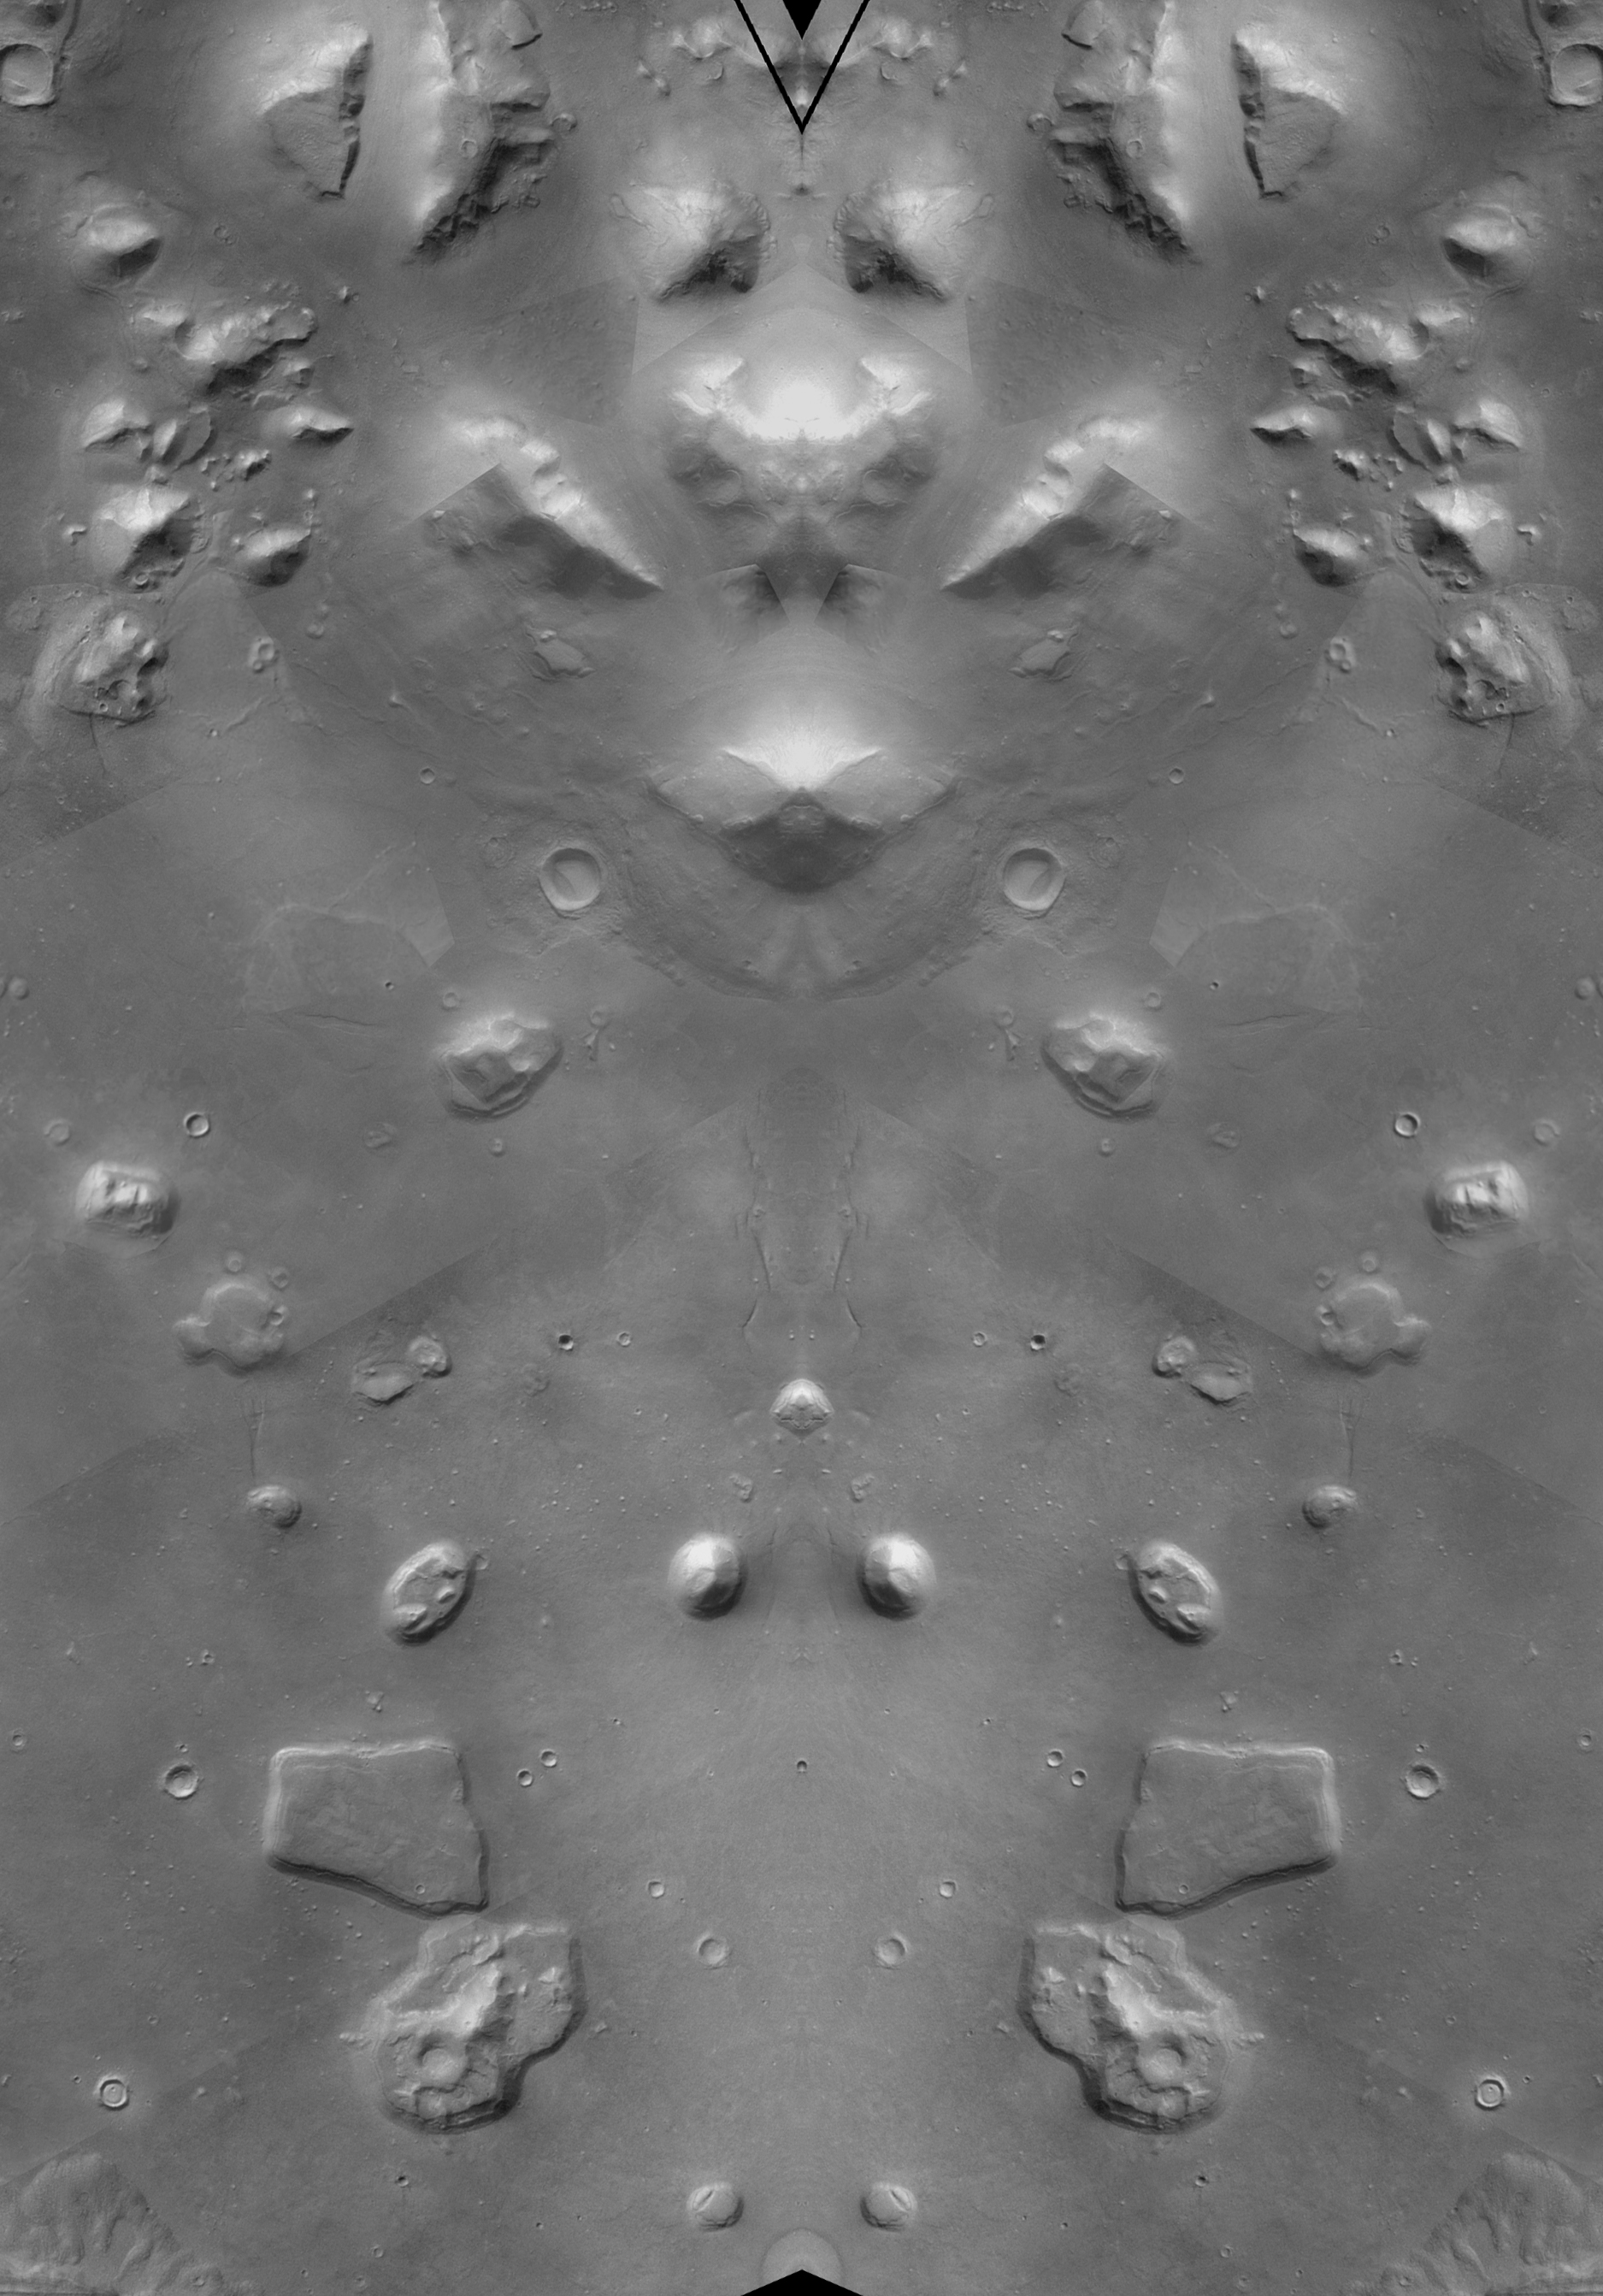
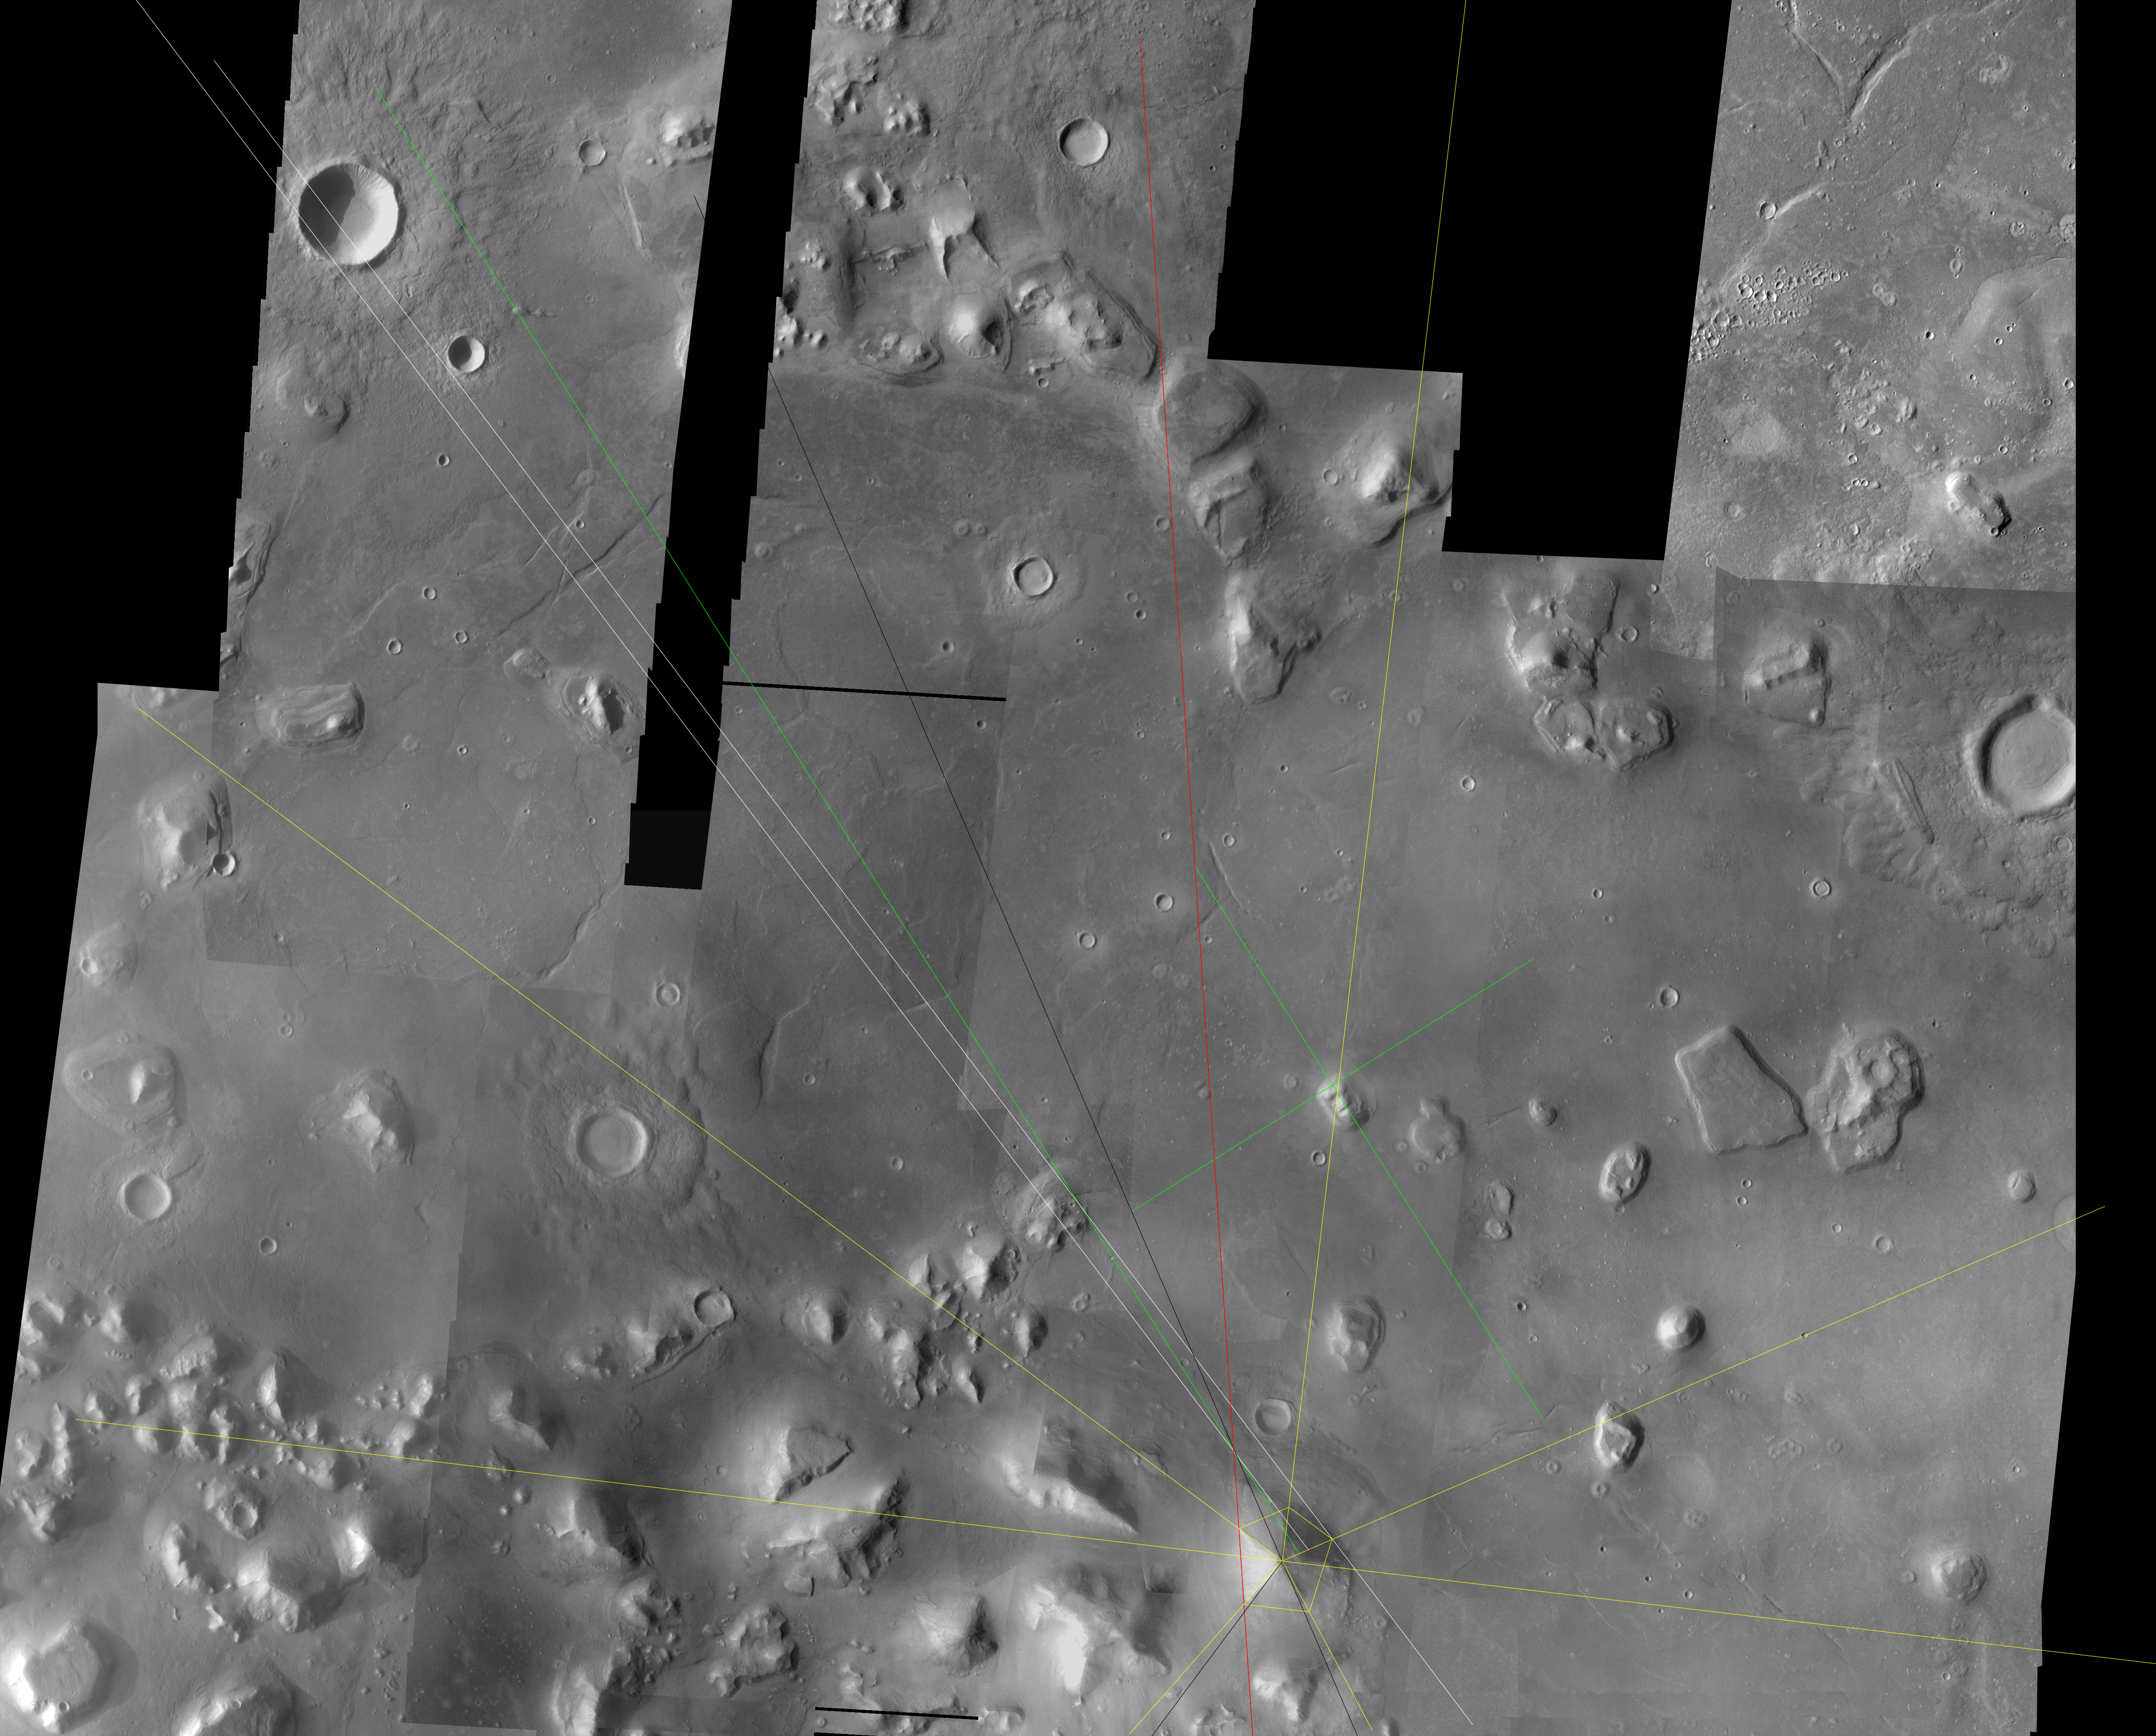
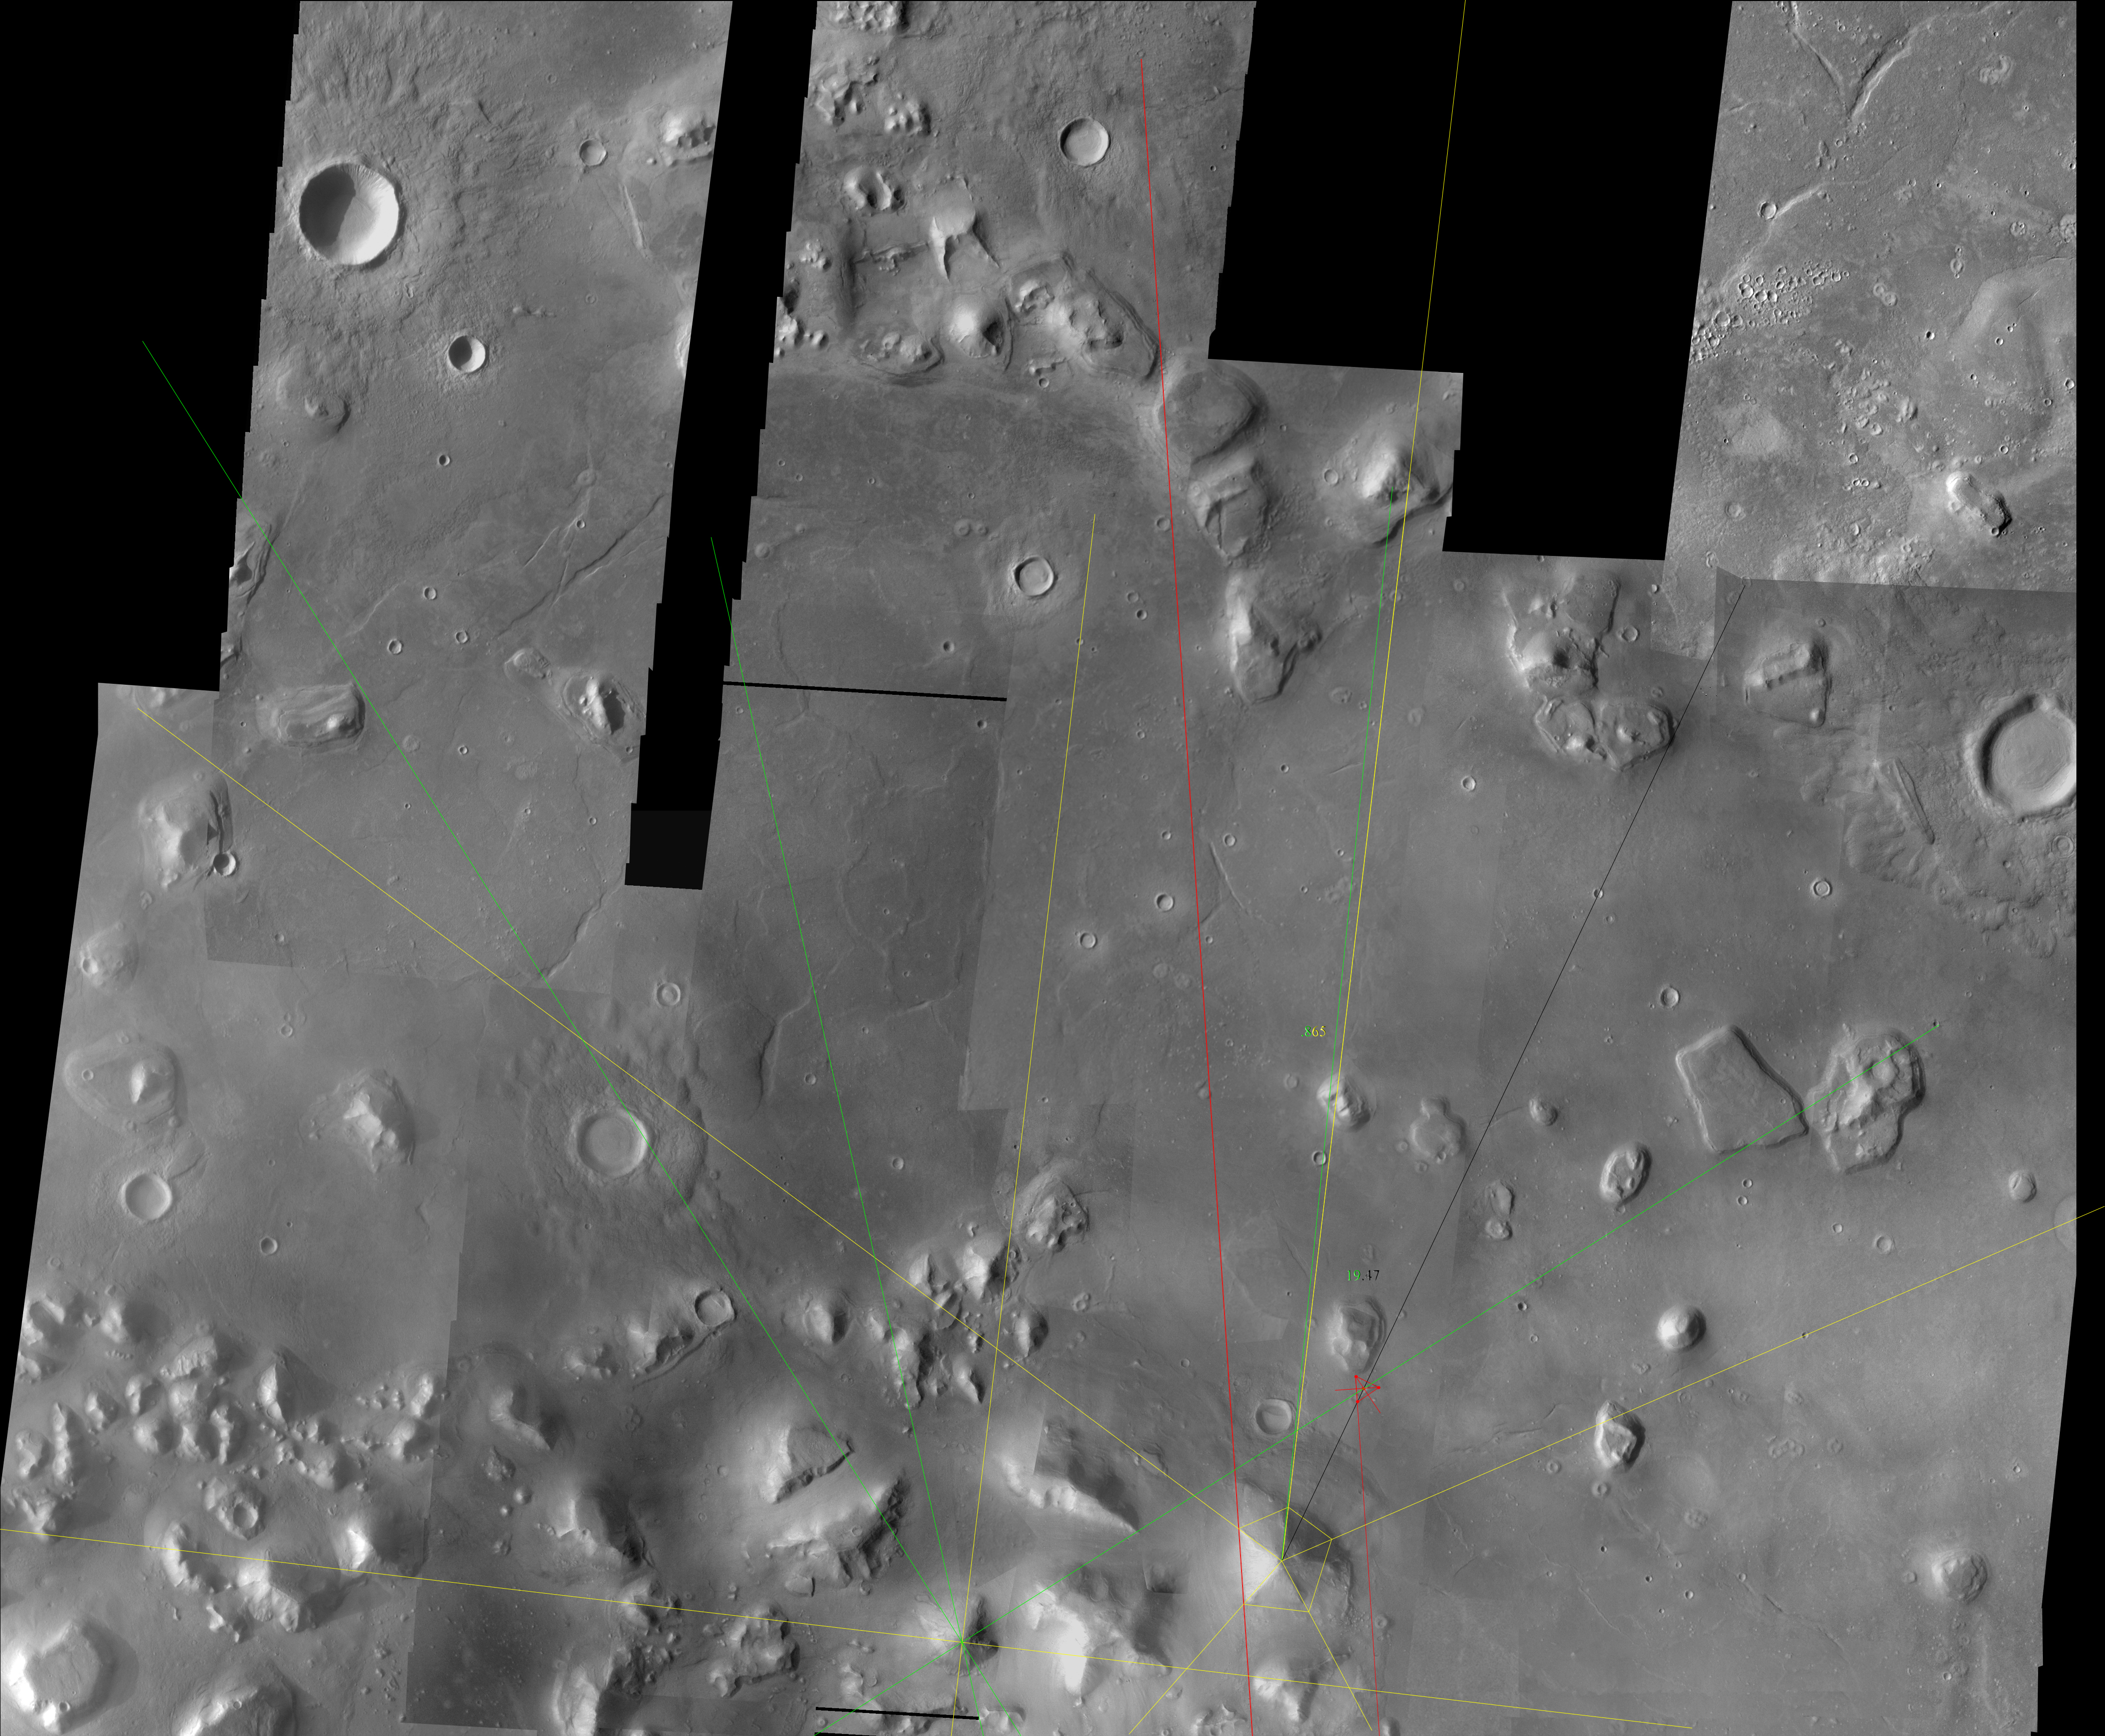
To further support my measurement versus Hoagland's, have a look at what happened while I was working on The Key.
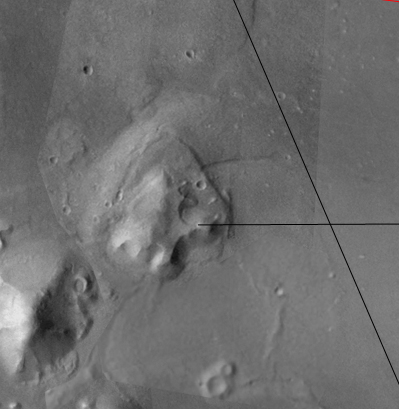
The 19.5 line, which reveals this specific reflection,
... applied to Gary's mosaic, passes through two very specific points.
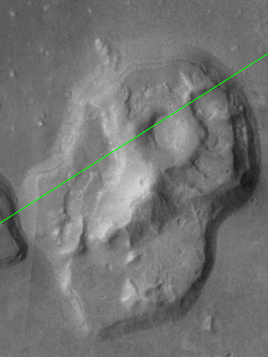
The first point through which the line passes is the apex of the "Ruined Tetrahedron" where I have carefully measured it to be.
The second point is here.
I go into some detail about the significance of this pyramid in The Key.
Simply compare where that same exact line intersects on Hoagland's measurement.

***
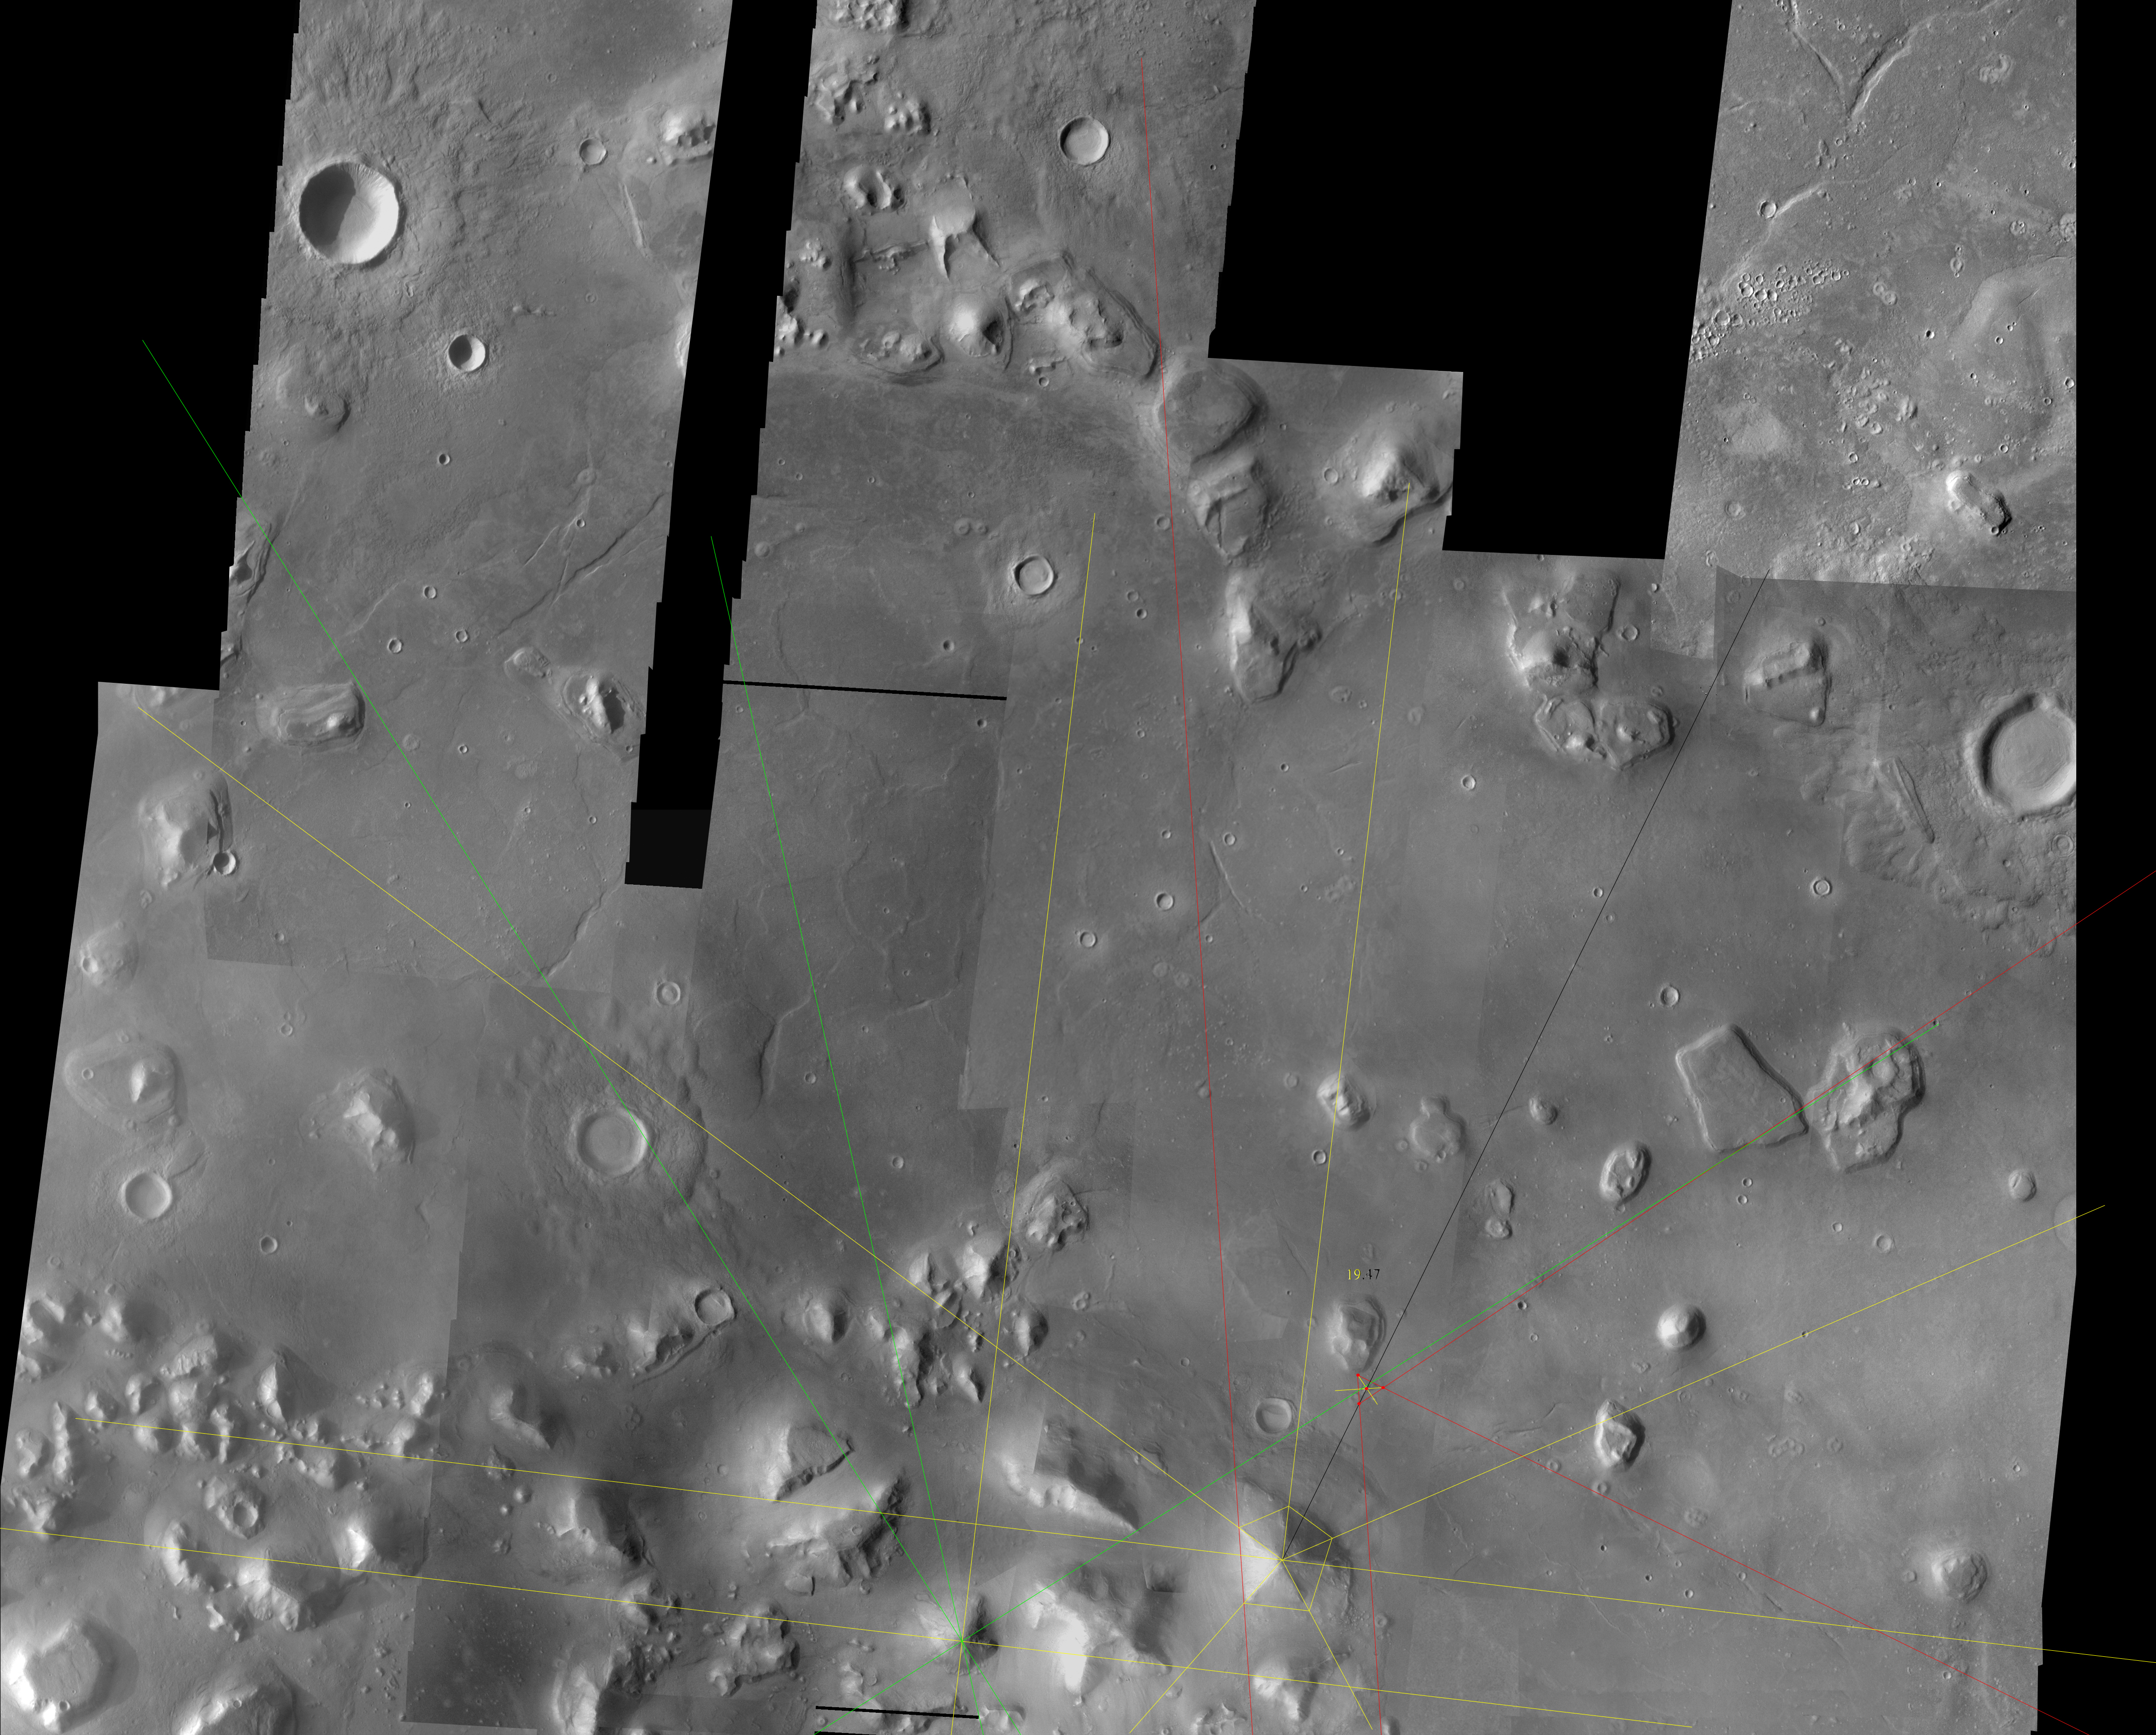
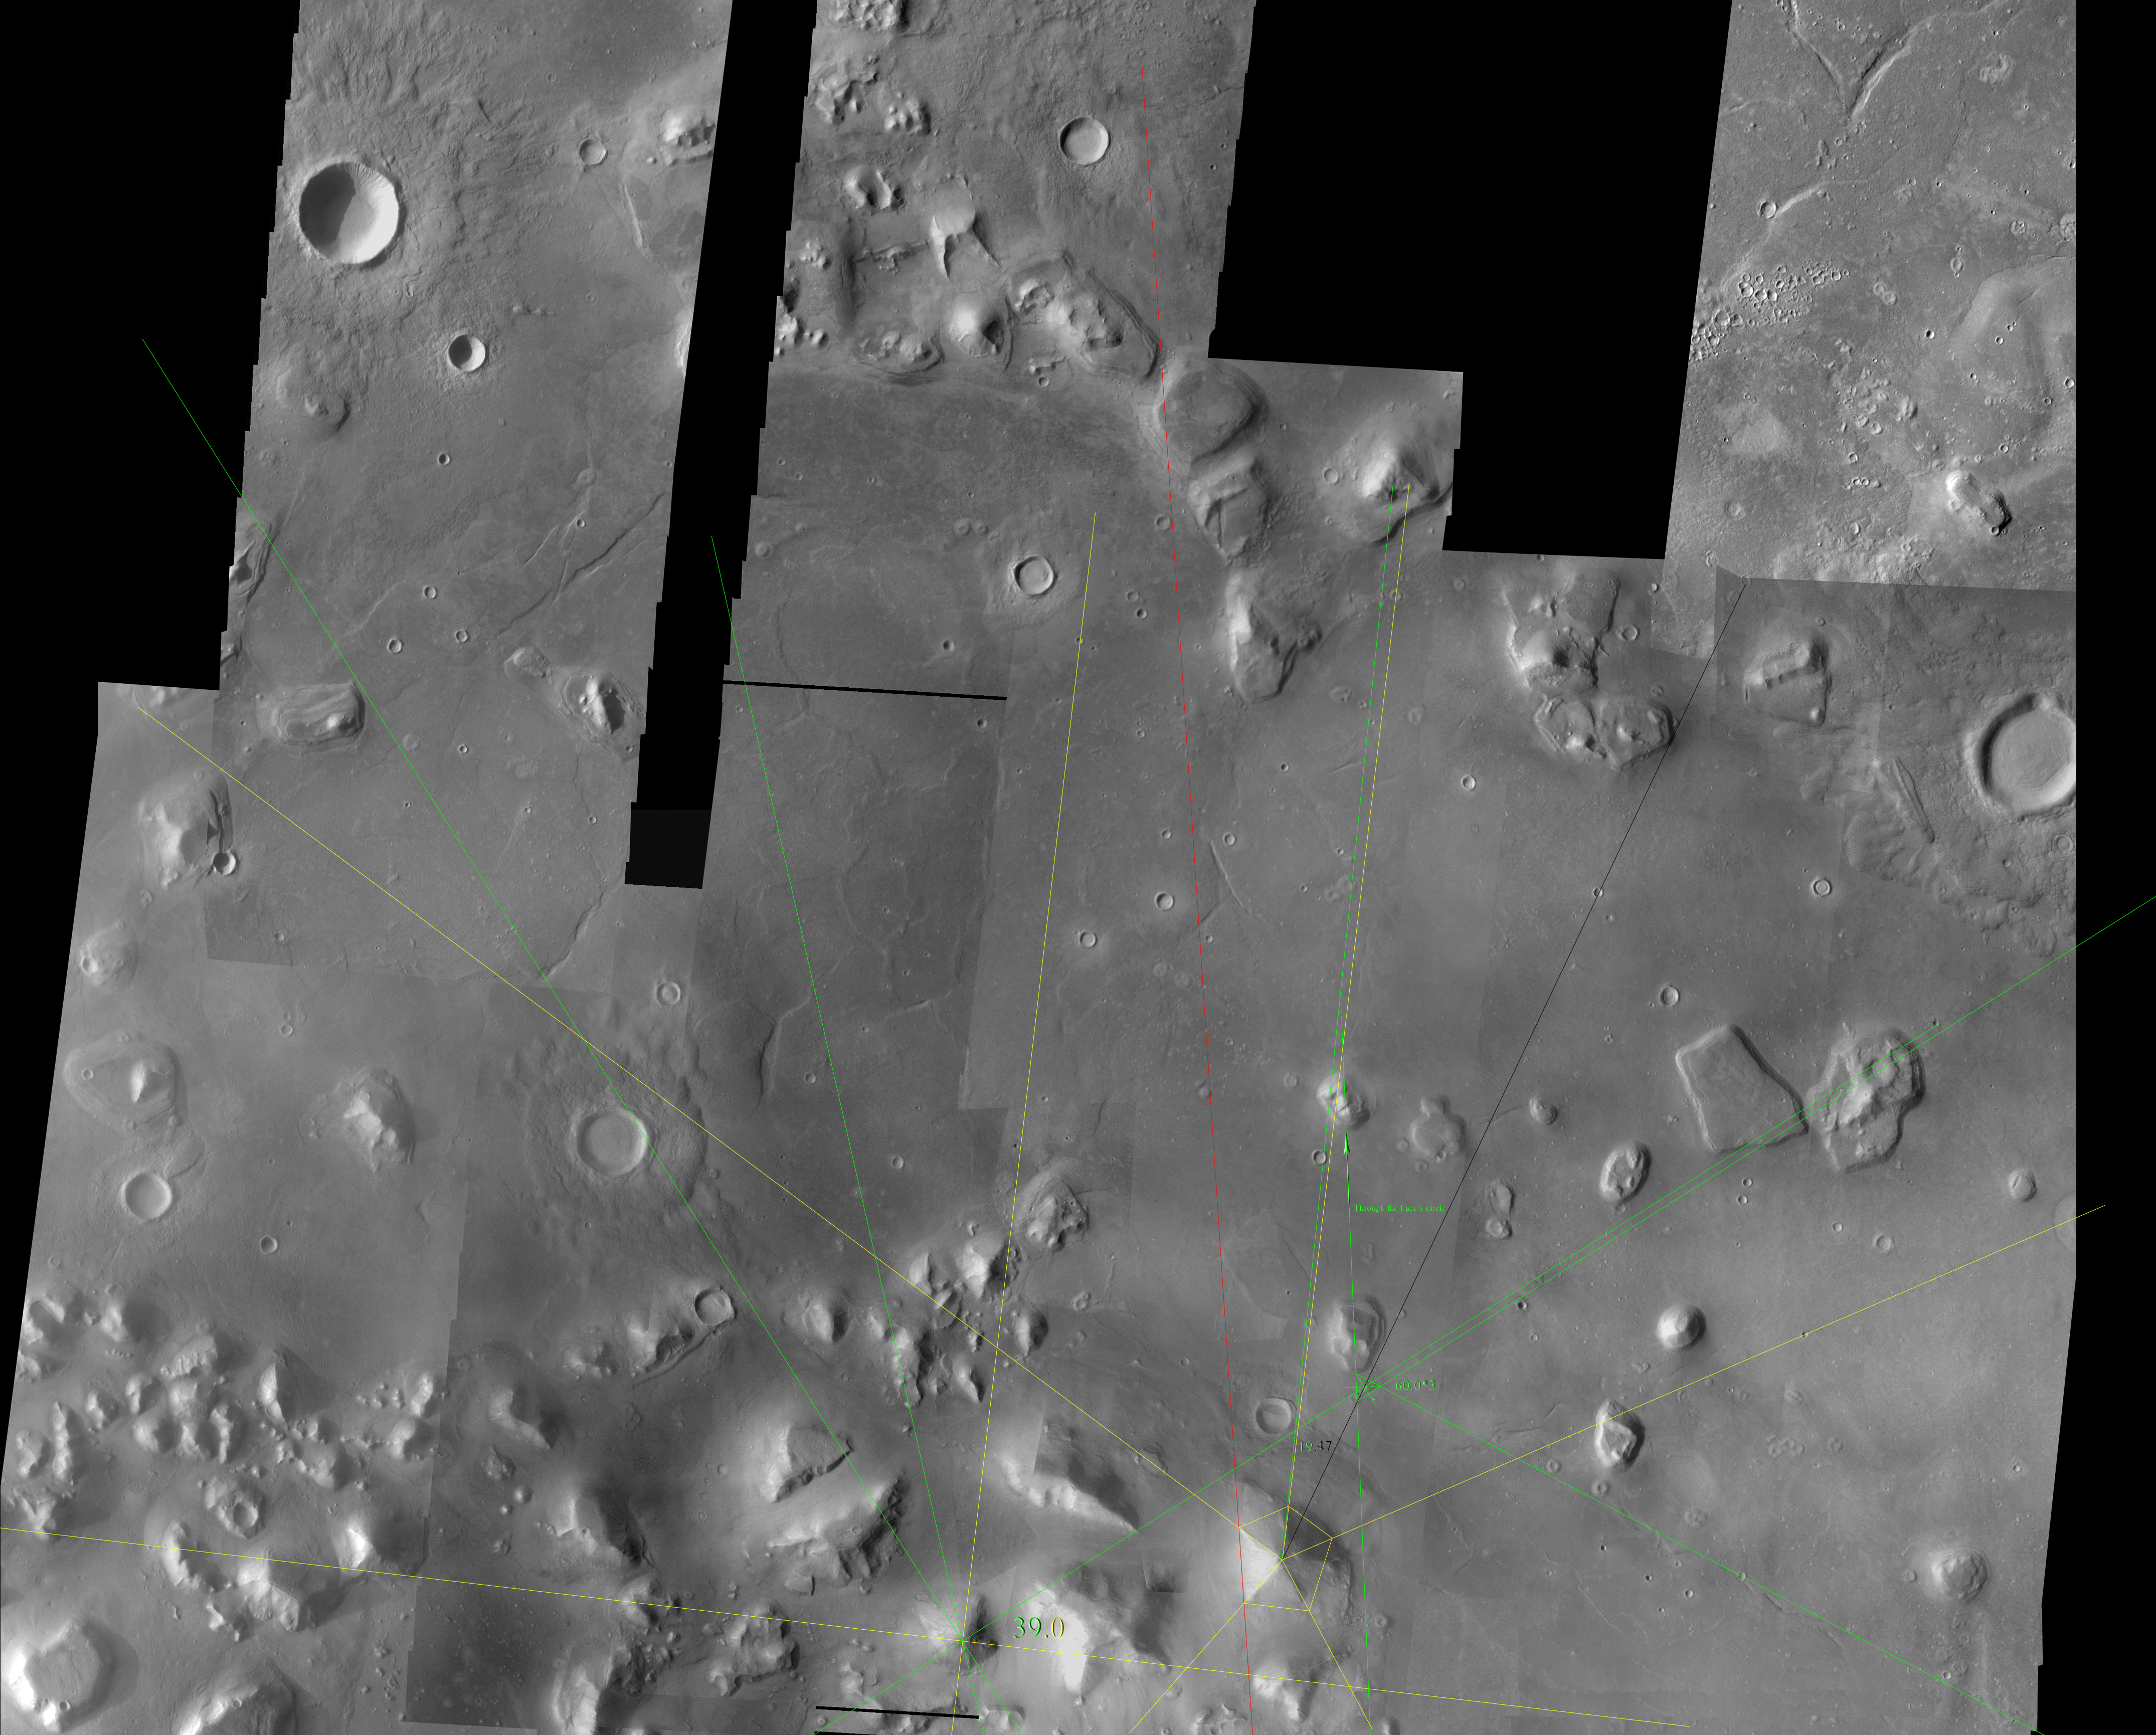
(Update, 07/02/09)
This new 19.5 line has given me a good reason to test my previous assumption about the alignments of the bases for this tetrahedron.
Notice how parallel the line seems to be to the southern base.
(If this image isn't flashing, refresh the page)
Look what happens if I just copy this line twice and rotate those lines 60 and -60 degrees respectively.
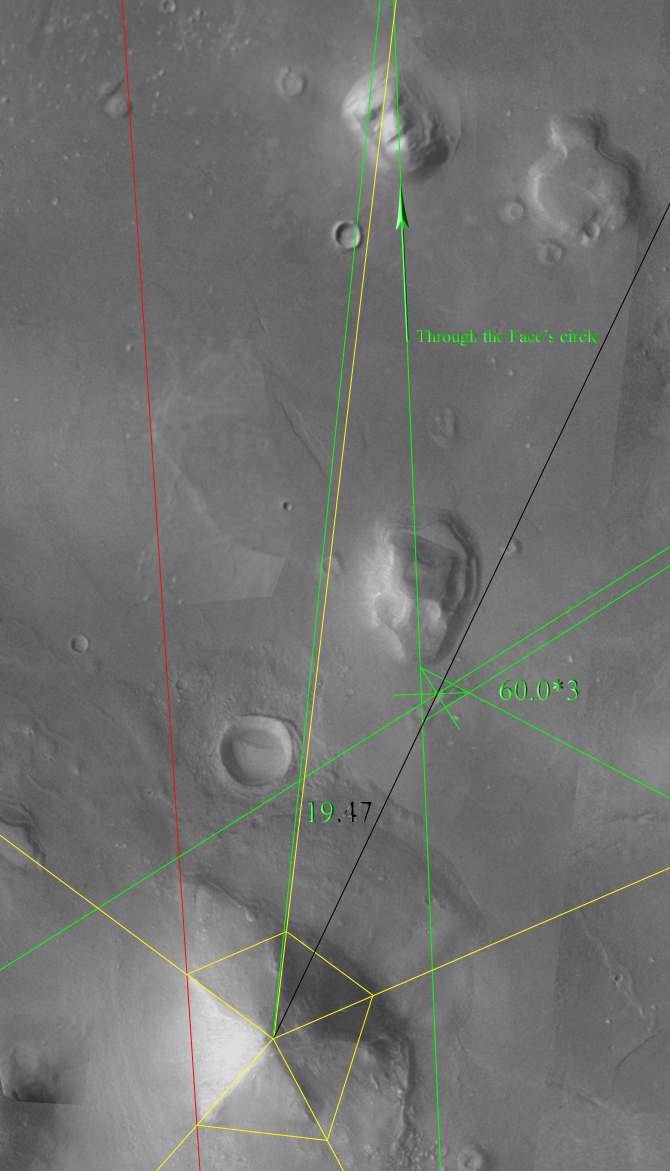
The western base of this tetrahedron now has purpose as it passes straight through the Face's circle.
Utilizing the D&M's western base for set up, as I have throughout this paper, passes very close, but not precisely tangent to, the Face's 'Tear Drop'.
Close but no cigar is not nearly as provocative, suggestive, or precise, as passing through the exact center of the Face's circle.
While this discrepancy of 1.5 degrees isn't exactly hair splitting for Photoshop, it is hair splitting if one considers the resolution of the image and only looks at the 'Ruined Tetrahedron' by itself which isn't very large.
Being able to take advantage of several long range alignments allows one to accurately split the hairs imposed by the image's resolution effectively bringing this 'Ruined Tetrahedron' back into form and focus.
***
(Note: Clickable images lead to full resolution version)
My father, the genius engineer that he was, used to love to share this anecdote.
"There was this company that specialized in making wire.
They manufactured all kinds of wire that ranged the spectrum in terms of material, thickness, and strength.
After years of research, they proudly announced that they had developed and were now able to reliably produce the strongest and (most importantly) thinnest wire ever made.
Upon reading this claim, which was published in their industry's trade magazine, a Swiss company arranged to acquire a sample of this incredibly thin piece of wire.
The next issue of that same trade magazine's cover read:
"Swiss company splits wire in half, offers ultra-strong wire half the diameter of the competition."
I loved it when he alluded to that story because it usually meant he was about to show me how he was about to vastly improve something.
I share this now because something I've been struggling with from the very beginning has finally fallen into place.
It has fallen into place by splitting the hairs previously split nearly a year ago... in half.
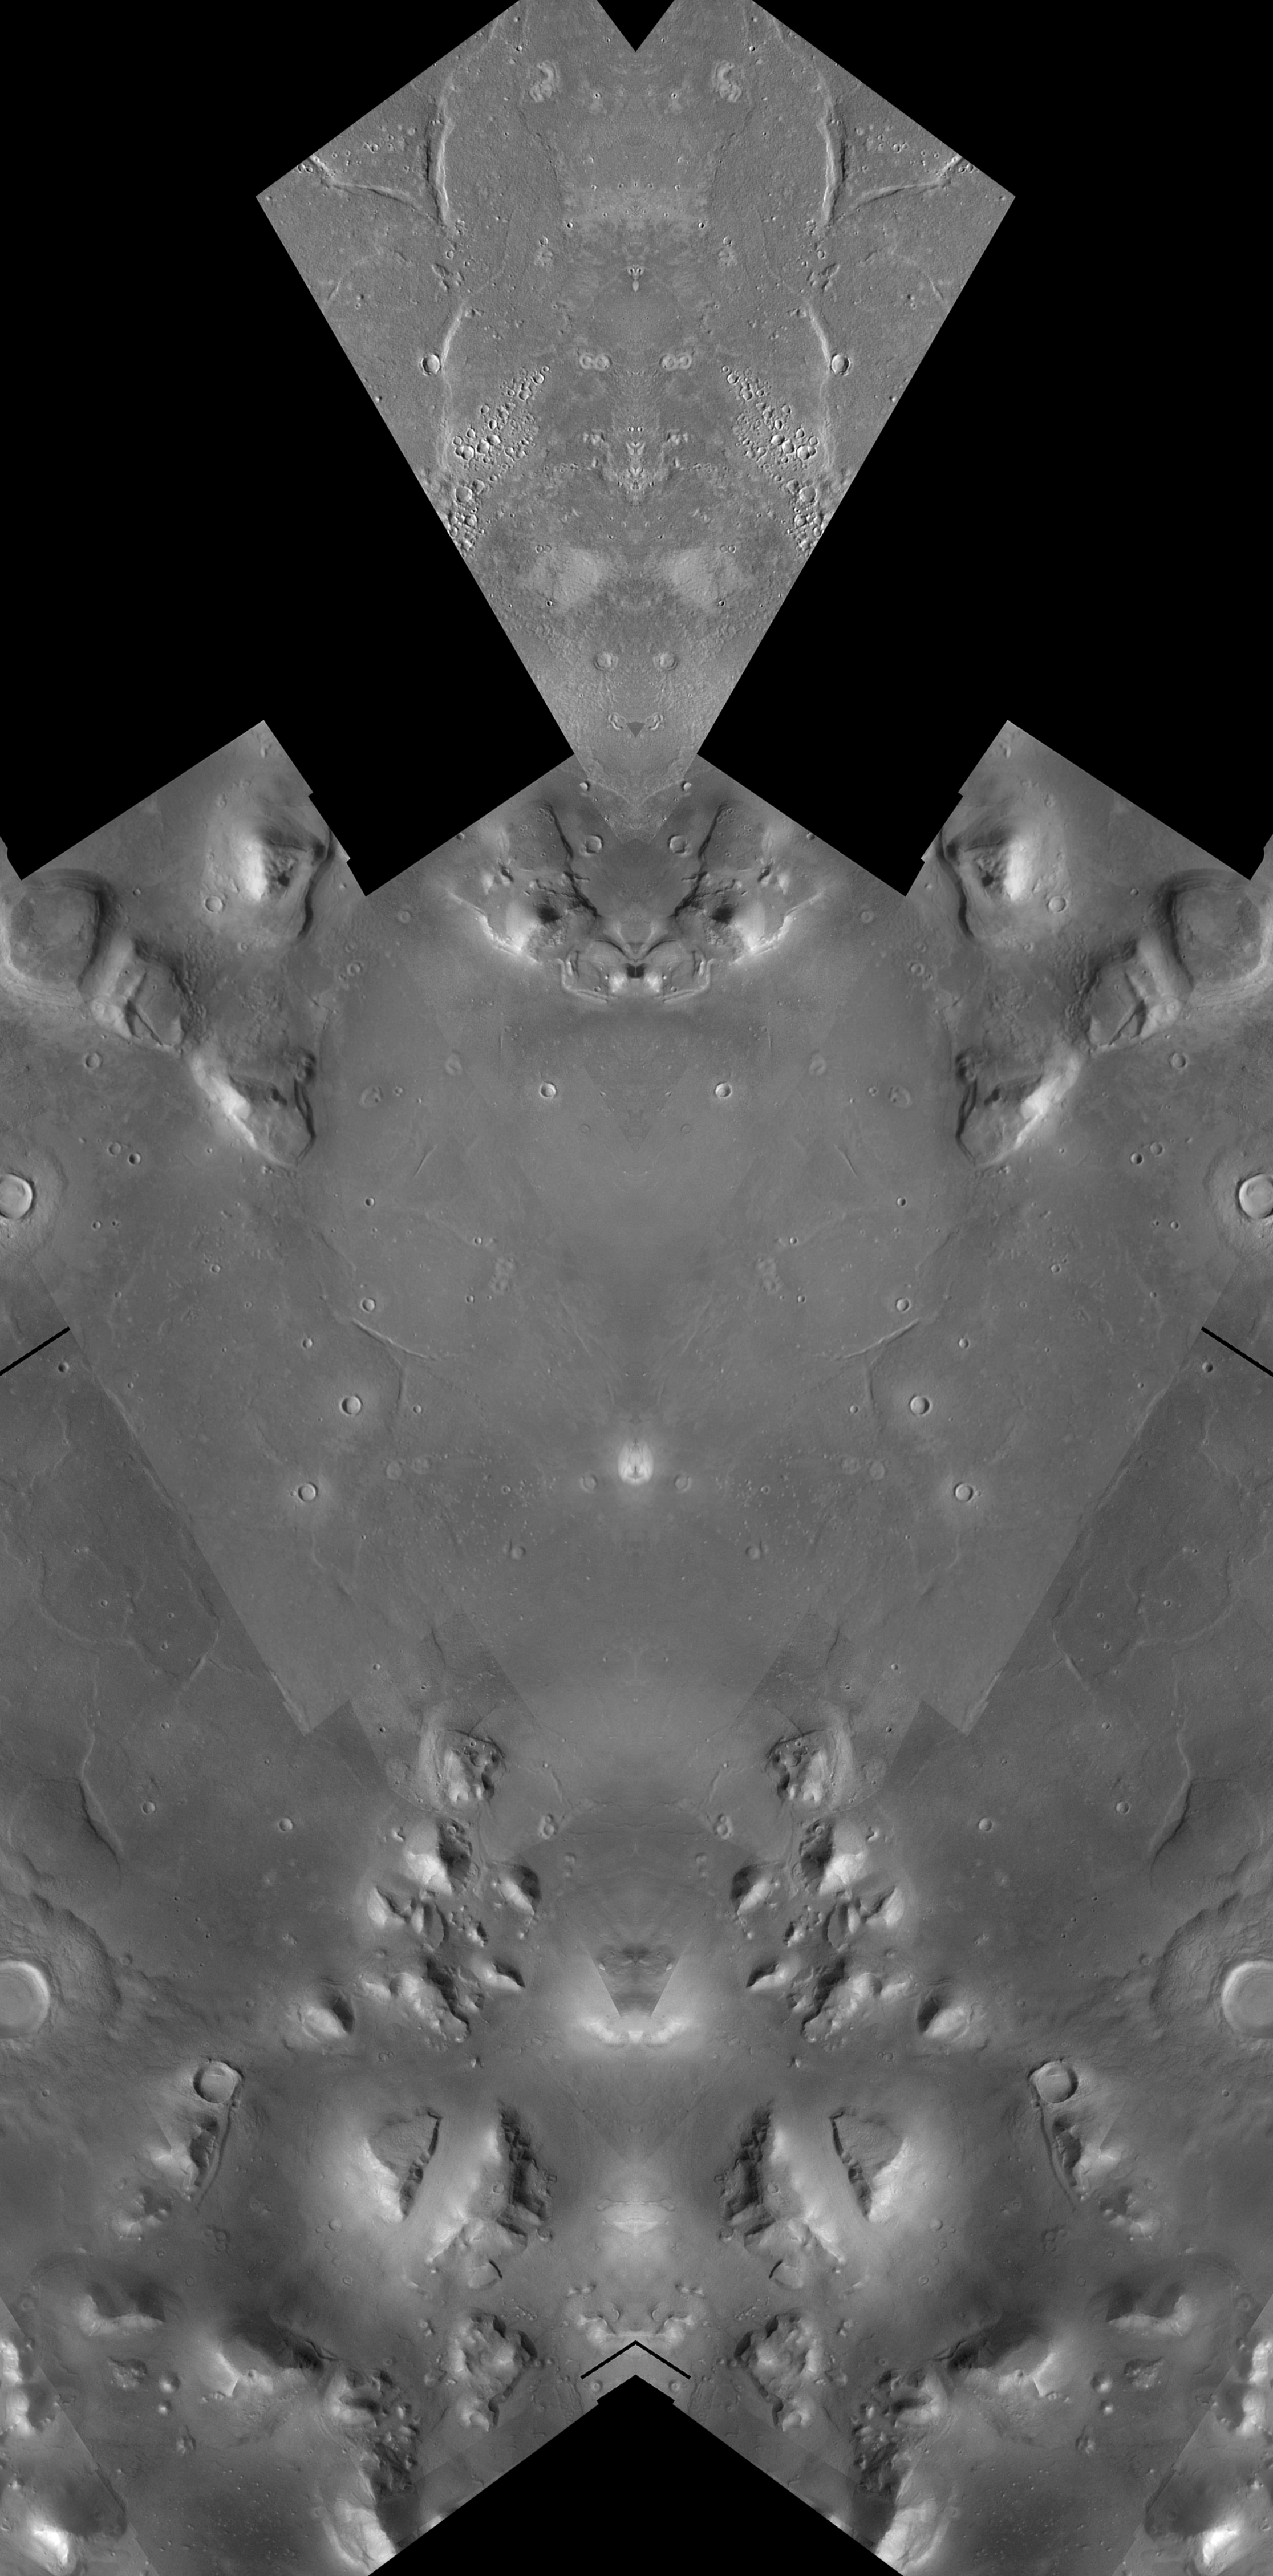
(If this image isn't flashing, refresh the page)
The clearly tetrahedral mound highlighted above is so small (compared to the other tetrahedron I reconstructed on this page) that discerning it's exact orientation proved to be quite difficult.
Difficult that is, until I found the right assumption to test.
I'm not sure how I missed it, but the clue I needed was found in The McDaniel Report on page 122.
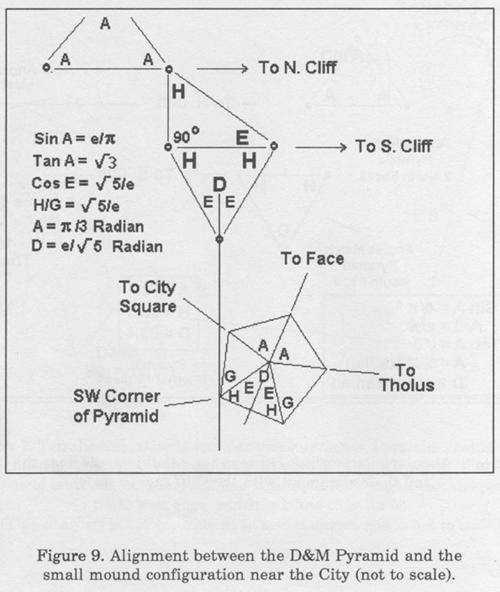
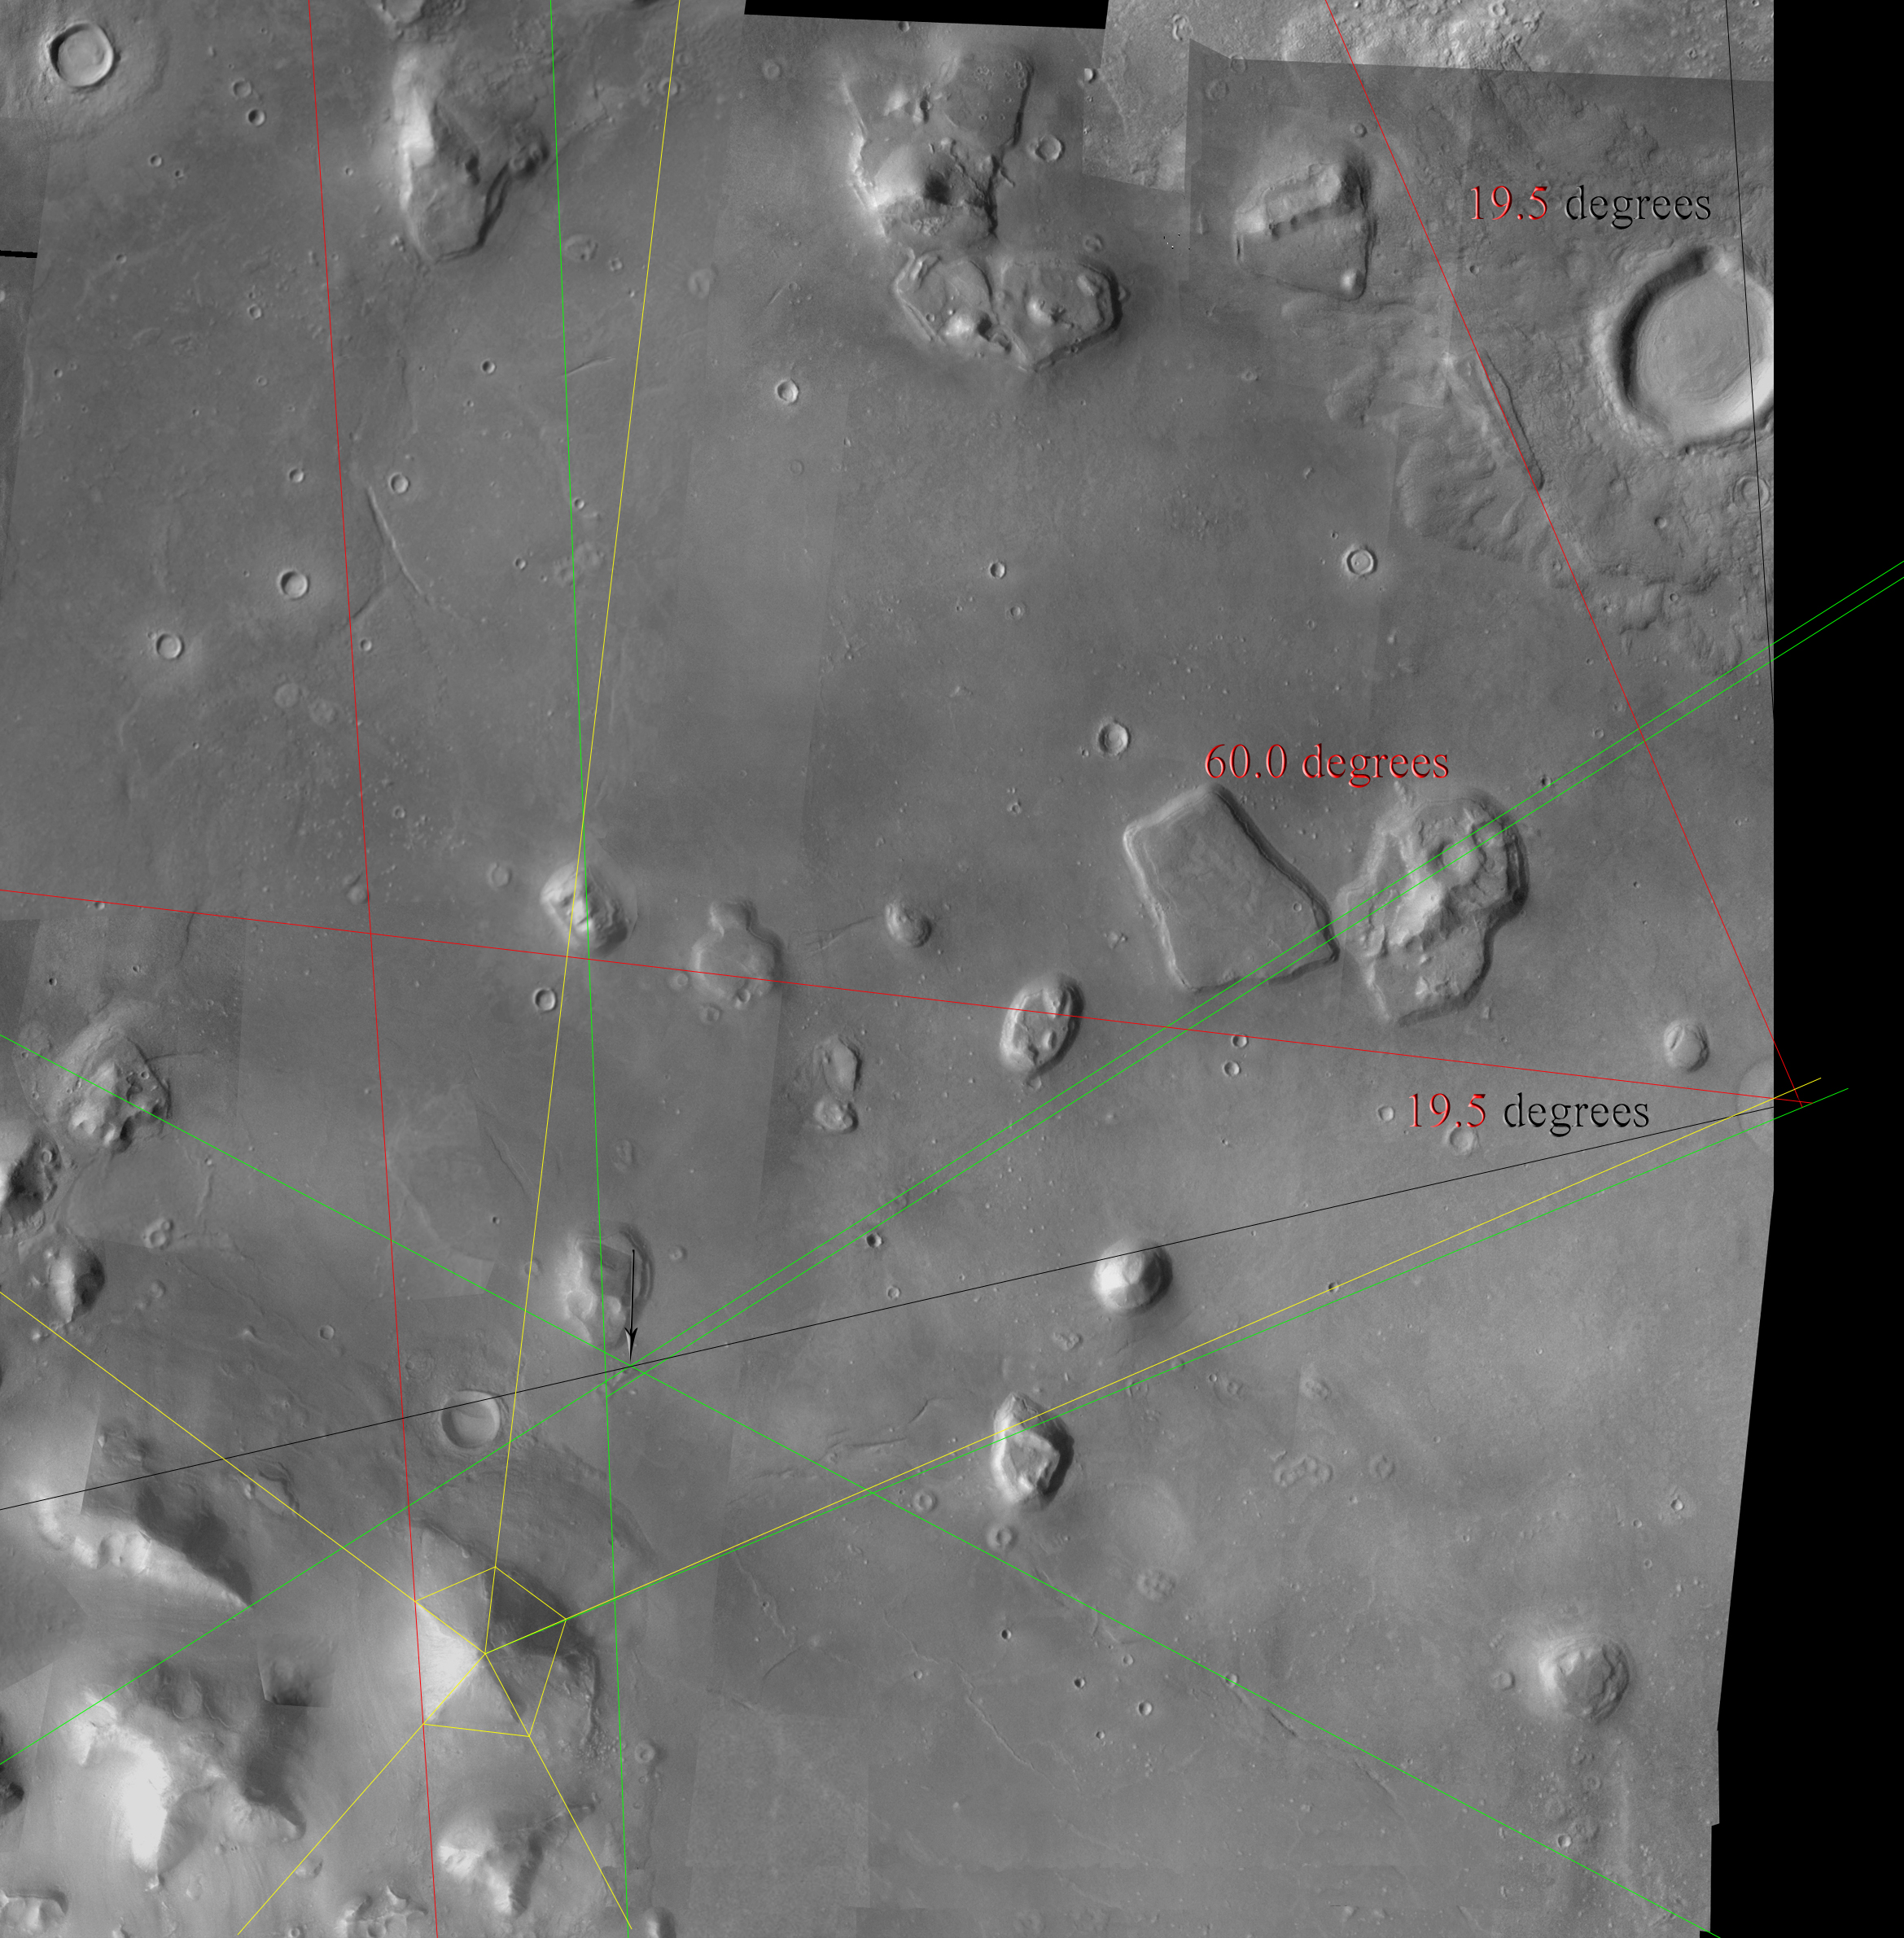
Looking at the above sketch, the first thing I did was to plug 4.7 degrees into the mix and place that line on the SW corner of the D&M Pyramid.
Nothing.
Next I tried 19.5 degrees...
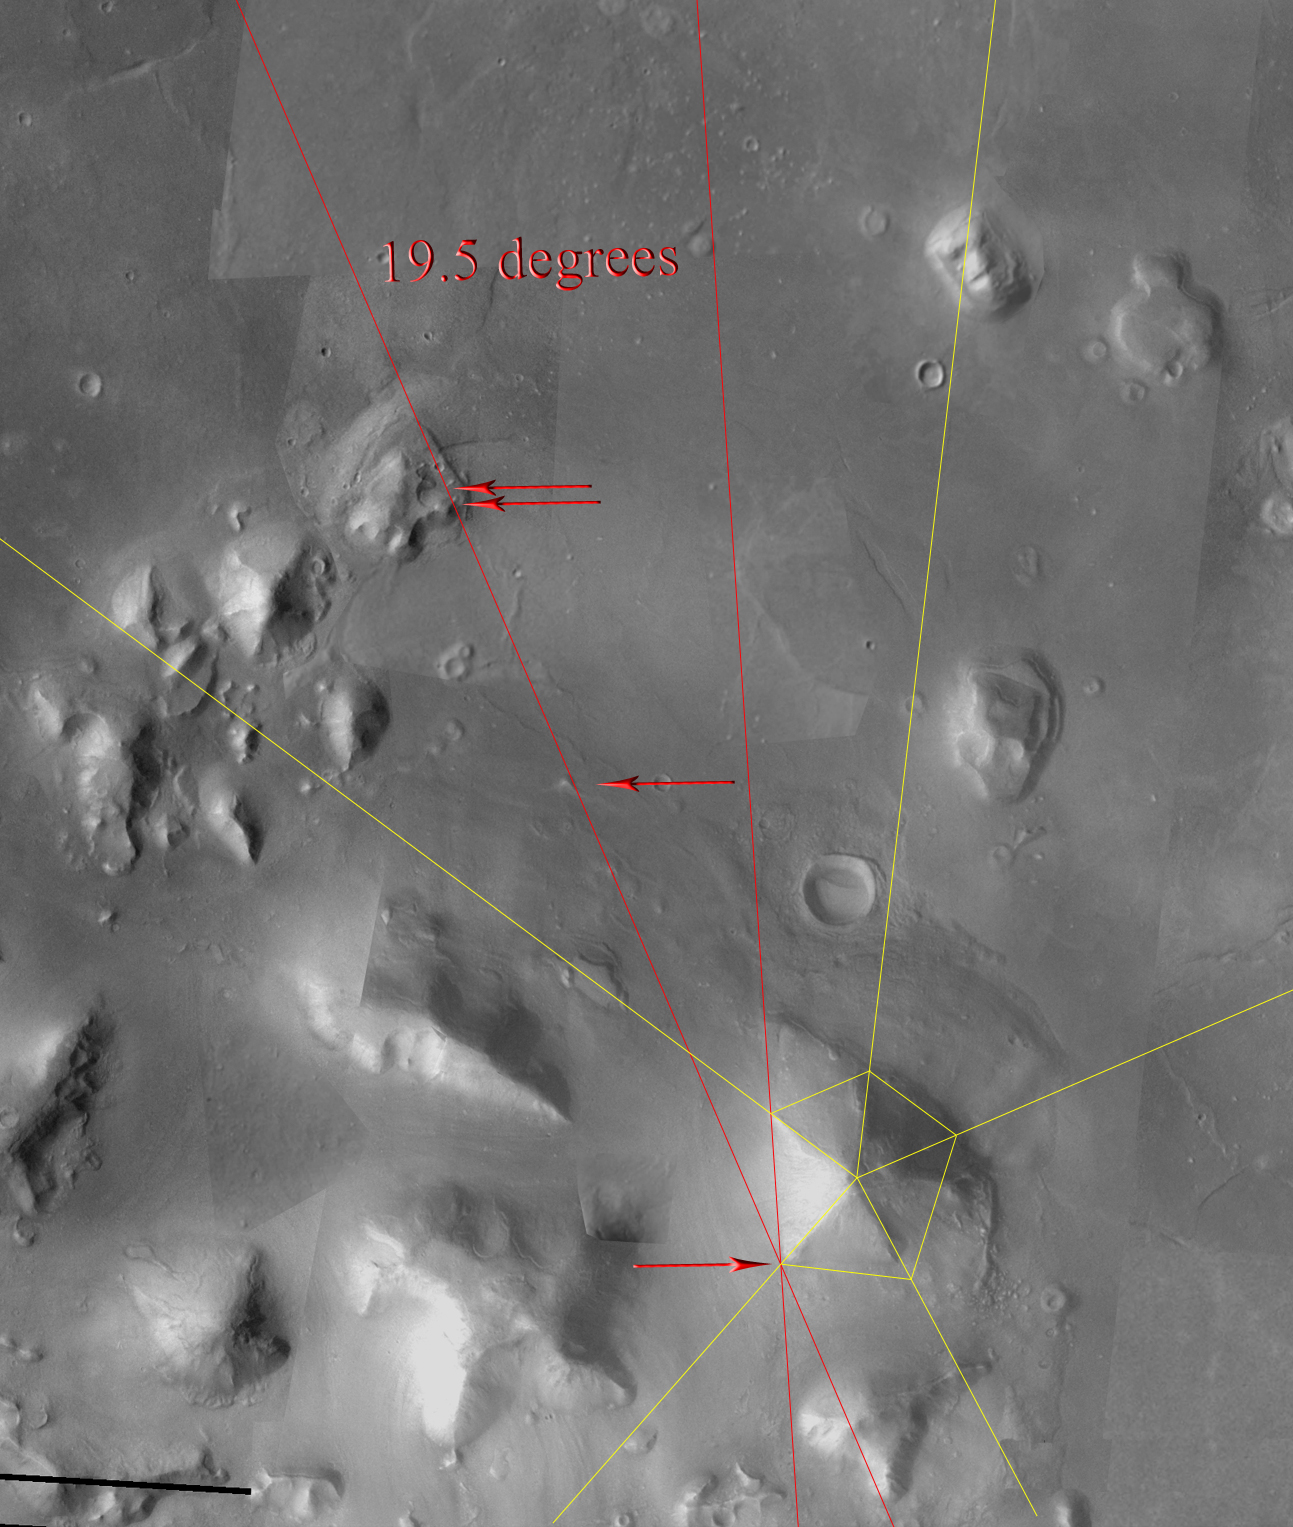
Bingo!
Now that looks interesting.
The next step was to 'plug & chug' and see if the results actually lead anywhere.
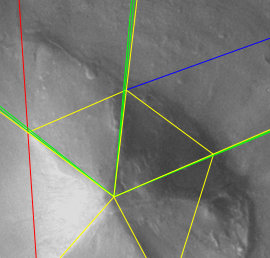
Exactly 60.0 degrees away from that line really got my attention.
When I slid that line up against the western side of the 'small tetrahedron' I immediately noticed it passed straight through a site that's already proven itself to be significant.
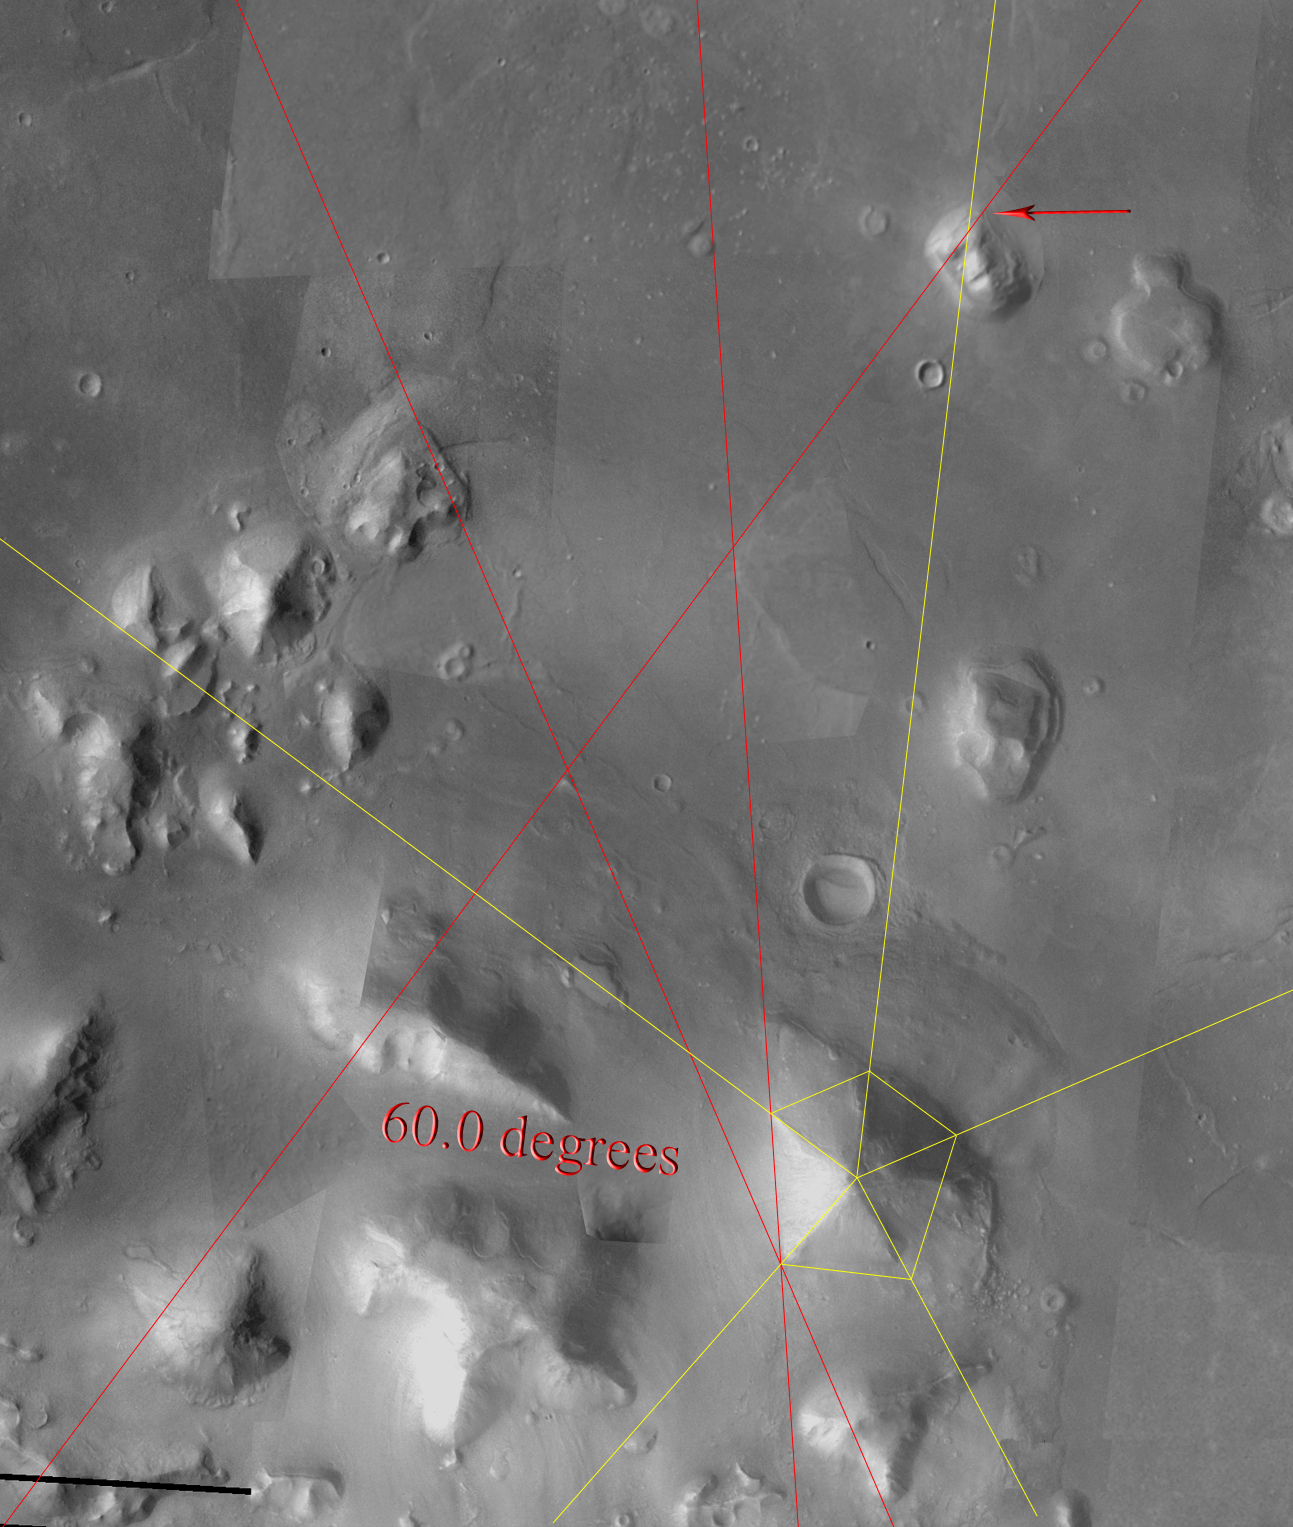
That site is the tip of the Lion's ear.
My next step was to drop in another line, rotate it 60.0 degrees, and slide it up against the southern base of the 'small tetrahedron'.
Now, this is interesting...

It's interesting because of the exercise performed on this page prior to this update.
If this line relates to this 'ruined tetrahedron' by producing a precise intersection or 'hit', I can be sure I'm on the right track.
I didn't get just one hit... I got two.
And more were to follow.
Duplicating that line and placing it on the northern corner produced this.
Another hit.
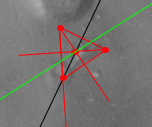
Next, I bisected the 'small tetrahedron', duplicated the above line one more time and placed it in the exact middle of those two red lines...
That line passes STRAIGHT through the 'ruined tetrahedron's' APEX.
Delicious!
But there's more...
One more copy of that line placed on the 'small tetrahedron's' apex produced one last hit.

This precision geometric test, based on a falsifiable assumption, is PASS or FAIL.
In order for the assumption to pass, it must relate in a precise and meaningful way.
If an intersection of three lines is off by even this much...
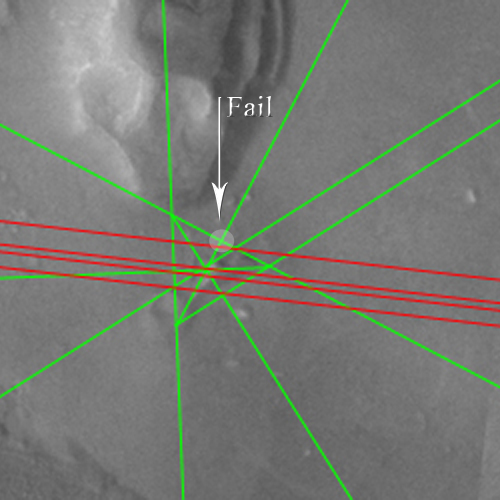
... it is a FAIL.
Clearly... the assumption passed with flying colors.
There is NO escaping the hard science of applied precision geometry which reveals the exact interlocking connectivity between Cydonia's monuments.
Given the relative size of this 'small tetrahedron' compared to the 'ruined tetrahedron', I hope my father's anecdote now seems as relevant to the reader as it does to me.
What this geometry seems to imply by virtue of the size of the smaller tetrahedron is the dissection of the larger one.
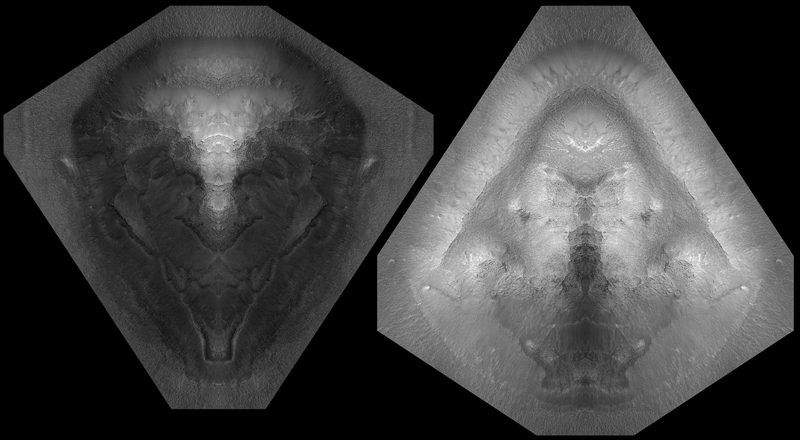
If my interpretation is accurate, this tiny and relatively remote tetrahedron should reveal an association with Horus through the reflections.
It does.
This line which passes straight through the tip of the Lion's ear...
... reveals this...
... and on the flip side, this.
The two faces on this single reflection are obvious and objective hits found on features I've already discovered to be associated with Horus several times over.
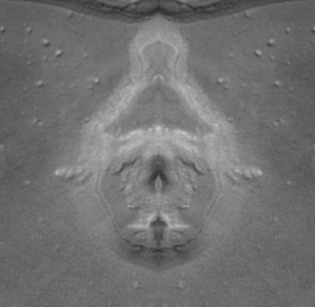
THEN.... as if these two reflections are not convincing enough... that same line applied to MRO's image of The Face...
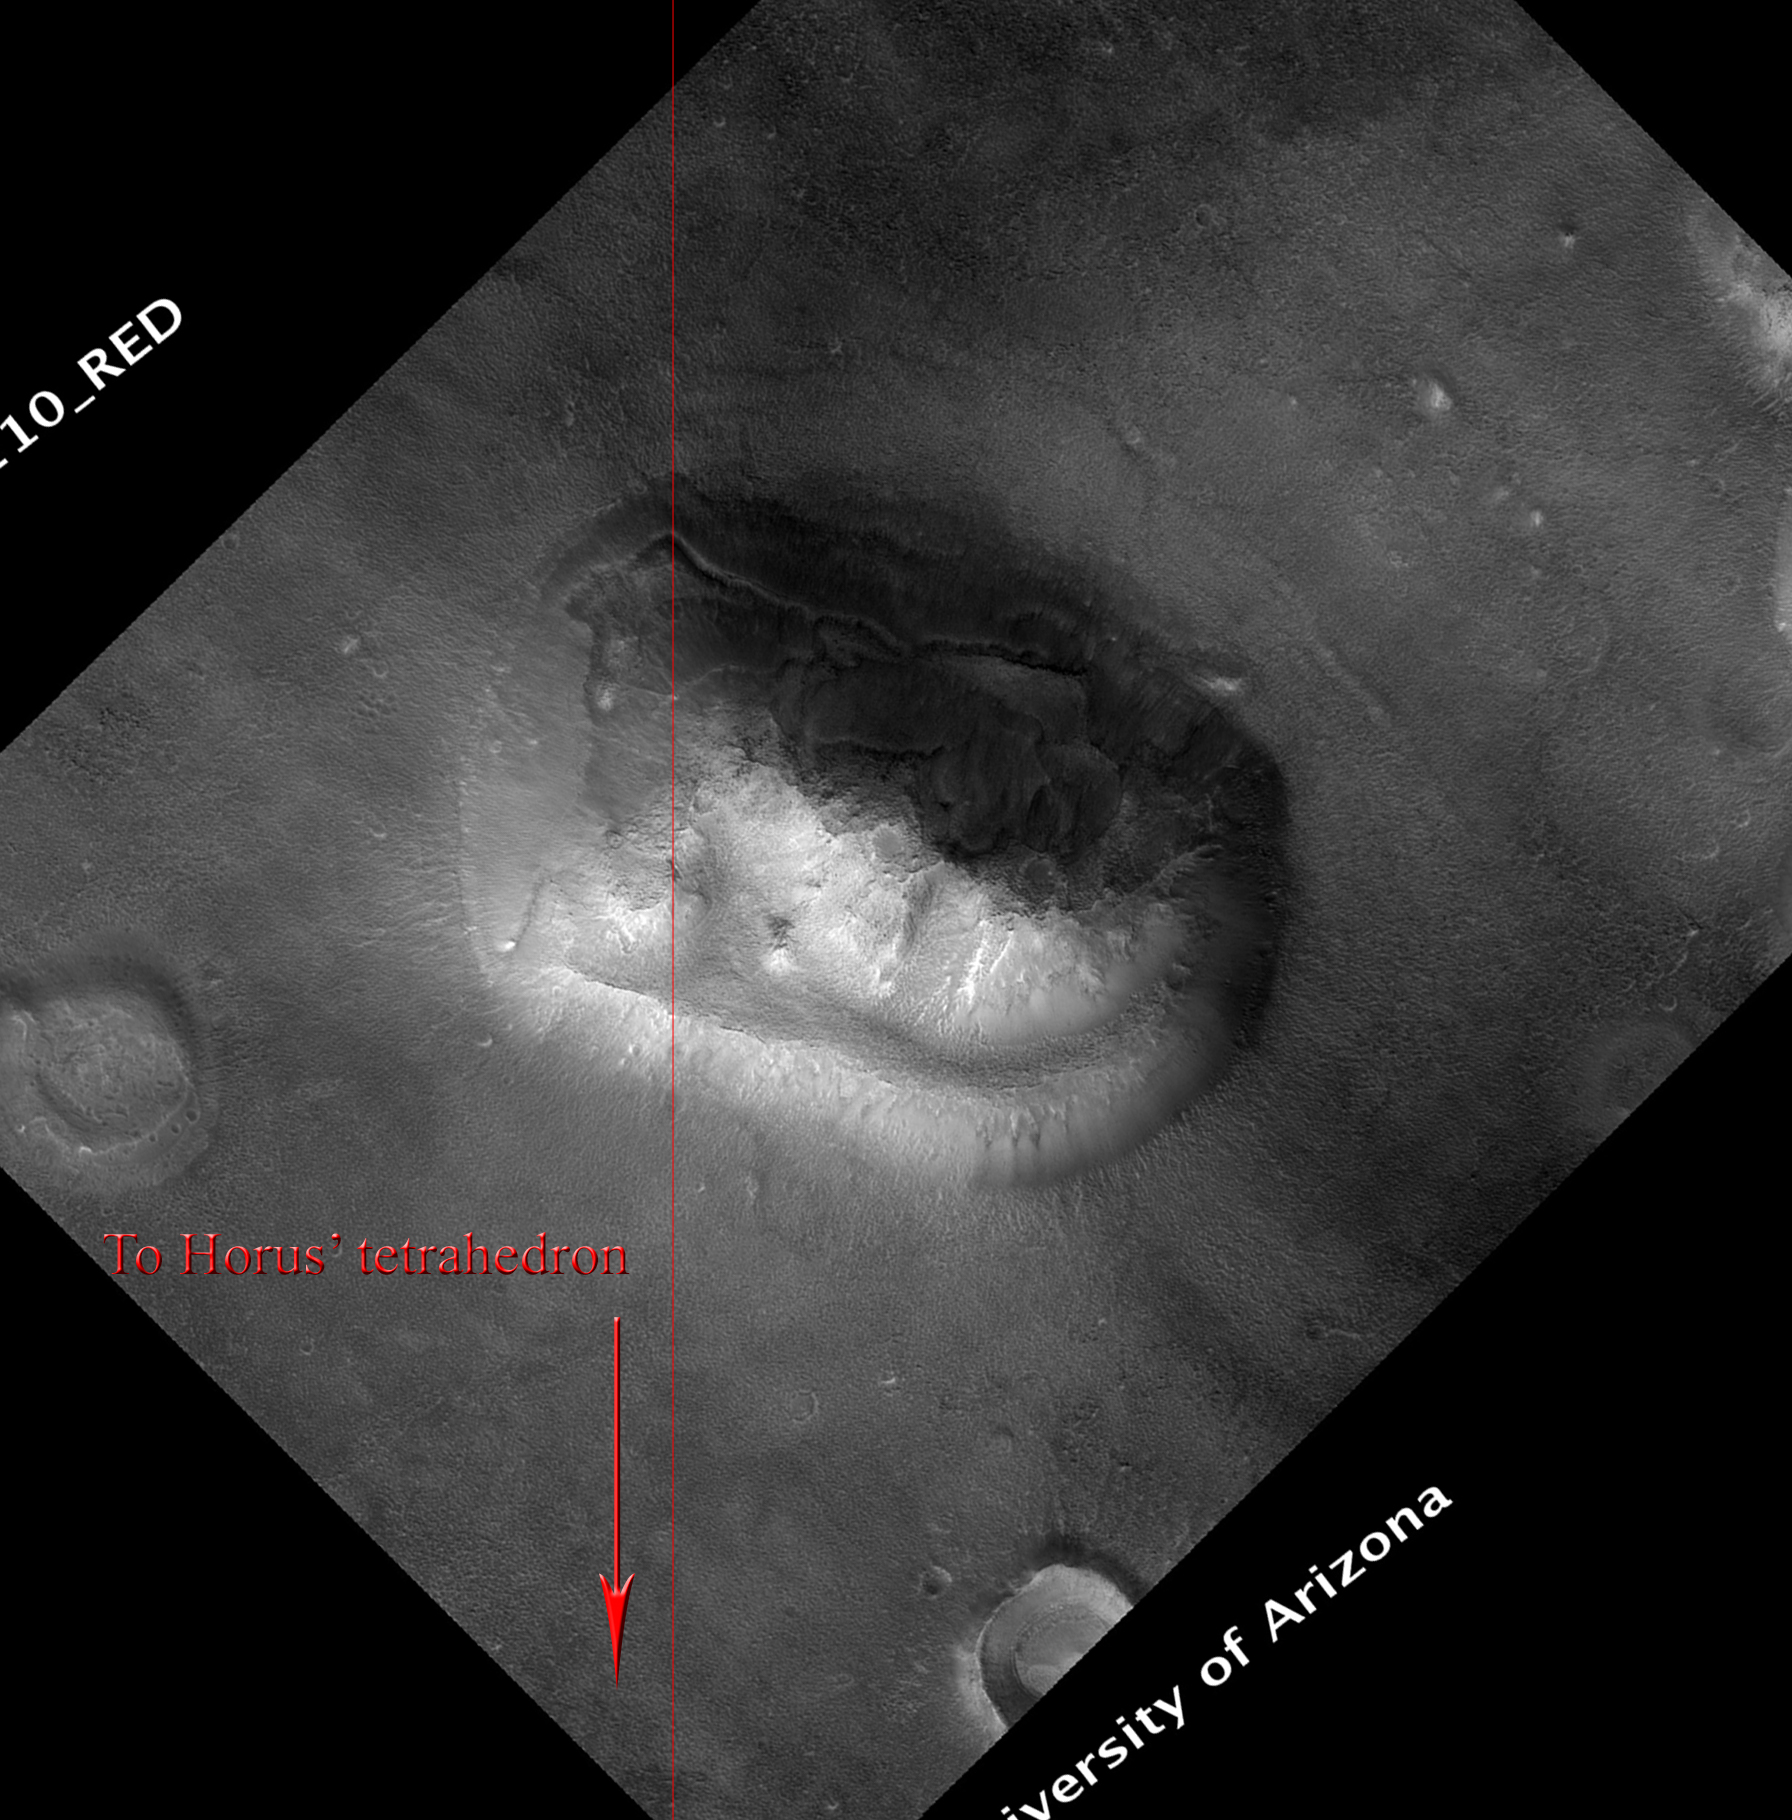
... reveals THIS.
(If this image isn't flashing, refresh the page)
Another stunning image of a lion reflecting directly out of the Eye of Horus.
And the flip side of that reveals, of course, another perfect Heart of Isis reflecting directly out of the remaining section of Horus' Eye.
(If this image isn't flashing, refresh the page)
***
Obviously, things have just become extremely complicated.
Because, as I illustrated in Humble Pie, Isis also has a way into The Face so that she may play her role and intervene in the upcoming battle.
I assumed Isis simply placed Horus on The Face, but it turns out, he finds his own way.
Horus and Set both have a way onto the Face through two very interconnected tetrahedrons.
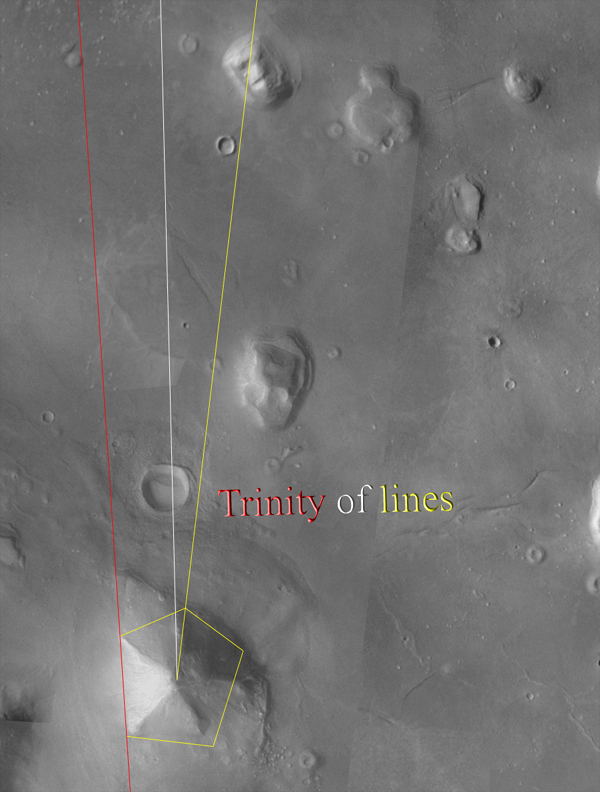
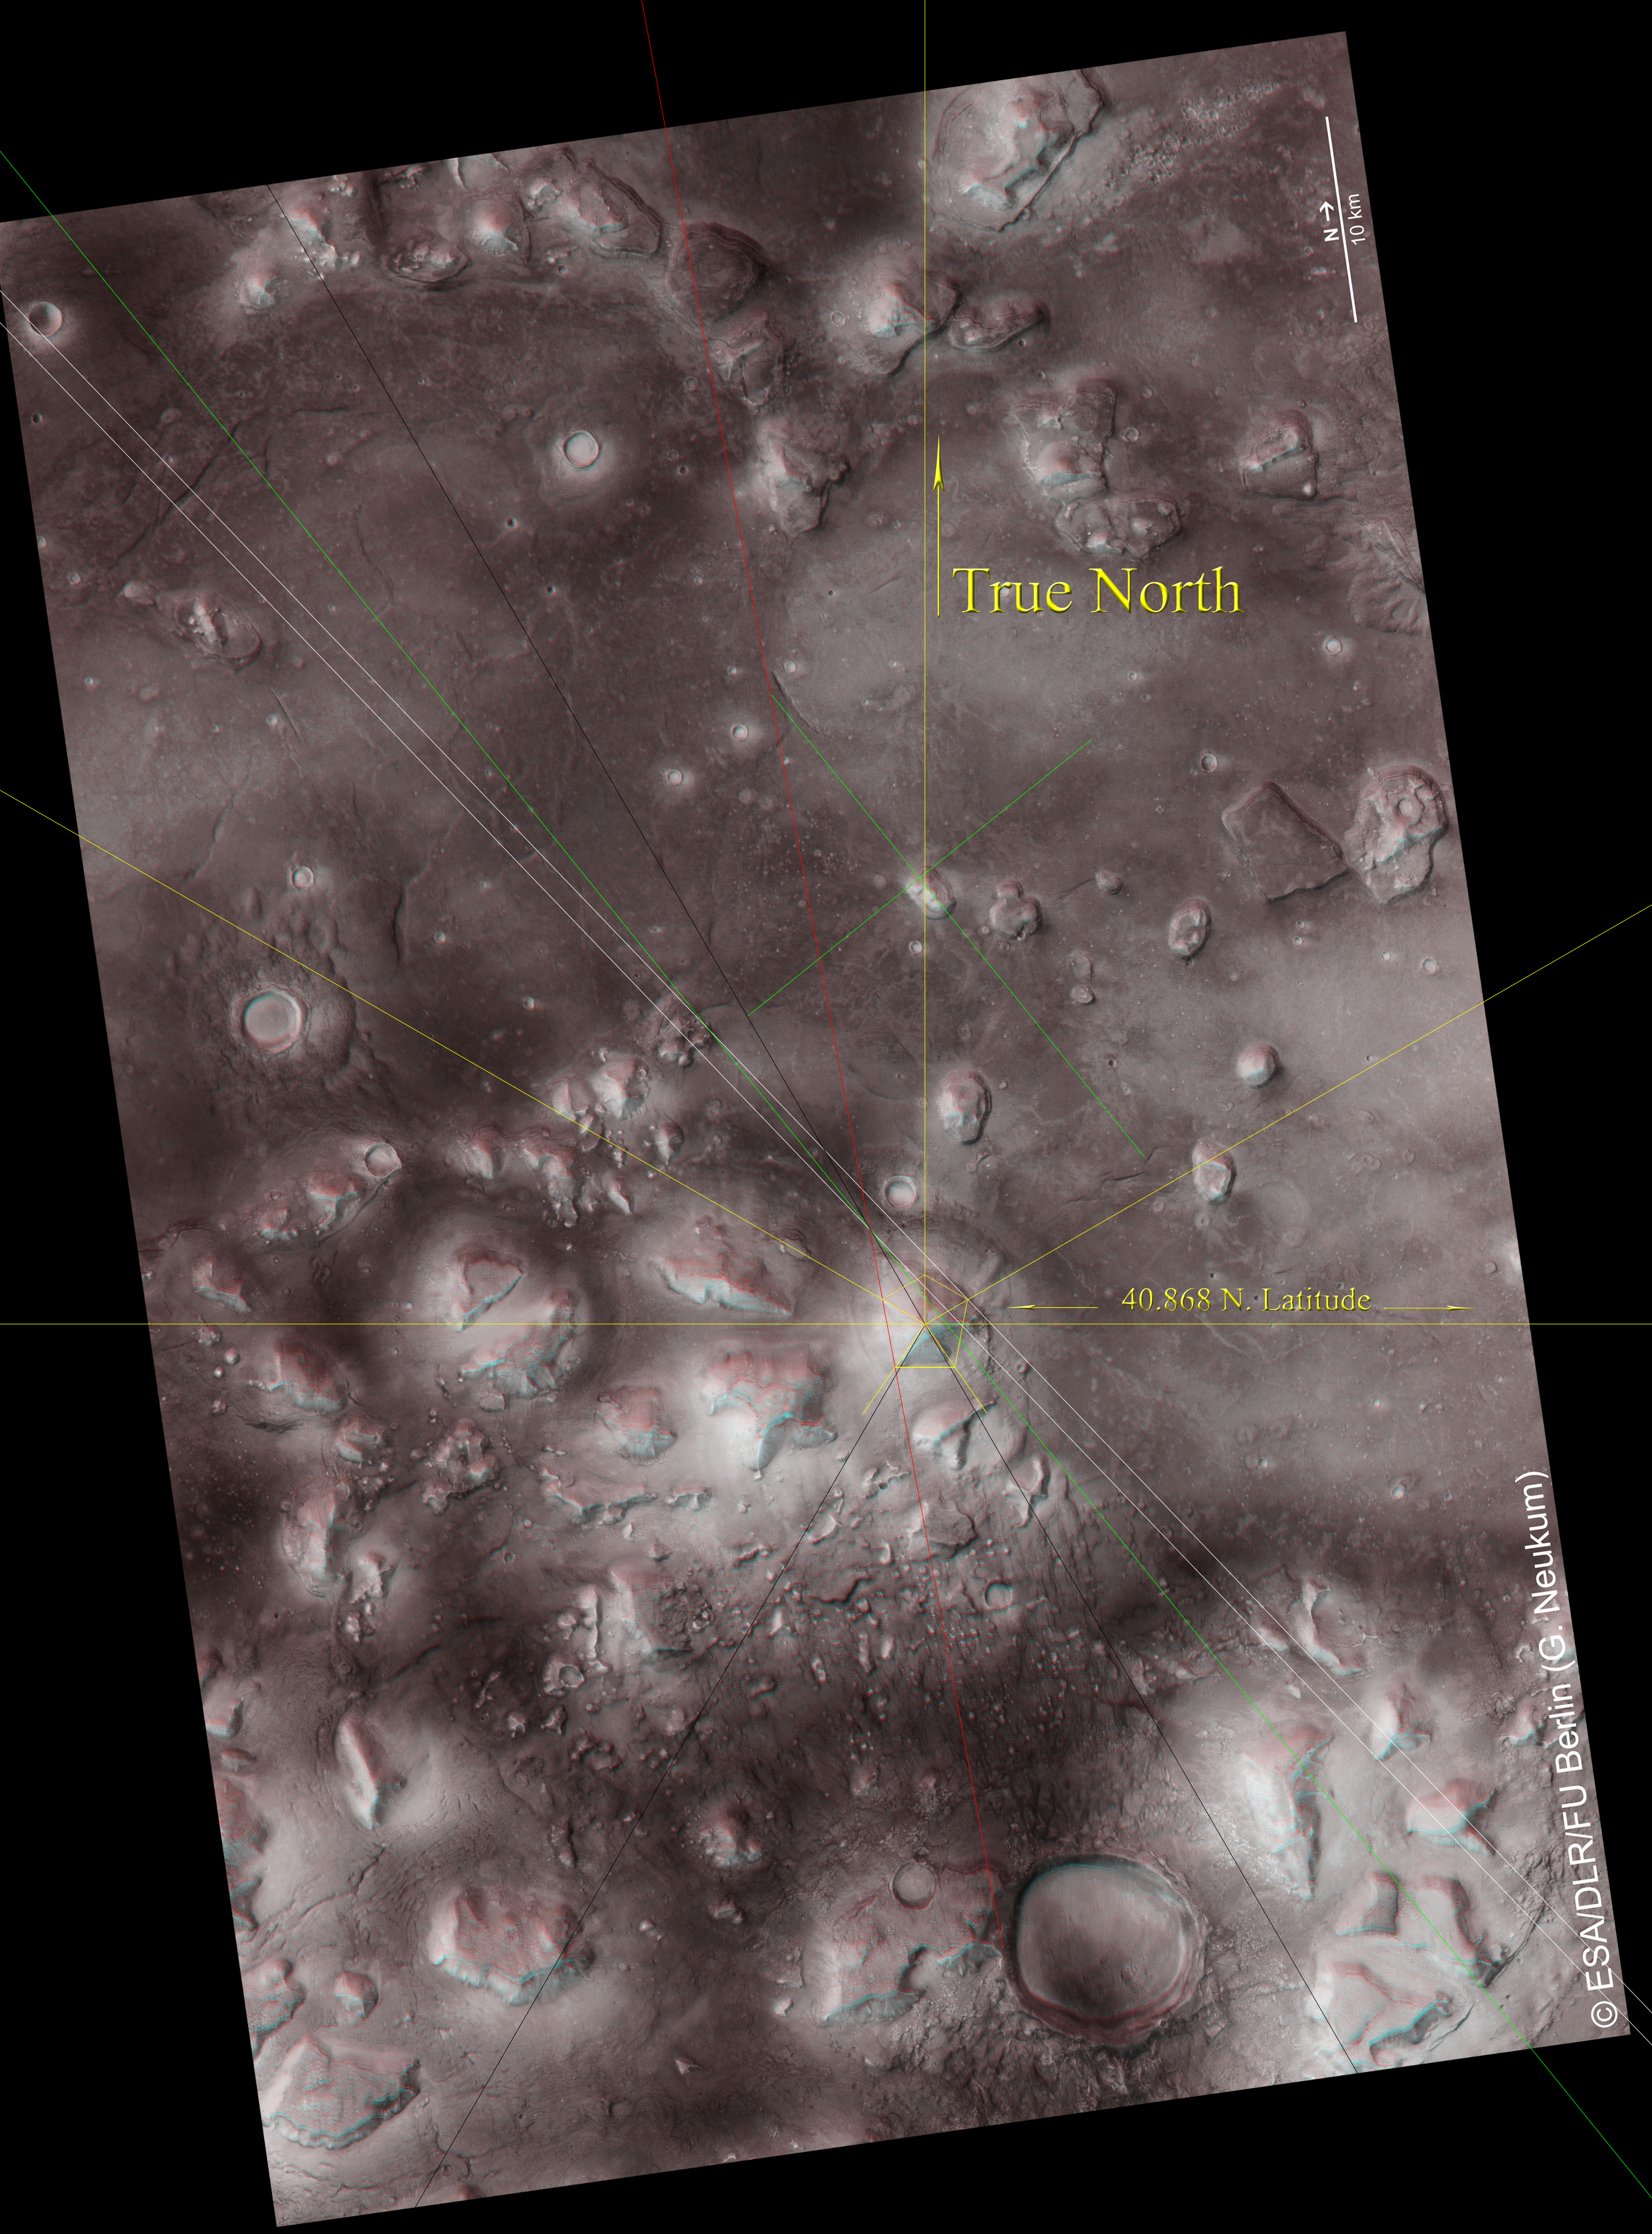
The exact lines through which Horus, Set, and Isis enter The Face are these.
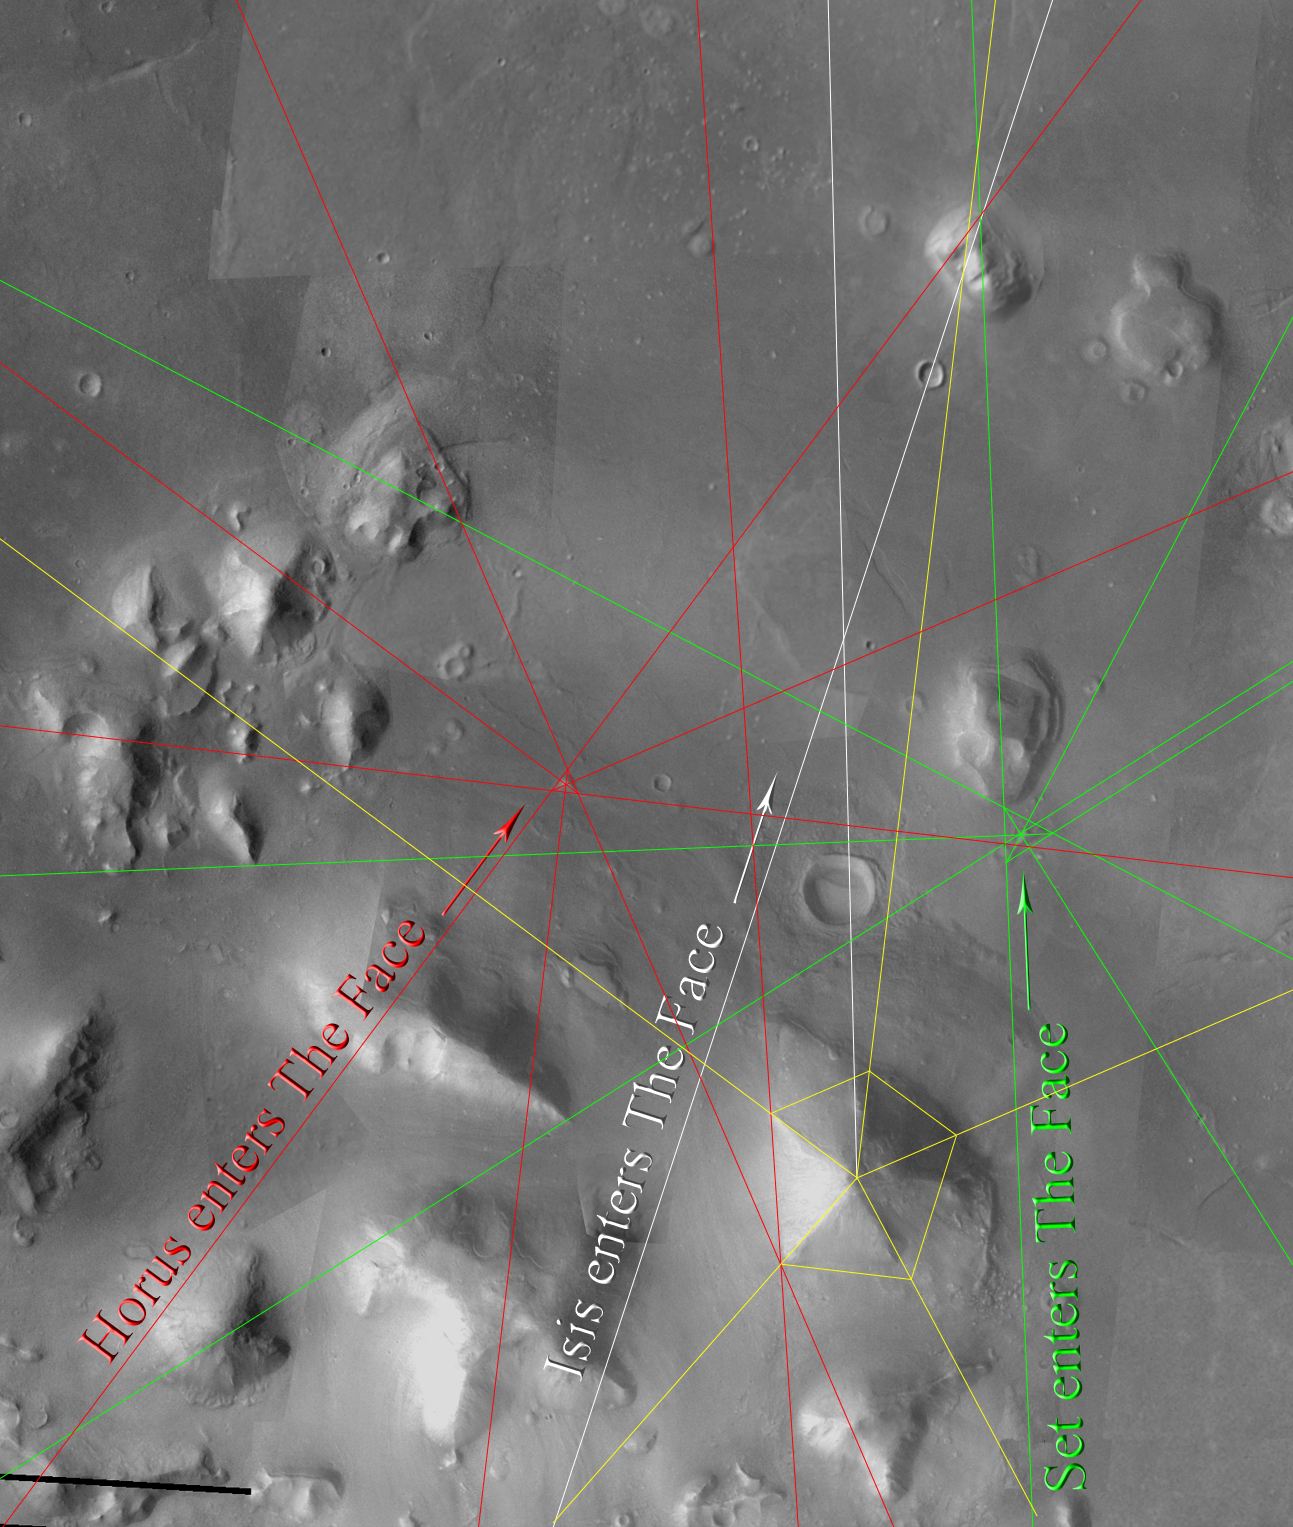
What these three lines all have in common is the angle 19.5.
Each line plays 19.5 degrees off a trinity of different, albeit incredibly meaningful lines respectively.
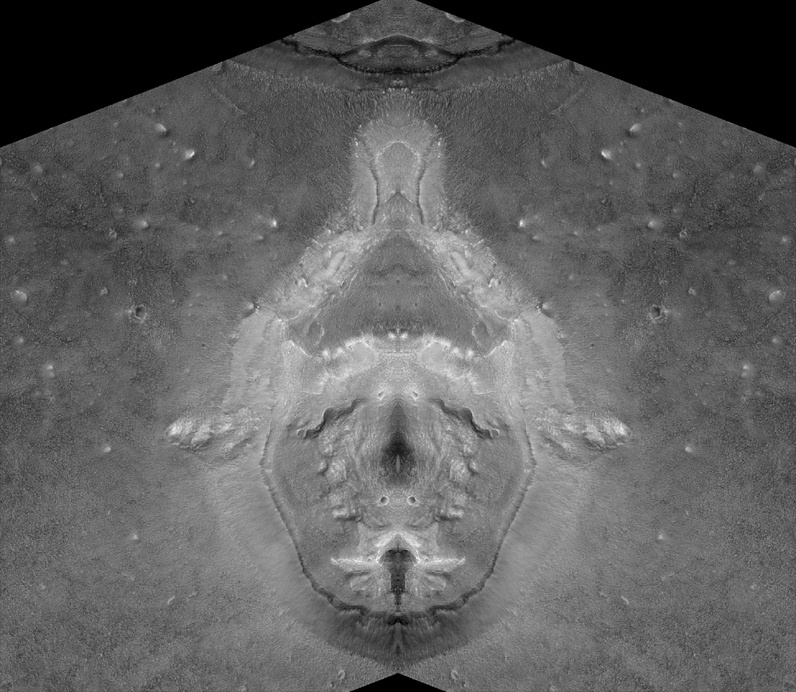
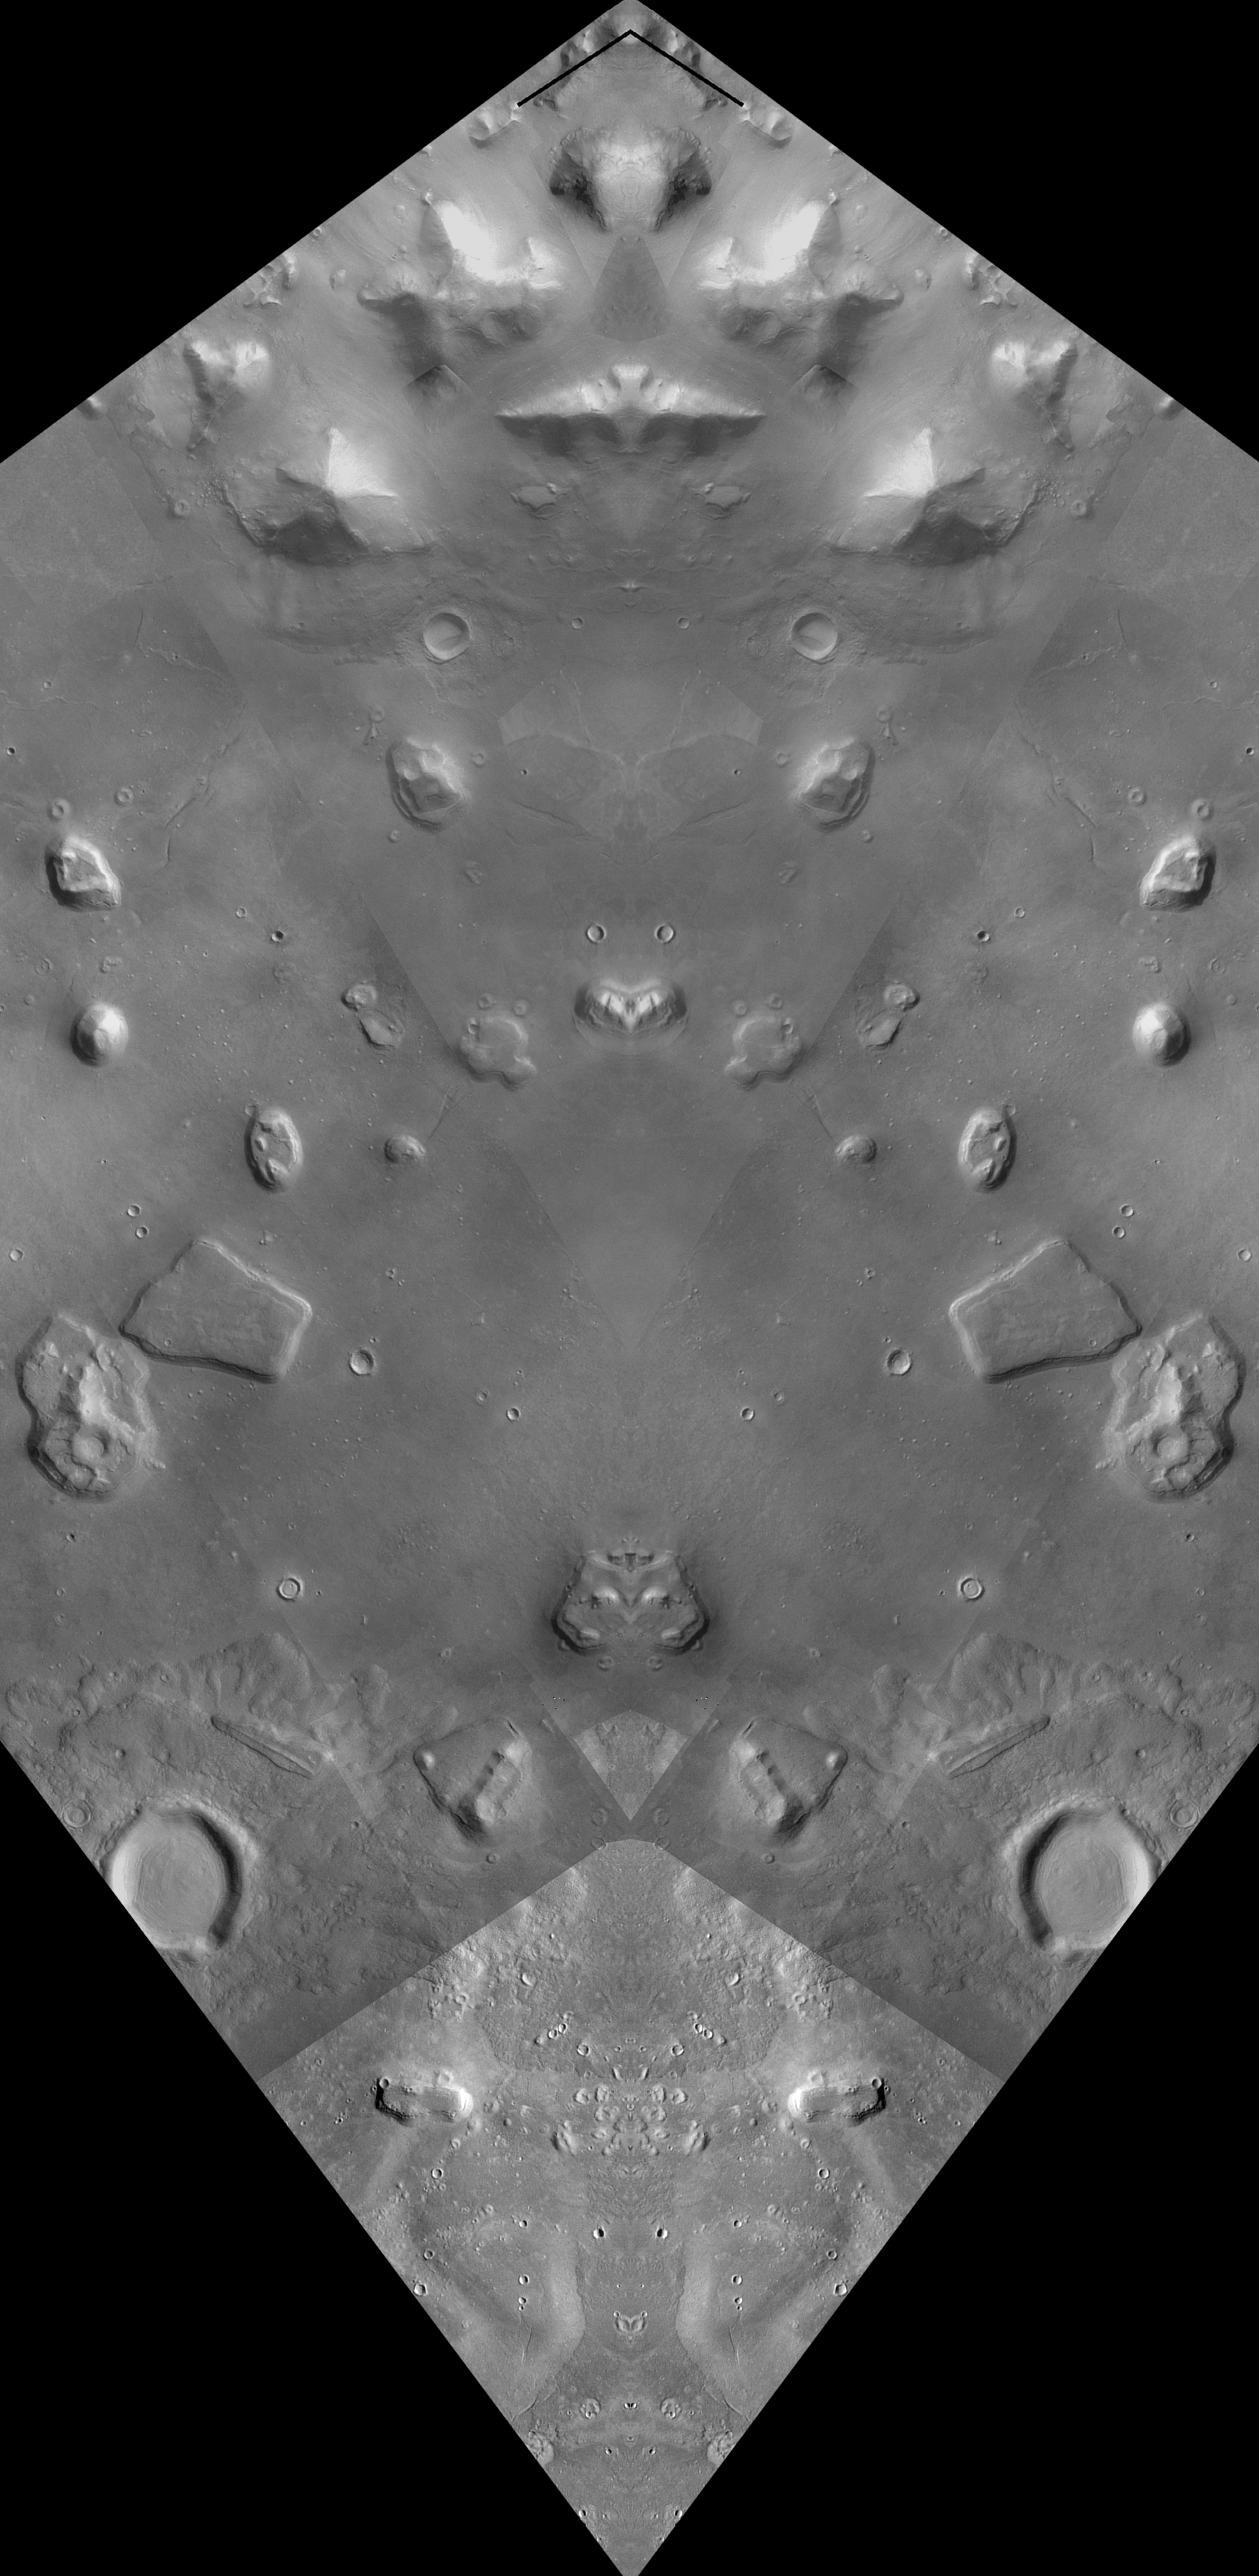
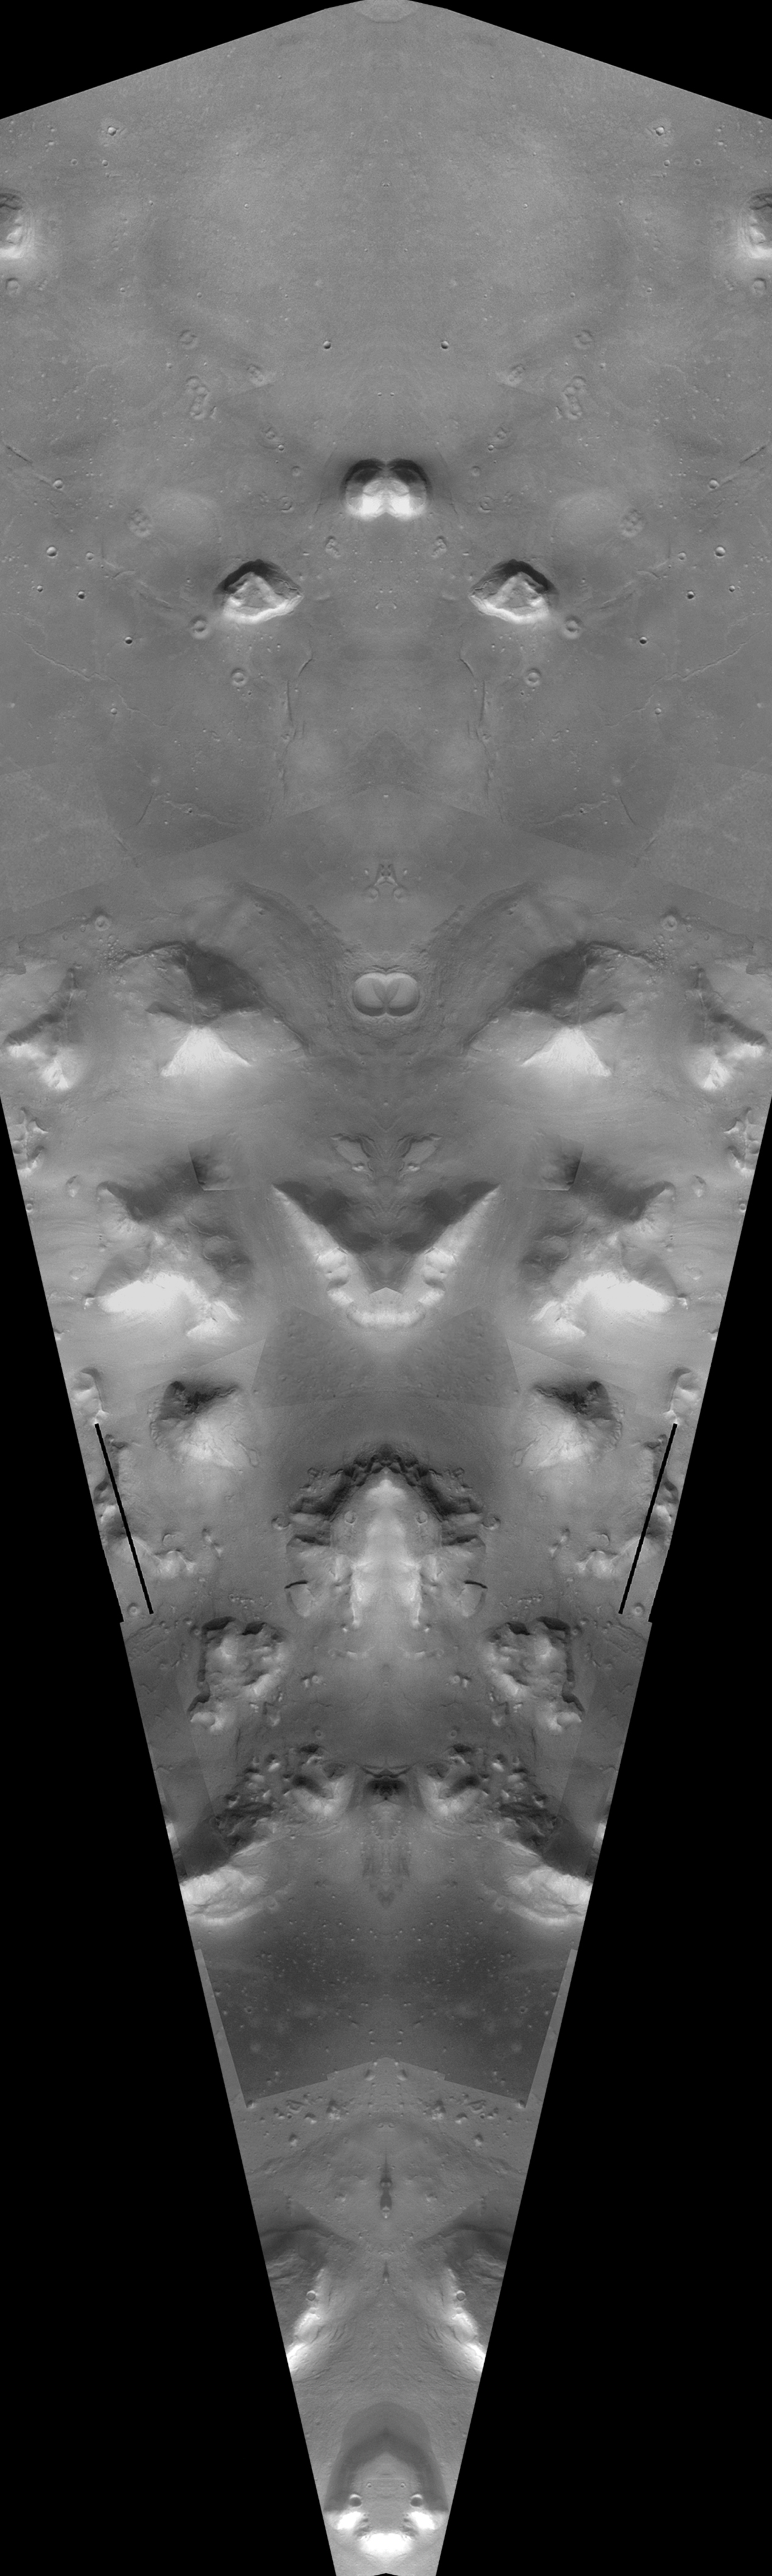
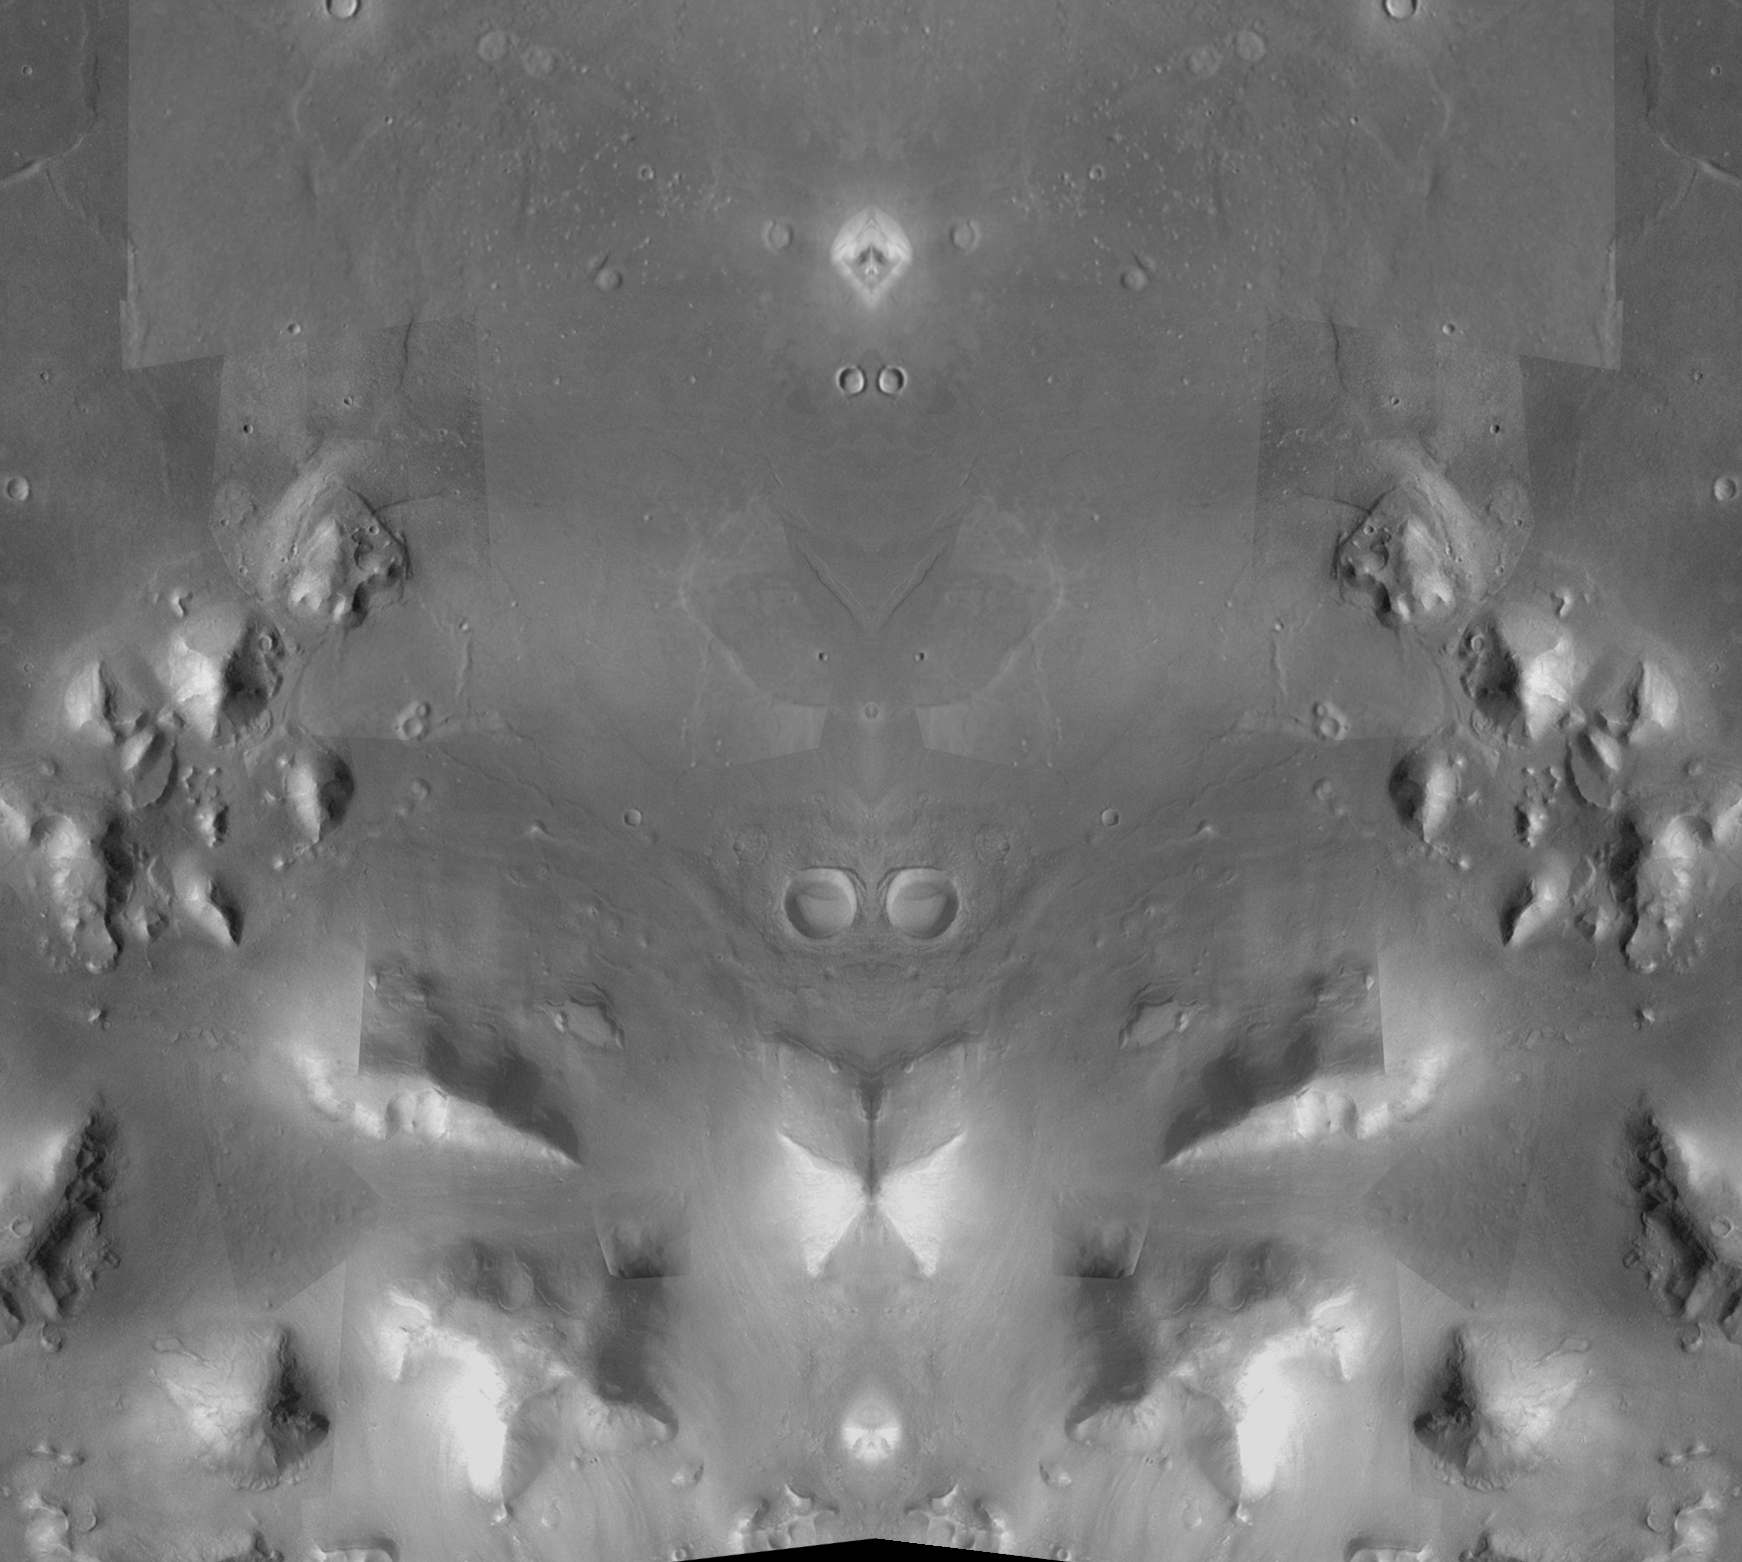
All of the 19.5 degree 'entrance' lines reveal extraordinary and corroborative large scale reflections...
(If this image isn't flashing, refresh the page)
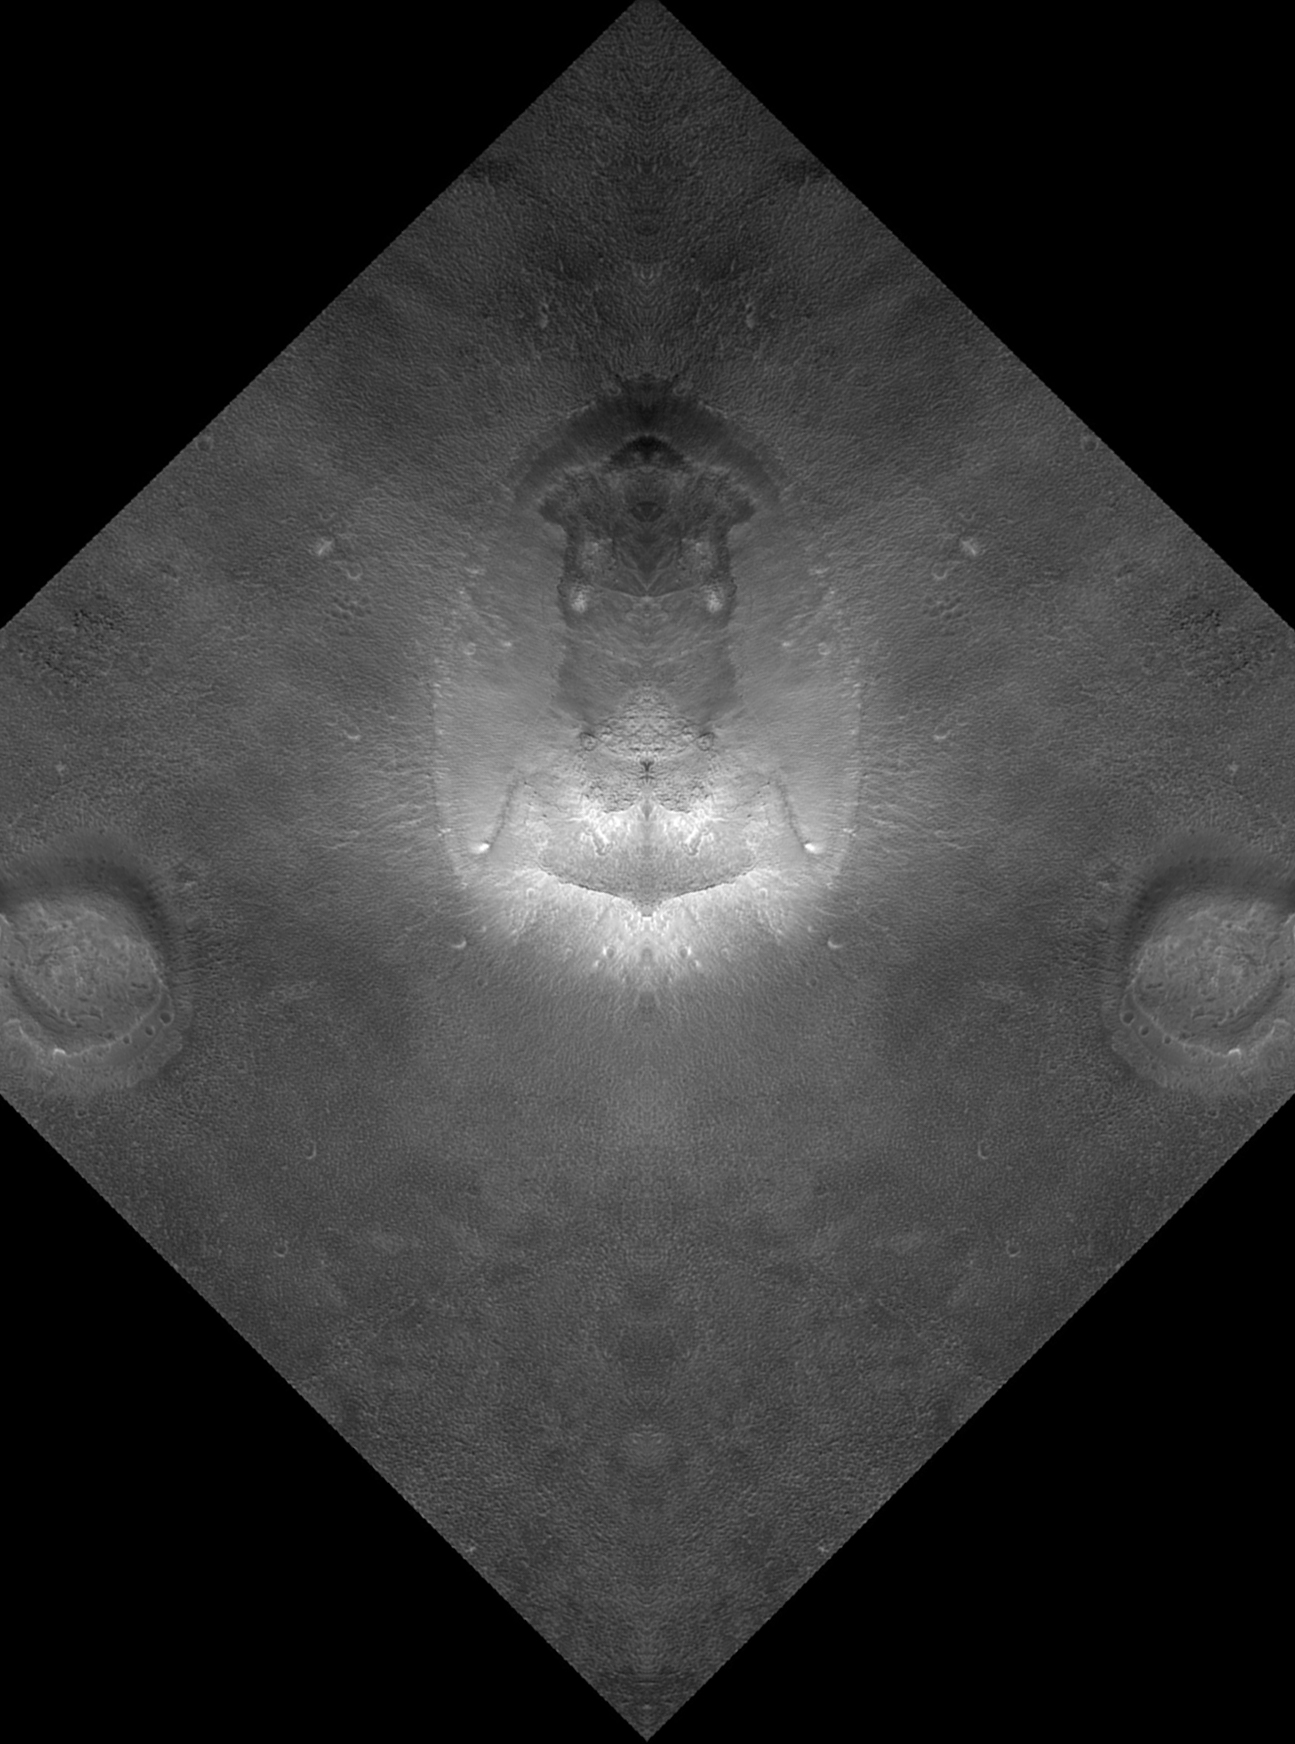
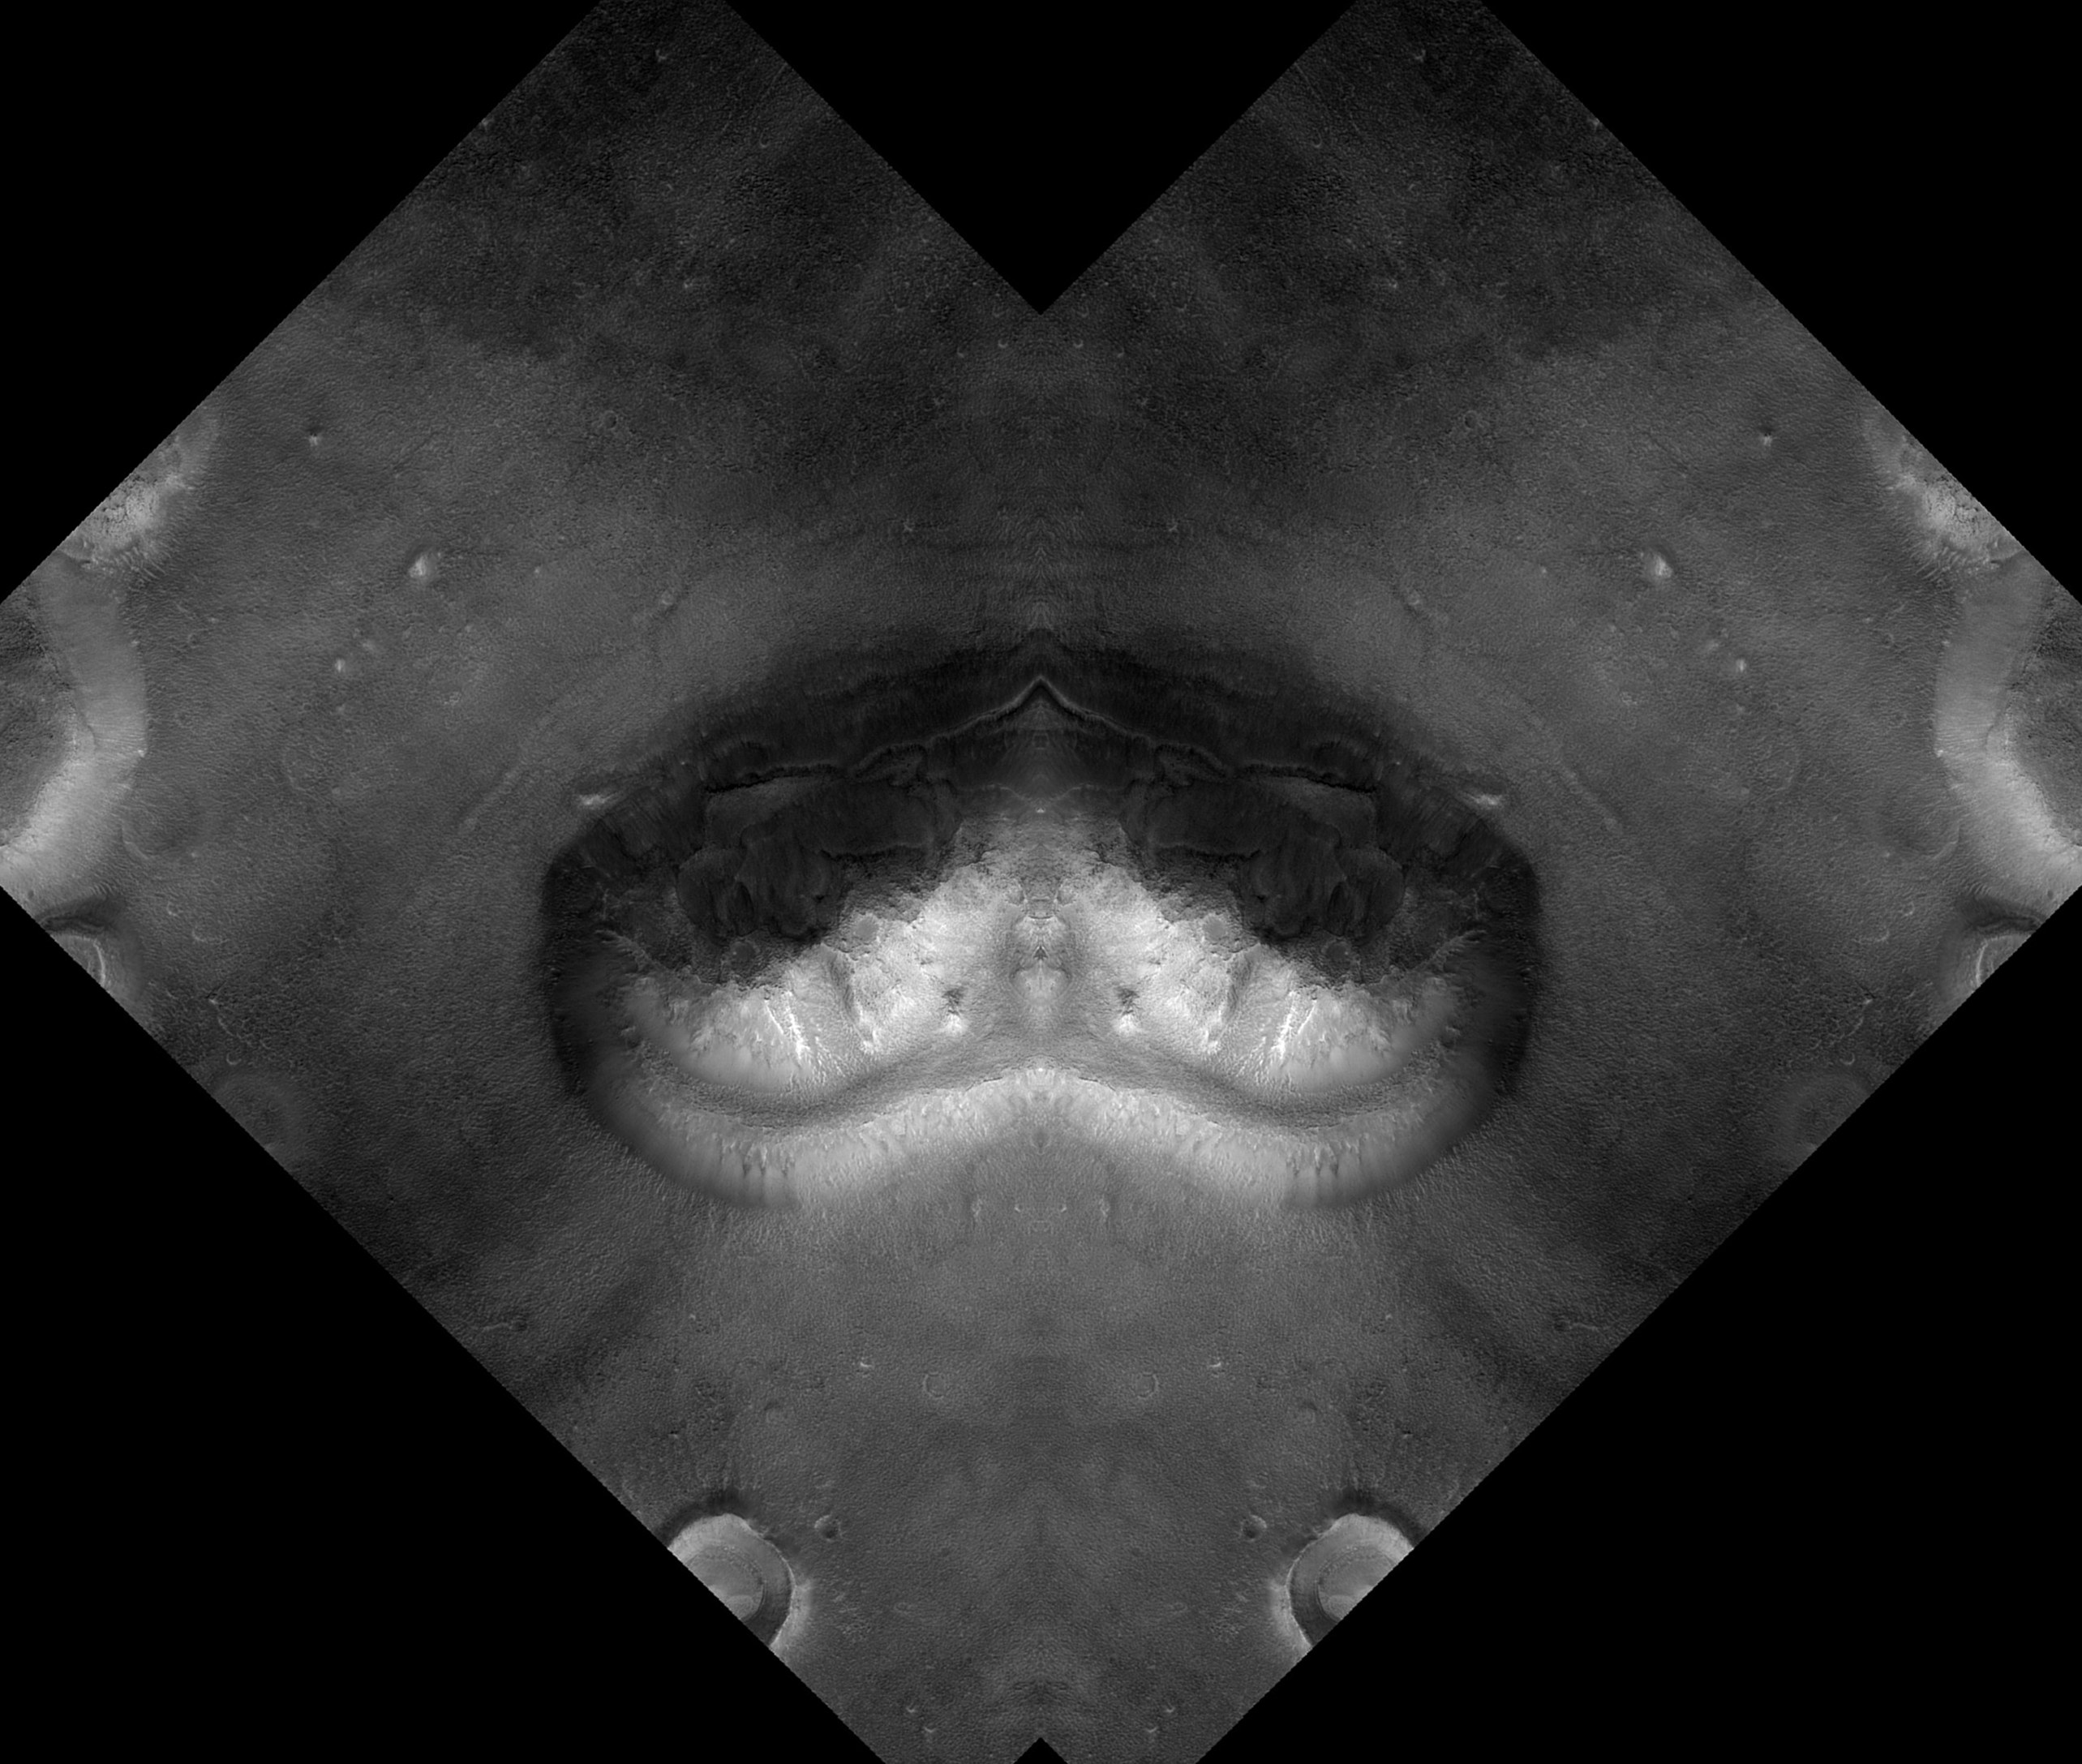
... as well as amazingly detailed reflections on an ultra high resolution image of The Face itself.
(If this image isn't flashing, refresh the page)
(If this image isn't flashing, refresh the page)
(If this image isn't flashing, refresh the page)
***
Once again, this quote becomes extremely relevant:
"Euclid taught me that without assumptions there is no proof. Therefore, in any argument, examine the assumptions." ~E.T. Bell
There isn't a snowball's chance in hell the results of this 'hair splitting' examination could possibly be a coincidence.
The only thing left to do is keep going and start putting it all together.
(If this image isn't flashing, refresh the page)
I think I'm off to a pretty good start.

***
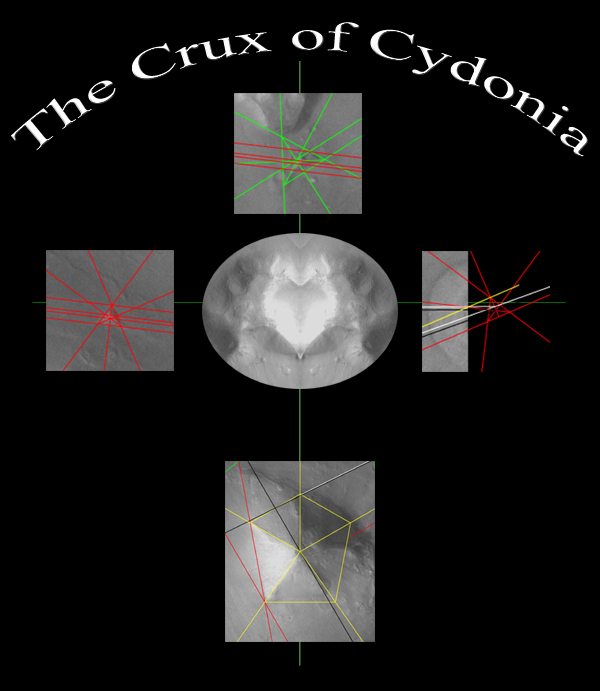
(Note: Clickable images lead to full resolution version)
The above mound warranted a separate paper which I produced and titled "The Crux of Cydonia".
The results of that paper, I don't believe, will ever be outdone.
Regardless, there is one more clear tetrahedron in Cydonia that deserves attention and definition.
That tetrahedron became clear upon high resolution Mars Global Surveyor data and is positioned on top of the Tholus.
As I mentioned in my Truth & Light presentation, it was originally discovered by Hoagland.
Hoagland also carried out a couple of preliminary measurements.
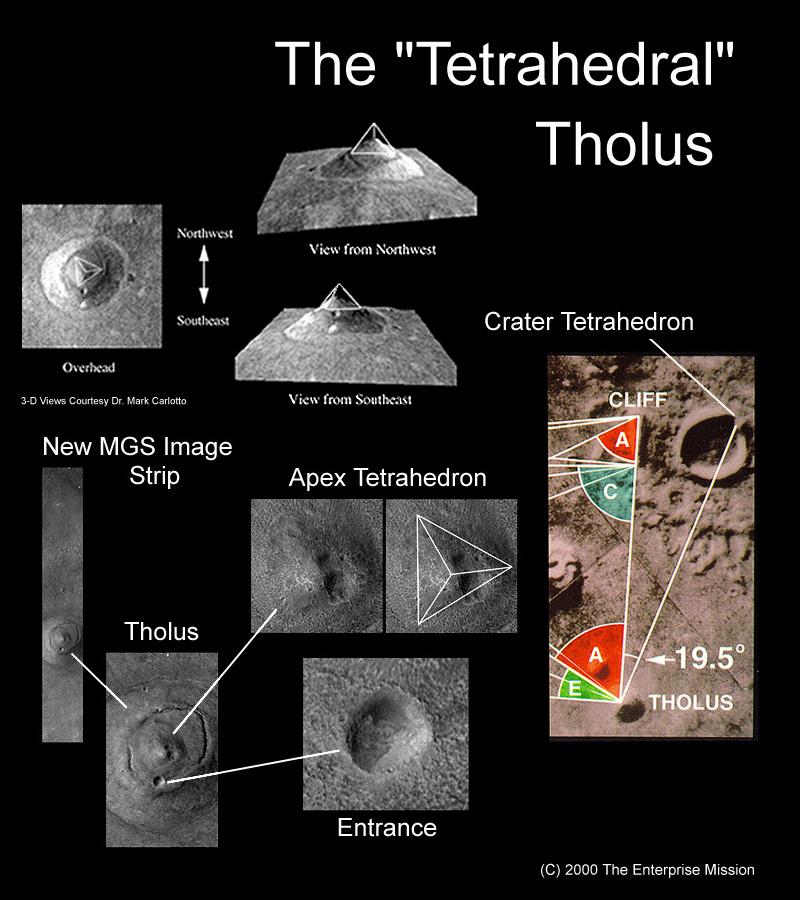
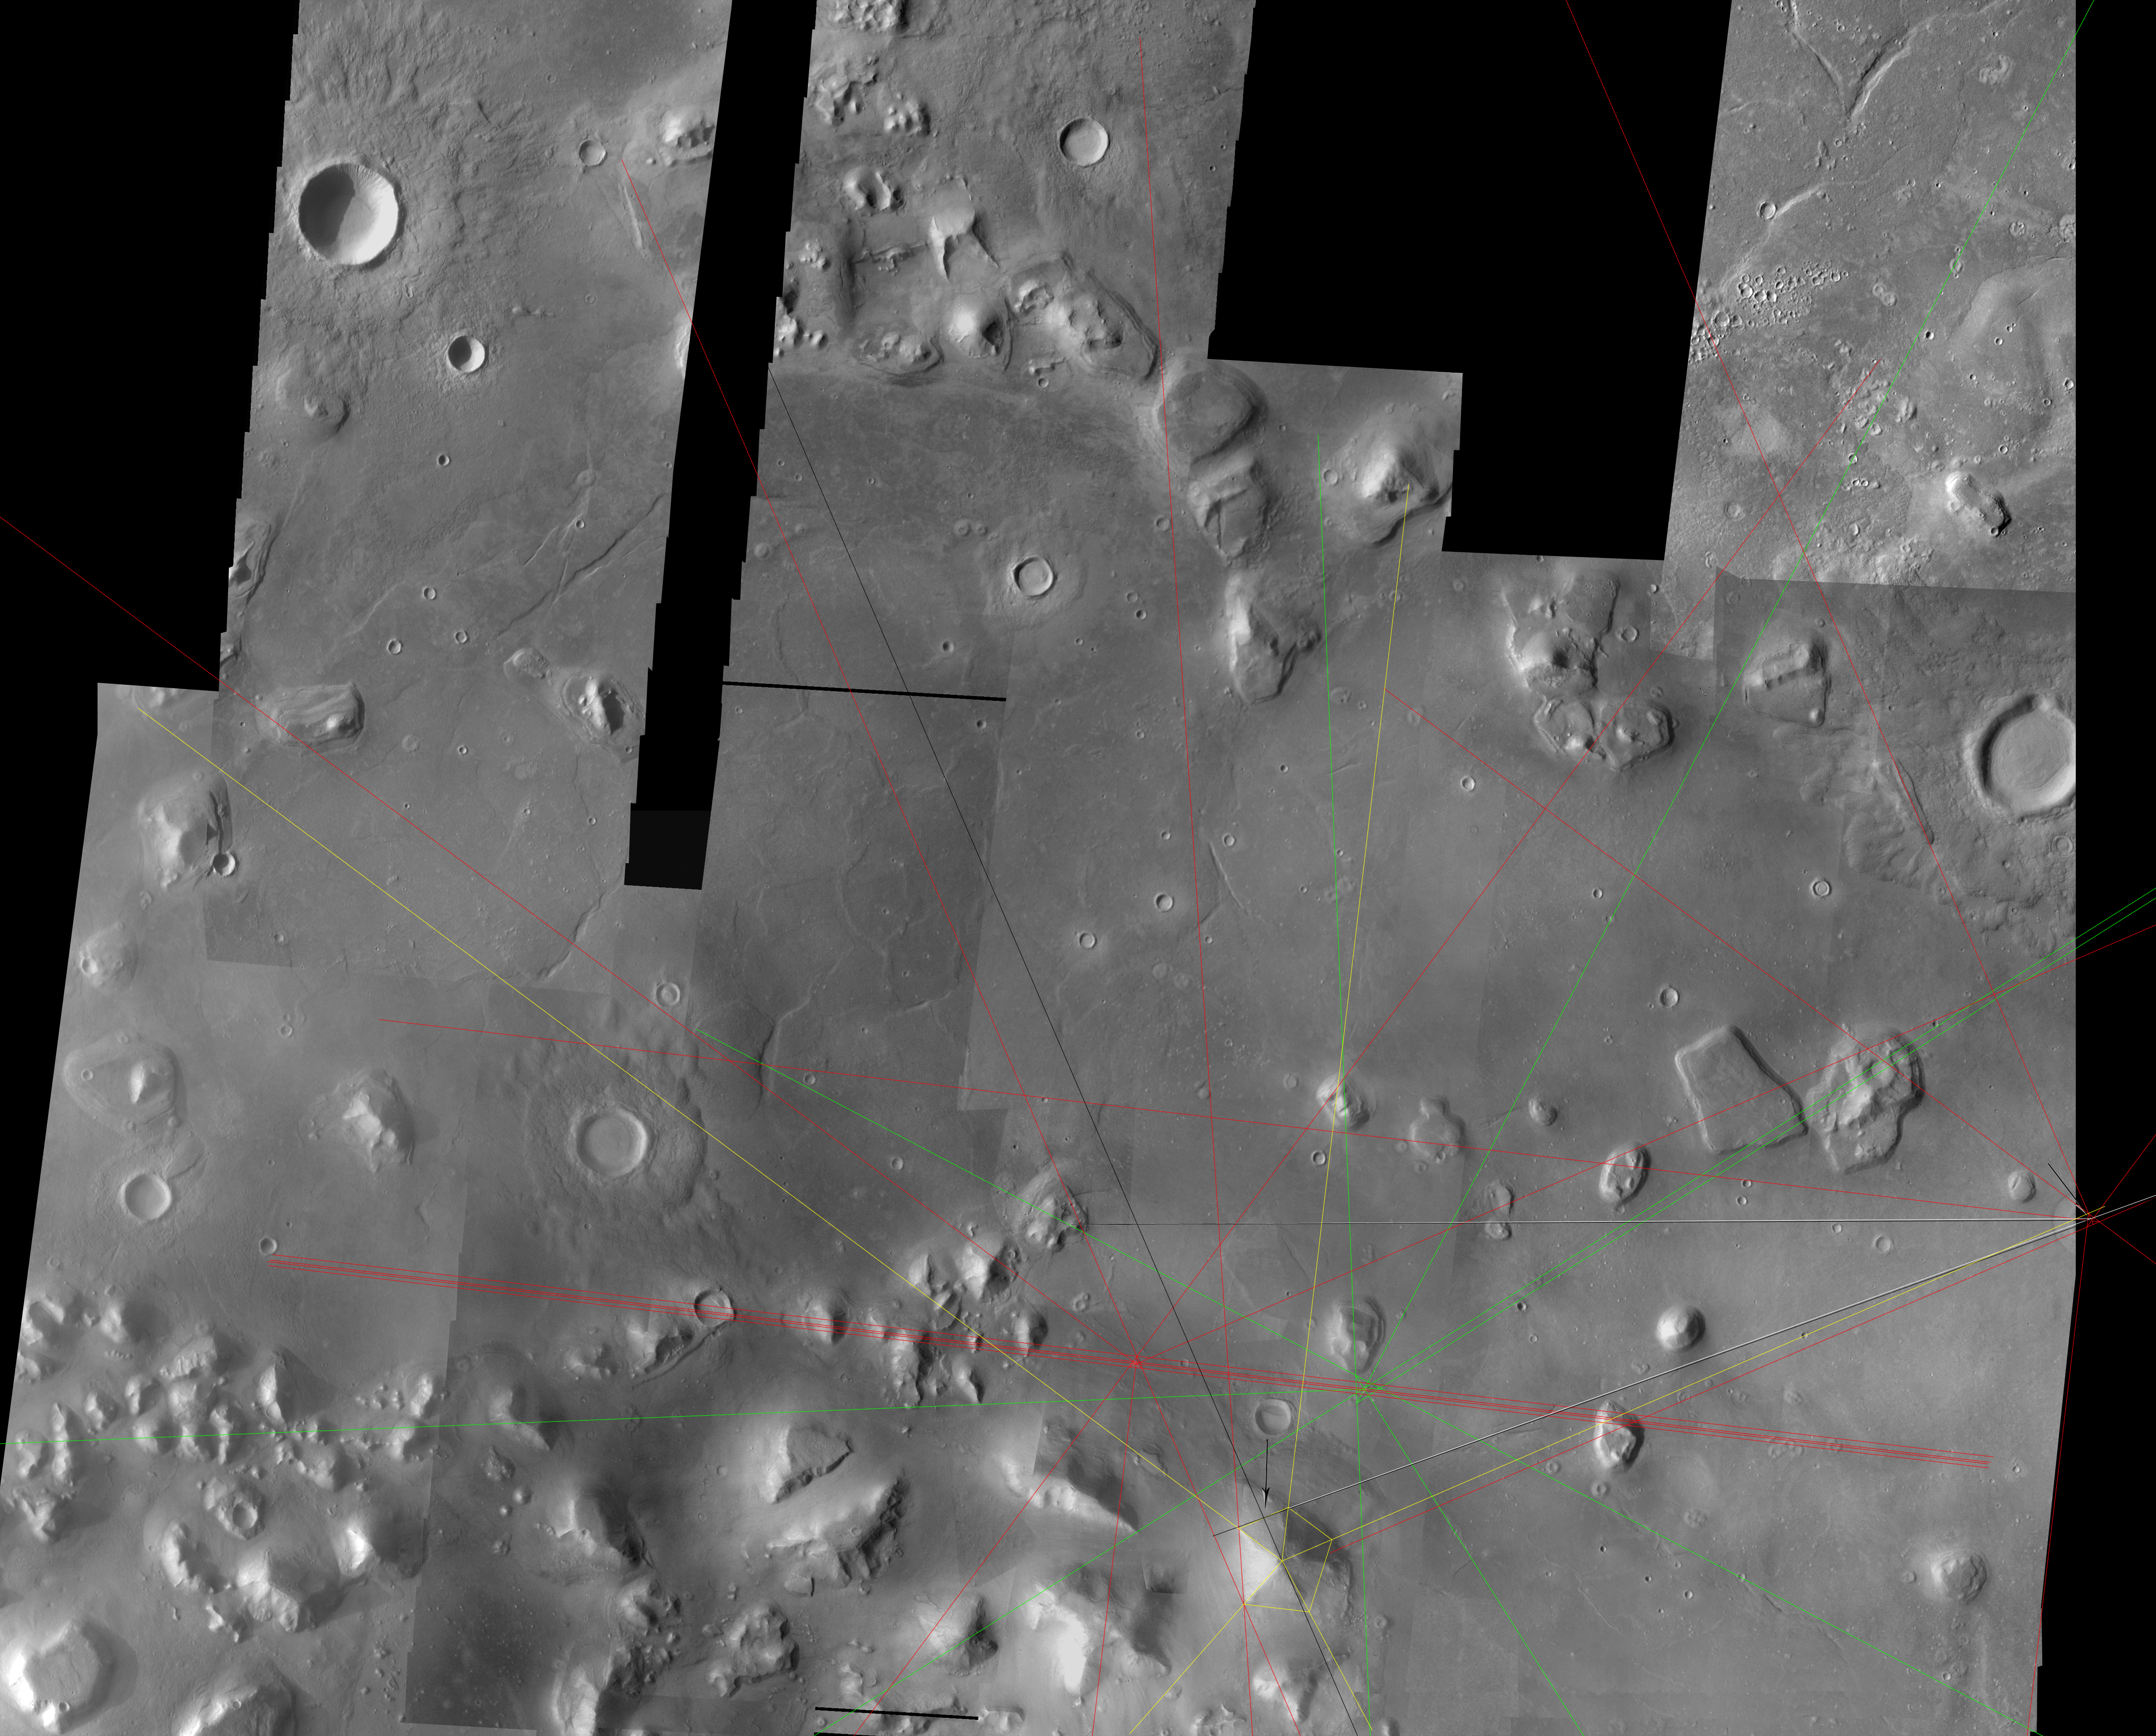
Now that I have two intricately related tetrahedrons, it occurred to me this third one might also relate in a precise and meaningful way.
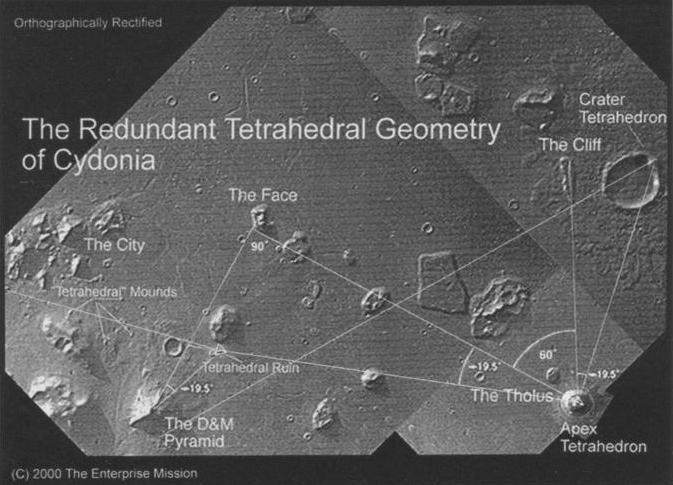
Especially when I finally noticed Hoagland's 19.5 measurement (above) passing through what I now refer to as "Set's Tetrahedron" (referred to above as "Tetrahedral Ruin").
Recall that in Truth & Light, through this specific Fort/Tholus/D&M relationship, I made a specific prediction vis-à-vis this tetrahedron's apex.
(Next three images cropped from above)
I used this prediction as a starting point, i.e., testable assumption, to begin verifying the three measurements Hoagland laid out on his two graphics.
The two 19.5 plus 60.0 degree measurements were quickly verified.
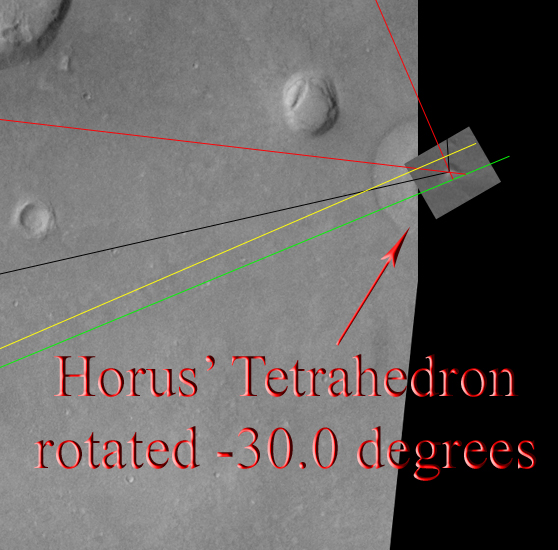
Then, with one tiny adjustment (which I explain further down this page), I noticed that the 19.5 line which passed through Set's tetrahedron (in green), does so at a specific point also intersected by Horus' Tetrahedron (below in red & left).

Then it dawned on me...
The Tholus Tetrahedron is an exact copy of Horus' tetrahedron!
The only difference is, the Tholus Tetrahedron is rotated -30.0 degrees.
Thus arises another fully verifiable... testable... assumption.
Once again, the test passes with flying colors.
The results speak for themselves.
Confirmed are my predictions about how the D&M would specifically relate to this tetrahedron...
(Next image cropped from above)
With one minor exception...
(Next image cropped from above)
My Fort/Tholus/D&M relationship does not anchor itself upon the apex of the tetrahedron.
Rather it anchors itself exactly upon the half way point between the southern base and northern most tip.
Now that I know the exact size and orientation of this tetrahedron, I can still claim my early measurement extremely relevant in that it fits perfectly without any adjustments.
Furthermore, drawing another line from the 'nose' of the Fort to the now reconstructed apex of the Tholus Tetrahedron and measuring 19.5 degrees reveals another inescapably precise relationship to the D&M.
(Next three cropped from above)
Of course, I have done ten new reflections based upon the measurements garnered from the Tholus Tetrahedron.
Out of the ten, only two really caught my eye.
The first was off the D&M's eastern 'arm' which passes tangent to the northern tip of the Tholus Tetrahedron.
It is a reflection of the ascending Isis which I first discussed here.
The second I've not seen before and is the 19.5 line which intersects Set's pyramid at the same point as Horus' Tetrahedron.
For those who are interested, I've posted the other eight reflections here.
***
So... what can I say...
I just reconstructed a relatively tiny 'ruin' at Cydonia without actually having it on the data set.
I was able to extrapolate it's exact location, size, and orientation simply through it's precise geometric relationship to the other monuments of Cydonia.
How much more 'extraordinary' could this geometric evidence be?!
I can also say that I now have another TRINITY.
This time made up of tetrahedrons.
(Next three cropped from above)
Which of course reminds me of this...
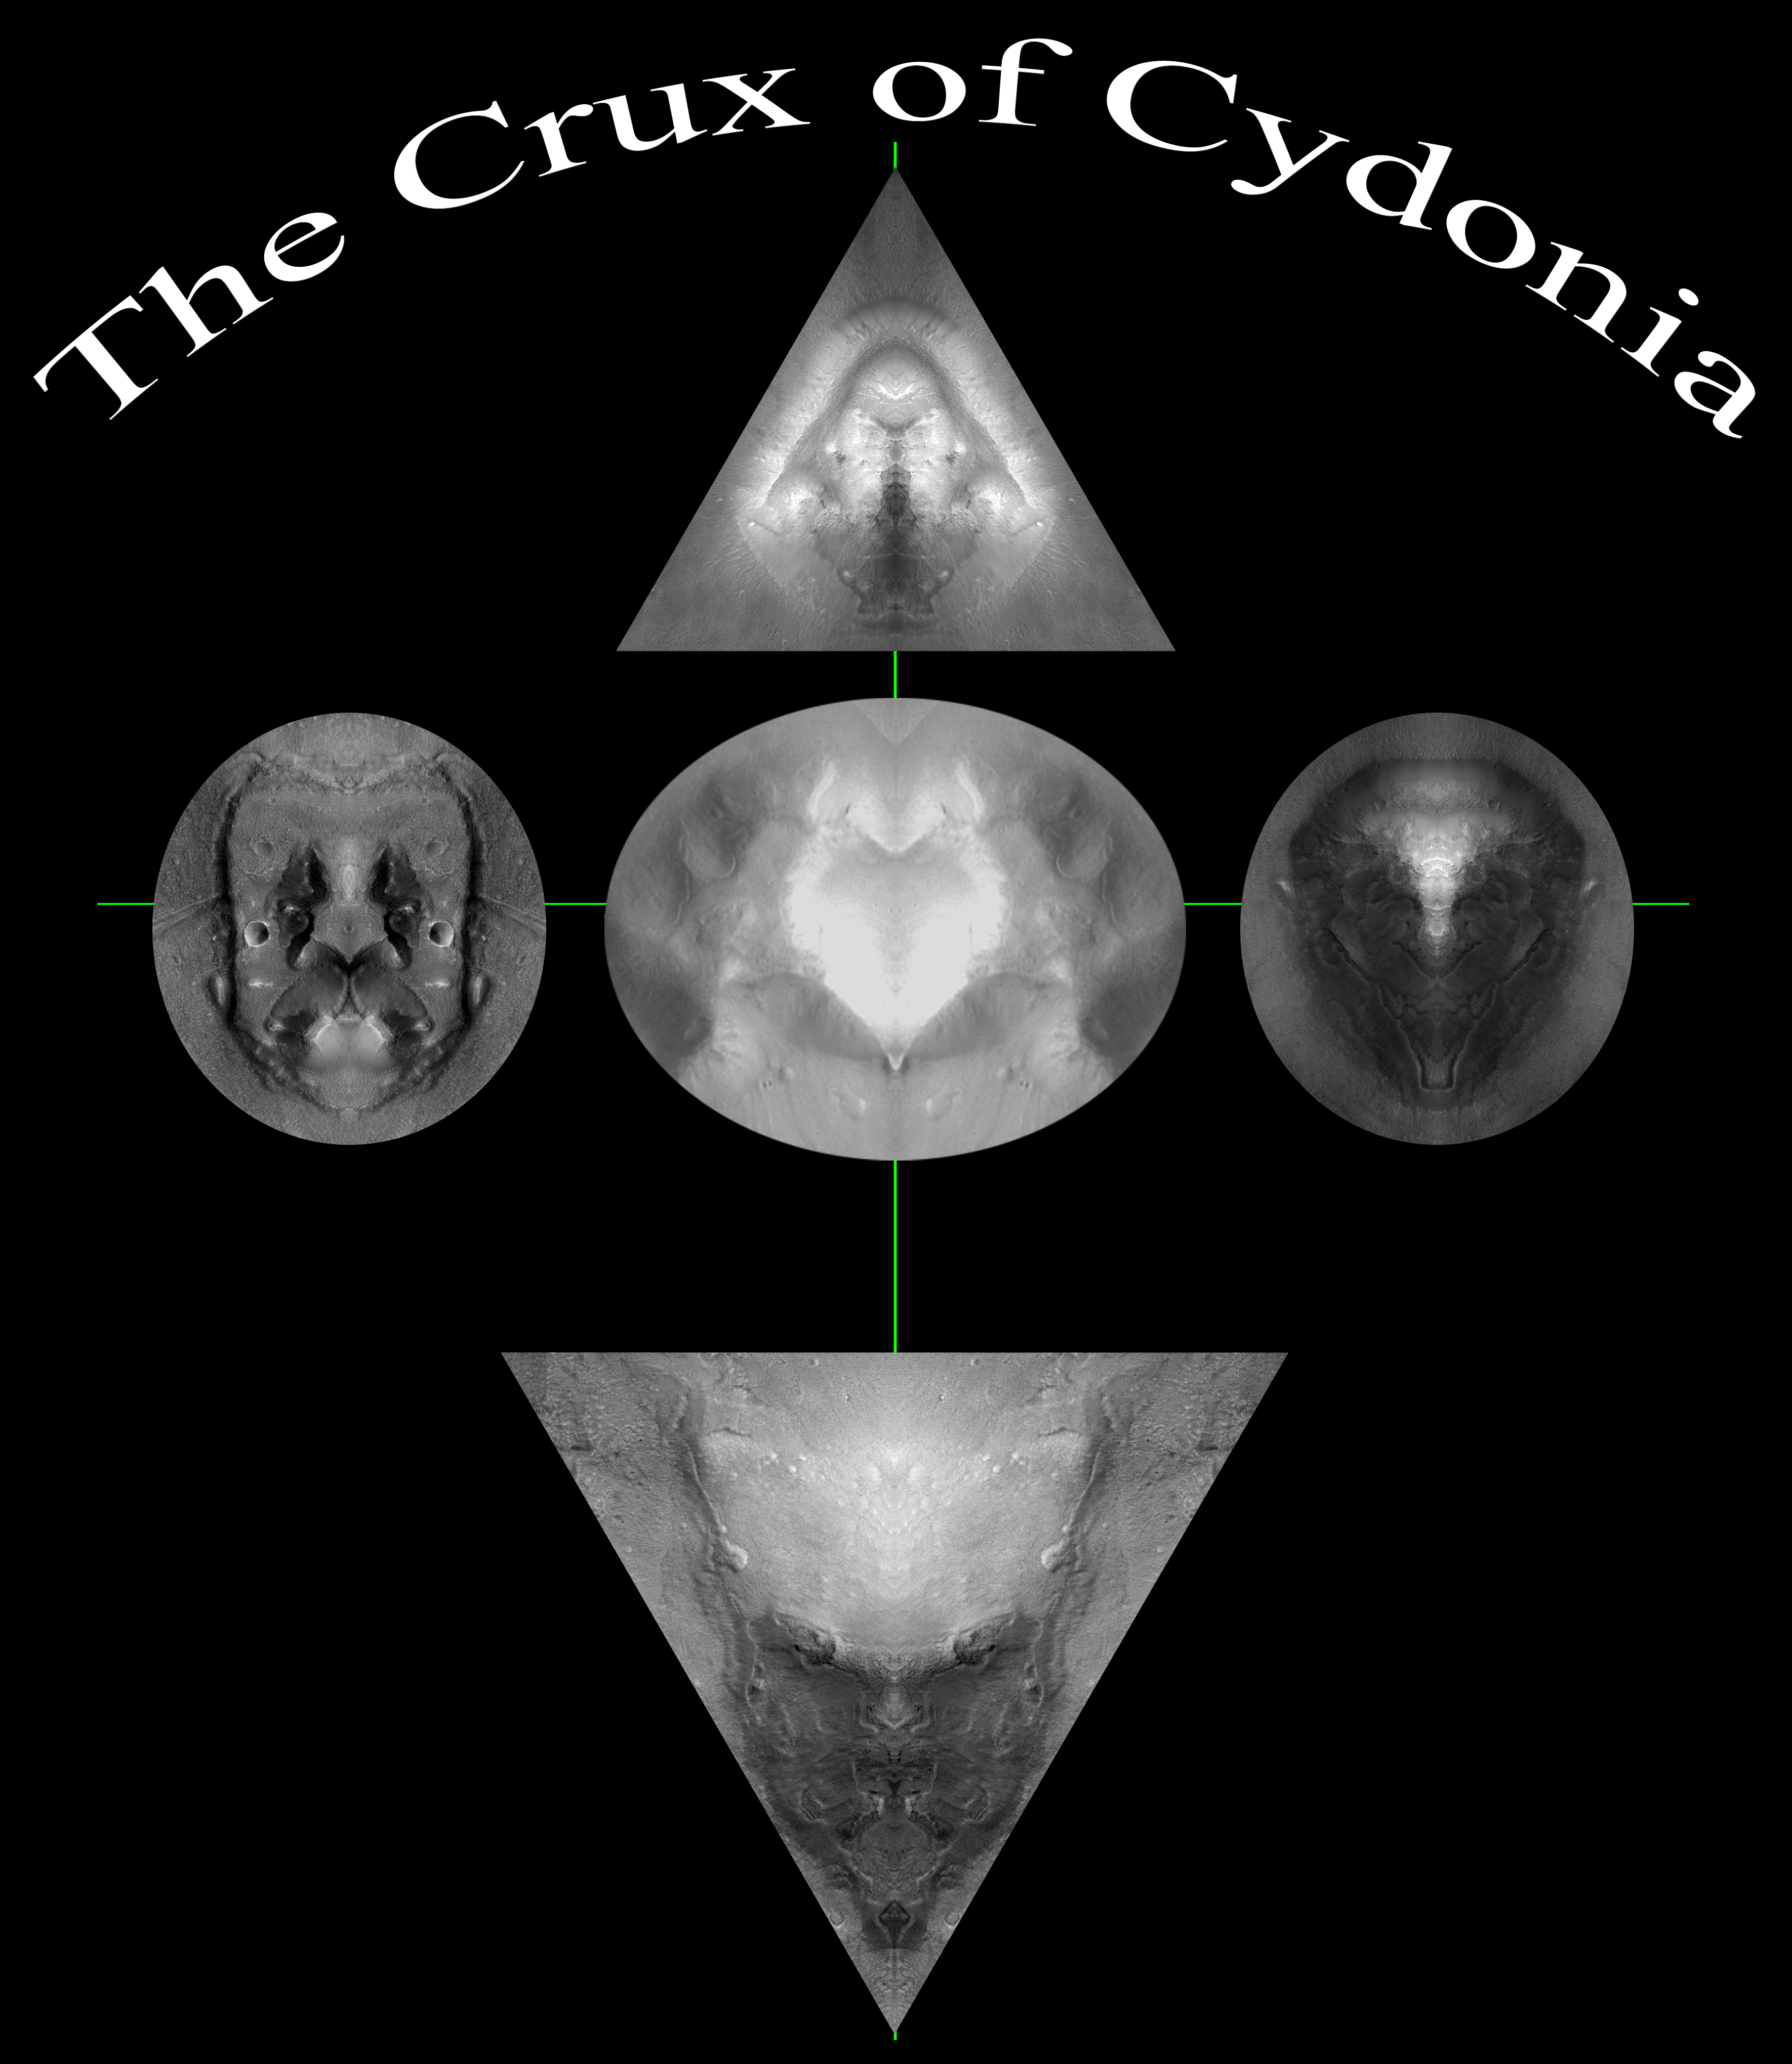
The only difference is, instead of two sphinxes representing Set on the horizontal arms, I see two geometric reflections of Horus.
Subsequently, rather than a sphinx representing Horus perched on top, I see a geometric reflection of Set.
So what does this mean?
Honestly... I don't know.
But I can surmise this much...
It cannot be a coincidence that the largest religion in the world, Christianity, is represented by one of the most recognizable symbols.
The cross.
I've recently been reminded by listening to Hoagland's "God, Man, & E.T." DVD set that the Cross is actually a two dimensional representation of what's called a 'tesseract'.
This means the Cross is a 2-D symbol which can be extrapolated into 3-D analogues for complicated "Hyper-Dimensional" shapes.
(Below graphics borrowed from this website)

(Below chart borrowed from Wikipedia)
|
|||||||||||||||||||||||||||||||||||||||||||||||||||||||||||||||||||||||||||||||||||||||||
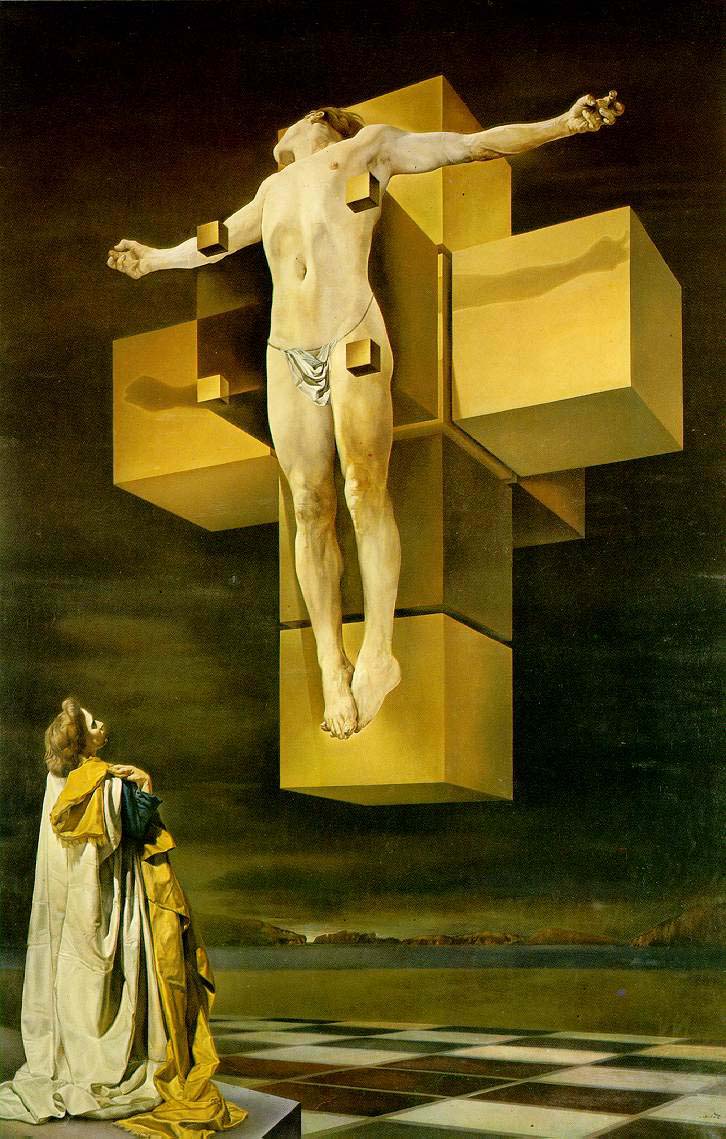
What I'm getting at is, one might just as well say that Christ was crucified on a tetrahedron.
(Artwork by Dali)
But why?
What I've managed to surmise from all this is that we have all been indoctrinated from the beginning of recorded history.
We have been indoctrinated so that when the time was right, we would discover Cydonia and be able to decipher it's Hyper-Dimensional message.
Hopefully the trials and tribulations we have endured through the past few millennia coupled with the message(s) of Cydonia will enable the human race to emerge from these current tumultuous times transformed for the better.
(If this image isn't flashing refresh the page)
I still have faith.
***


